Rescuer Learn 2: Installing the Distance Sensors
| Site: | GoLabs |
| Course: | Robotic Challenges with Python and GoPiGo |
| Book: | Rescuer Learn 2: Installing the Distance Sensors |
| Printed by: | Guest user |
| Date: | Saturday, 4 July 2026, 5:55 AM |
Description

This is the third challenge within the Robotics with GoPiGo and Python Curriculum.
Your task is to design a robot program that can navigate through the maze-like jungle without trampling over any plants or getting stuck in any dead ends.
Learn how to use the Distance Sensor and practice using the left-hand rule of maze-solving.
1. Build: Connect the Two Distance Sensors
In this challenge two distance sensors are used, one to look left and another to look ahead.
- Let’s attach these onto the chassis using sensor mounts and plug them into the controller board using the cables provided.
- You will use the I2C port for the left-facing sensor
- You will use the Analog Digital 1 port for the front-facing sensor.
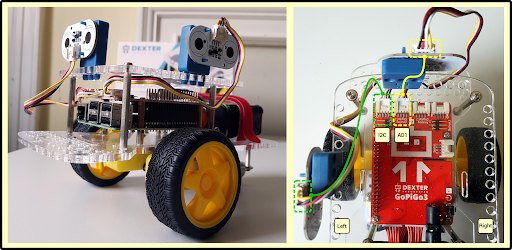
It doesn’t matter which way up the sensor is, as long as the mount is vertical and the sensor is facing away from the robot.
For best results, it is recommended mounting the side facing sensor above the wheel but you can experiment with mounting it further forward or back if you like.
2. Code: Creating Instances
You are now ready to create instances of the left-facing and front-facing distance sensors in our code.
They will be named them distance_left and distance_front for ease of reference later on.
- Type the following code into the Sensor Setup Code cell in the template notebook you have just opened.
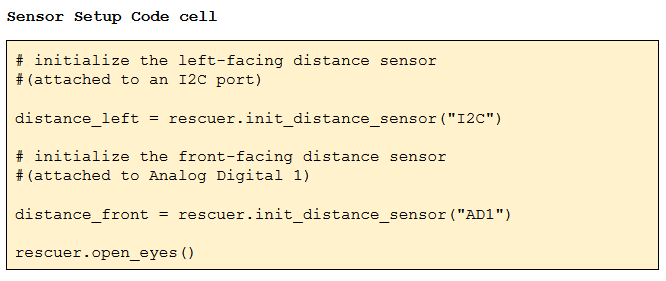
- Select the Sensor Setup Code cell
- Click on Run Selected Cell.
If your robot’s eyes light up you can skip over the debug section below. However, before moving on, why not try breaking your sensor setup code by changing just one thing to see what happens? Use the debug section as inspiration for what you could change.
After each code-breaking experiment remember to fix your code, and prove that it is fixed by getting the eyes to light up once more, before moving on.
Do you see the eyes light up? If you do, great. Otherwise, read on…
3. DEBUG: I did not see the eyes light up
So you don’t see the eyes light up? Oh dear! You may have mistyped something. Fear not, even the most experienced programmers do this on a daily basis. When this happens, Python has a way of telling us what is wrong so we can fix our code.
You will see a pink box appear under the code cell containing a lot of text. In the programming industry this is called debug information. It tells us about the errors in our code. These errors are known as bugs and the practice of finding and fixing them is called debugging.
The debug information might look a little scary. However, as a user of pre-written functions and classes you can just skip to the last line for a hint. What does the last line of your debug information say?
Below is a selection of the more common things that the last line of the debug information might say when you are trying to initialize sensors and what this is actually telling you about your code.

4. Pro Tip
Breaking your code in a controlled manner is one of the best ways to learn.

5. Debugging Hardware Issues
If your code is error free, you can skip this section.
In the unlikely event that after debugging your code you still get the OSError: [Errno 5] Input/output error message you may have a hardware problem.
Let’s investigate this further.
Hardware issues occur in the computing industry all the time. With a methodical approach to things, by changing just one thing at a time and re-testing, you can identify which piece of hardware is the root of the problem so you can replace it.
- Comment out one of the sensor initialization lines and re-run the cell. Does the error now go away?
- If not, comment out the other sensor initialization line instead and re-run the cell. Does the error now go away?
When you have silenced the error, you have narrowed down your problem to either the sensor or connection cable for the sensor that is not currently being initialized. Let’s now work out which of the two is the culprit.
- With the error silenced, swap the sensors around, leaving the connection cables in place, and re-run the cell. Does the error now re-appear? If it does, you might need a new sensor.
- However, if the error doesn’t re-appear, leave everything in place, comment out the other sensor initialization line instead and re-run the cell. Does the error now re-appear? If it does, you might need a new connection cable.
- Replace whichever piece of hardware has been identified as broken or faulty and re-run the cell. The error should now go away.
- Uncomment both sensor initialization lines in your code and re-run the cell to confirm that everything still works.
Well done. You’ll make a great hardware test engineer!
6. Sensor Testing - init
Let’s now write some code to test that our sensors work and learn how to use them.
To test the distance sensors, you will write some code to repeatedly take sensor readings for 30 seconds, reporting the values read as they happen.
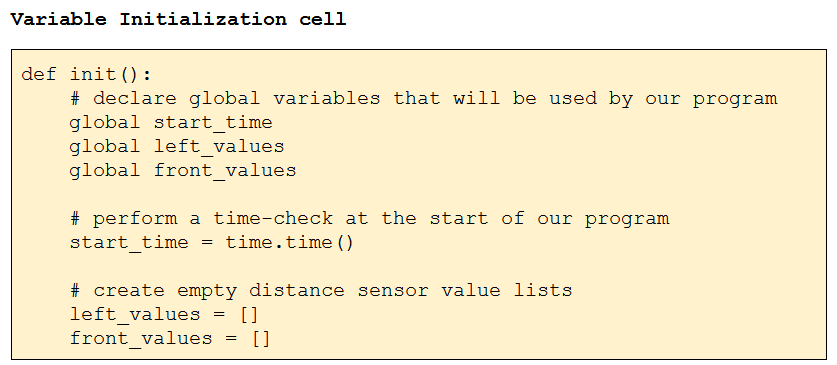
Let’s record the start time of our program.
- Within the empty init() function in the Variable Initialization cell, declare a start_time variable.
- Assign the result of an initial time check to it.
- Let’s also declare and set up empty value lists ready for the left-facing and front-facing distance sensors to store their readings in. We will call these left_values and front_values.
7. Sensor Testing - main
Now you’re ready to code up a sensor reading loop to test your sensors.
- In the Main Code cell, type the following code:
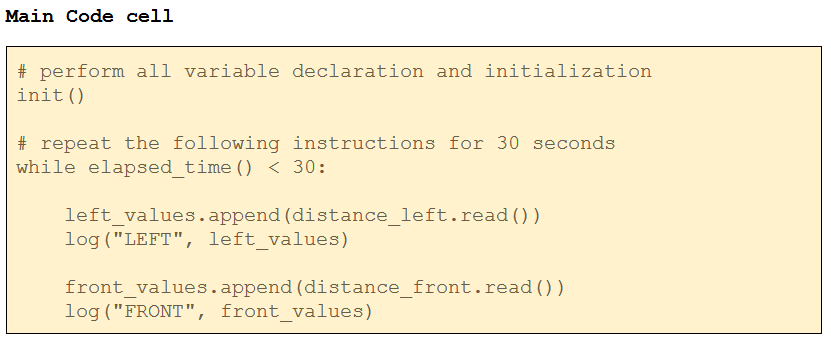
- Click on Run Selected Cell.
8. Sensor Testing - results
In this code you:
- read each of the distance sensors using the distance sensor class library function read()
- add the value reported back to the end of a data list.
Note: The distance sensor reports its values in centimeters.
It also uses a template function written for you called log(). It takes a label and a values list and writes the most recent two readings and the difference between them into the notebook for you. This allows us to see what the robot is measuring as the distance to the nearest wall to its left and in front of it.
If you get any code errors, debug your code and try again. Re-read the debug section above for advice if needed.
Once everything is in order, you should see a stream of left and front distance readings displayed below the code cell (your numbers will be different).

9. Next Step: Following a Wall
You are now ready for the next step: Rescuer Learn 3: Following a Wall.