Rescuer Learn 3: Following a Wall
| Site: | GoLabs |
| Course: | Robotic Challenges with Python and GoPiGo |
| Book: | Rescuer Learn 3: Following a Wall |
| Printed by: | Guest user |
| Date: | Monday, 6 July 2026, 4:59 PM |
Description

This is the third challenge within the Robotics with GoPiGo and Python Curriculum.
Your task is to design a robot program that can navigate through the maze-like jungle without trampling over any plants or getting stuck in any dead ends.
Learn how to use the Distance Sensor and practice using the left-hand rule of maze-solving.
1. First, init()
Let’s now take your robot for a walk around the block.
First of all, you need to declare and initialize a couple of new global variables that you will be using in this task. They will be explained later on, as you will have need for them.
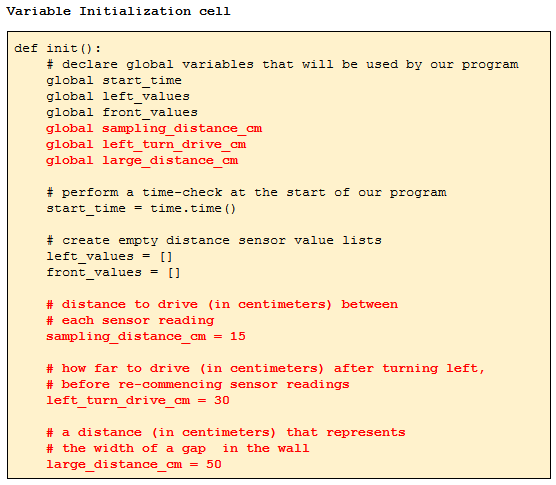
- Add the code below in to the Variable Initialization cell.
In the image below, the code in red is the new code to be added. Note that you will not be able to change the color of your own code in your own notebook.
2. Then, Main Cell
Now add the code highlighted below in bold red font to the Main Code cell.
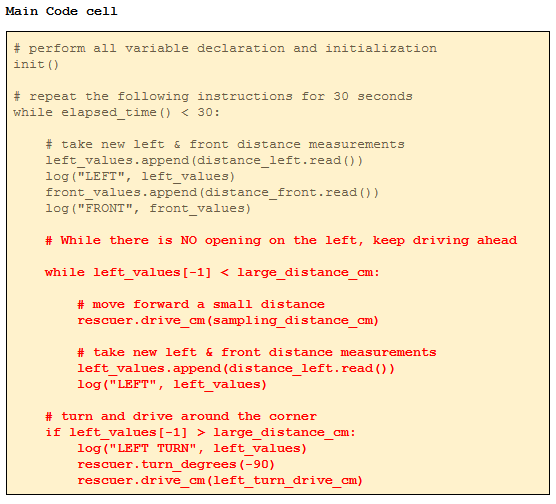
3. This code does the following:
- repeatedly drives a small distance (sampling_distance_cm)
- measures the distance from the wall on the left.
- When the distance measured is large (greater than large_distance_cm) we
- turn 90 degrees anti-clockwise,
- drive a distance (left_turn_drive_cm) around the corner,
- reach a point where we have a wall on the left once again,
- resume the drive & measure loop.
Note that your original sensor reading code is required to take an initial reading from the distance_left sensor, both before you start and after the robot has completed turning each corner. This is needed for the while loop that follows (while left_values[-1] < large_distance_cm).
4. Test It Out
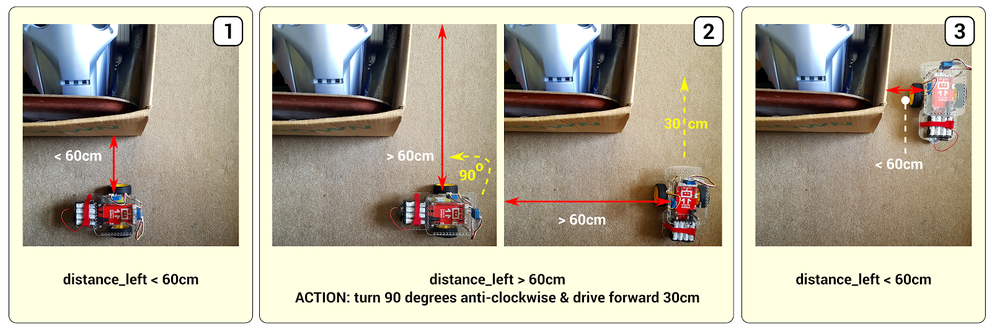
- Place a cardboard box in the middle of the room and
- Place the robot approximately 15cm away from it with the left side facing the box, similar to picture 1 above.
- Select the Main Code cell
- Click on Run Selected Cell.
Do you see the robot drive around the box, turning at every corner?
Does the robot maintain a constant distance from the box as it drives around it?
If not, why do you think this might be?
Describe your results.
5. Correcting for “Drift”
If your robot is drifting away from the box you can make a minor adjustment to the code to correct for this and ensure that it continues to run parallel to the box.
There is a template notebook function called align_with_left_wall() . To use it, add the code highlighted below in the image in bold red font to the Main Code cell just below the while left_values[-1] < large_distance_cm:line.
The code is provided here for readability.
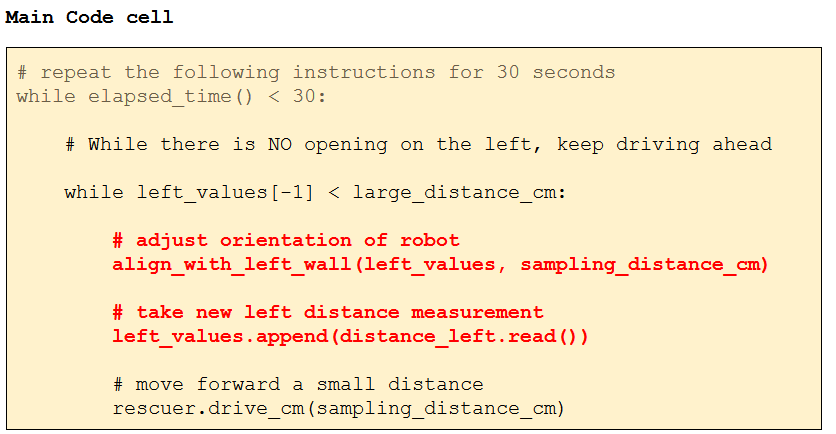
Pay attention to proper indentation (either 4 spaces or 1 tab, don't mix them)
For the curious among you, the align_with_left_wall() function uses trigonometry to correct the angle of orientation of the robot. Correction angles are based on the change in distance to the left wall between the last two sample measurements and the straight line distance the robot is known to have travelled between these two sample points (sampling_distance_cm).
6. Test it Out Again
- Can you now see the robot adjusting its orientation with every step that it takes?
- Does it now maintain a constant distance from the box as it drives around it?
- If not, where is it going wrong and in what way? Can you see why this might be happening?
Try experimenting with different values for the global variables sampling_distance_cm, left_turn_drive_cm & large_distance_cm in the Variable Initialization cell and re-running the Main Code cell.
7. Next Step: Logical Decisions
You are now ready for the next step: Rescuer Learn 4: Logical Decisions.