Ops Manager Learn 3: First Steps / Line Follower
| Site: | GoLabs |
| Course: | Robotic Challenges with Python and GoPiGo |
| Book: | Ops Manager Learn 3: First Steps / Line Follower |
| Printed by: | Guest user |
| Date: | Friday, 26 December 2025, 6:33 PM |
Description

This is the fourth challenge within the Robotics with GoPiGo and Python Curriculum.
Your task is to design a robot program that increases the volume of products that Amazing.com can ship out to its customers on a daily basis without increasing the number of robot pickers it employs.
Learn how to program and calibrate the Line Follower while they try to design an efficient system.
1. Sensor Setup Code cell
Having installed and calibrated the line follower sensor in the previous lesson, we are now ready to create an instance of the sensor class, and give it the name line_follower .
- Type the following code into the Sensor Setup Code cell

- Select Run Selected Cell to set up your sensor.
- Remember that the Robot Setup Code cell must be run at least one before you can run this cell
2. Functions
In the following steps, we will create a function to test our line follower.
A function is a piece of code that doesn't execute right away. It's stored in memory and awaits being called. This allows you to call it when you want, where you want, without repeating the code.

Let’s write some basic code to test that everything is set up correctly and works as expected and learn a little about using the line follower. To do this, we will write a simple function that we will call from within the Test Code cell.
3. Creating a New Cell
Create a new code cell immediately below the Sensor Setup Code cell.
- Select the Sensor Setup Code cell so that the blue line shows up on the left side.
- Use the ‘+’ sign at the top of the notebook.
4. Read Position from Line Follower
- Type the following function definition code into this new cell and declare this function by clicking on Run Selected Cell in the notebook menu.

- Do not forget the colon at the end of the def line
- Do not forget to indent the second line using 4 spaces
- If you run this cell now, nothing will happen as the function needs to be called first
5. Some Explanations
Line 1: The def keyword tells the robot that we are defining a new function.
Line 2: The indented code tells the robot what to do whenever we call the function.

- calls a line follower method called position(),
- inserts the return value from position() into a string,
- writes that string into the notebook.
6. What are F-Strings?
You may have noticed the f character in front of the quoted string. This is not a typing error. It turns the quoted string into a formatted string, or f-string for short.

7. Line Position
The position() function returns a string that tells us where the black line is relative to the center of the line follower. The image below illustrates the full range values that can be returned by this function.

8. Calling our function
Let’s now test our line follower by calling the function that we have written. In the Test Code cell,
- type this code

- run it by clicking on Run Selected Cell in the notebook menu.
All being well, you should see output like the following appear in your notebook (the value to the right of the = symbol may be different for you):
Position of line = left
9. Debug
If you didn’t see a message like the one above, did you see an error message instead?
If you did, use what you have learned about debugging code in mission 3 to fix your code and try again.
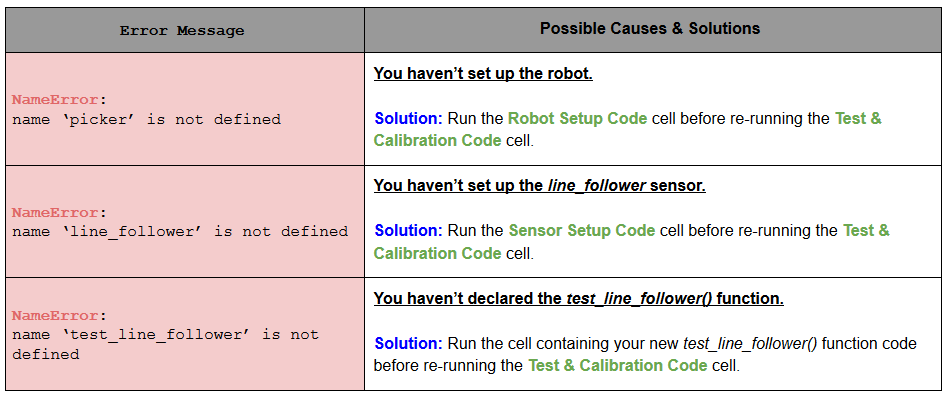
To help you, here are some likely error messages, their causes and solutions:

10. Experiment
Let’s take a closer look at what the line follower is and how it works.
What is a line follower?
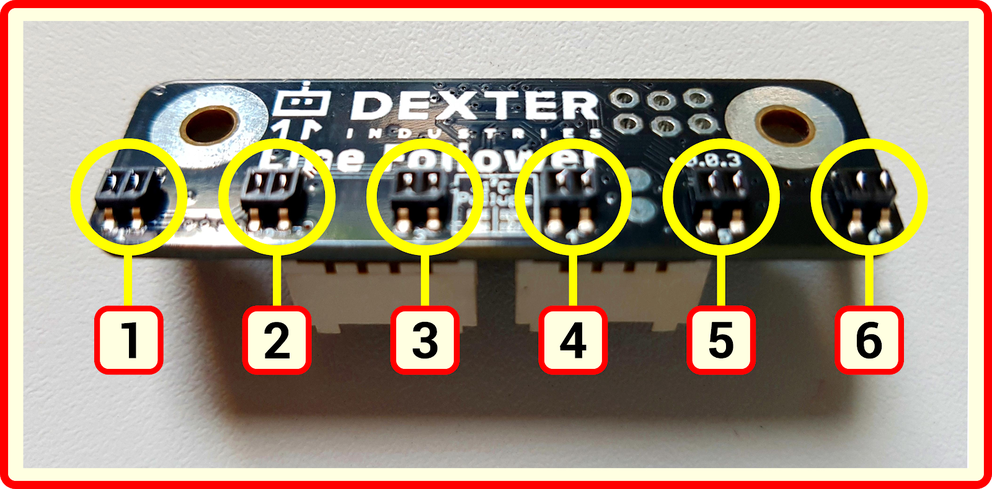
The Line follower has a set of 6 line sensors on its underside, spread out equally across its length. Each of these sensors is capable of detecting whether or not it is immediately above a black line. Based on what these 6 sensors collectively tell us we can work out where the line is relative to the center of the line follower.

If time permits, take a look at the Line Follower Explained extension where this sensor is studied in more details.
11. Other Line Follower Methods
So far we've been using line_follower.position() to know where the line is.
Experiment with the following methods
position_01()position_bw()position_val()
by modifying your test_line_follower() function:
Can you figure out how these methods are similar and how they differ?
Download the Line Follower Methods document for extra information.