Ops Manager Learn 4: Turn a Corner
| Site: | GoLabs |
| Course: | Robotic Challenges with Python and GoPiGo |
| Book: | Ops Manager Learn 4: Turn a Corner |
| Printed by: | Guest user |
| Date: | Sunday, 7 December 2025, 2:55 AM |
Description

This is the fourth challenge within the Robotics with GoPiGo and Python Curriculum.
Your task is to design a robot program that increases the volume of products that Amazing.com can ship out to its customers on a daily basis without increasing the number of robot pickers it employs.
Learn how to program and calibrate the Line Follower while they try to design an efficient system.
1. Basic Algorithm
Now that we've calibrated and instantiated our line follower, let’s make the robot follow a line around a corner.
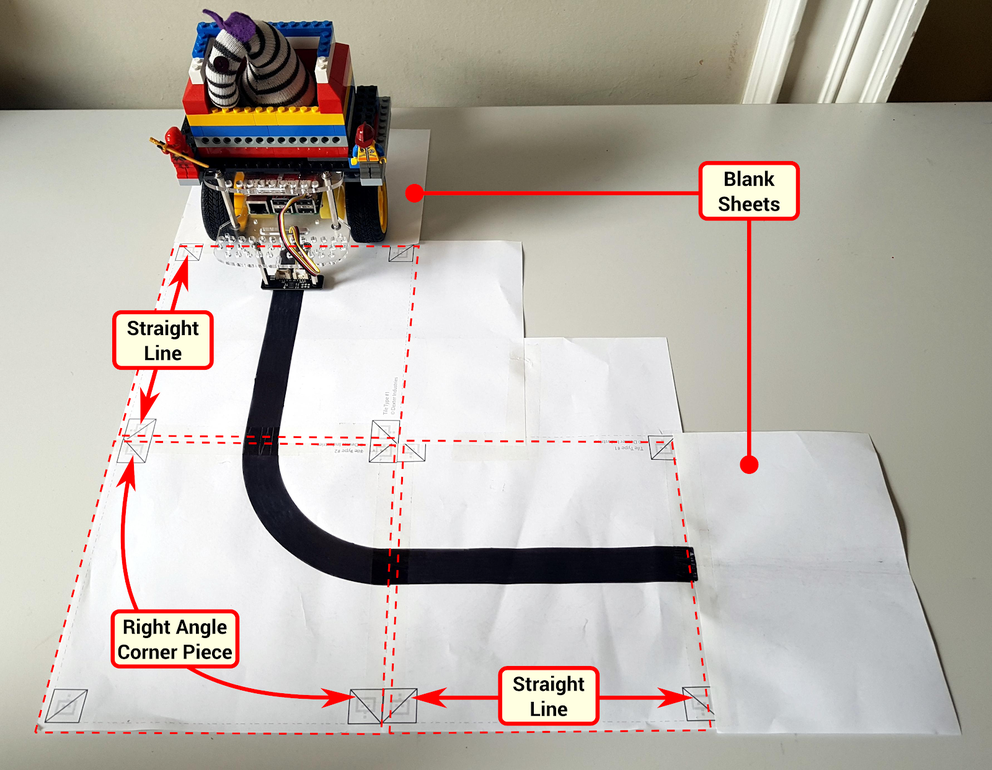
Construct a minimal test track with a corner like the one shown below by taping together printed template sheets (2x straight , 1x corner). Attach a blank sheet to each end.

2. Planning
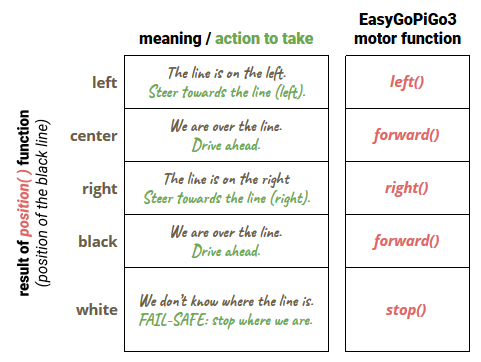
Let’s plan out our line following strategy. We must consider how we want to react to each possible response value that can be returned by the position() function.
- If the line is centrally located, we simply continue on our path.
- Where it isn’t, we steer towards the line to return it to the central position.
- If we cannot see a line then we’re “flying blind” and we should simply stop.
The last rule is a fail-safe.

3. Plan of Action
The table below summarizes this plan of action using pseudocode.

In previous missions we have used if statements. These are great for performing one of two possible actions based on the answer to a simple yes/no question e.g. “did I hear a bell?”.
In our plan of action we want our robot to take one of a number of actions based on what the position() function tells us; left, right, drive forward or stop. To do this we will need to extend the if...else construct.
4. Scaffolding
Before we start sending our robot careening down the line, let's do some code that can be manually tested.
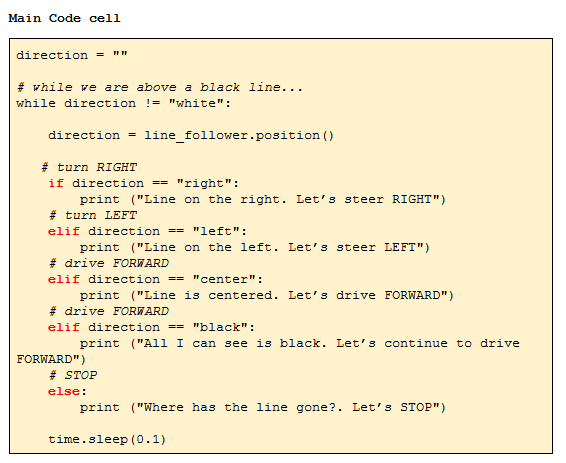
Let’s write some code to repeatedly read the line follower, decide on an appropriate course of action according to the above pseudocode and report back the value read and the decision made.
Type the code below into the Main Code cell.

NOTE:
- elif is python’s way of saying else if.
- The instructions within the elif are only executed f none of the previous conditions have been met and the stated conditions apply.
- You can use any number of elifs between the if and the else conditions to build up an arbitrary number of options.
5. First Test
- Click on Run Selected Cell.
- Place the robot in a variety of positions on the printed sheet that you used when calibrating your line follower. You should see output similar to the following image appear under the Main Code cell.

6. Code Coverage

- Move your robot around to make it generate all possible response messages in your notebook.
If needed, you can refer back to the TEST section above where we provided you with an image that demonstrated the full range of responses from the position() function.
Does the robot respond as you would expect it to in every case? If not, check your code, amend as necessary and repeat the test.
We recommend that you observe the robot’s response over a white area last as the code will finish whenever it loses the line (position() = “white”).
7. Putting It All Together
When everything works as expected, do the following:
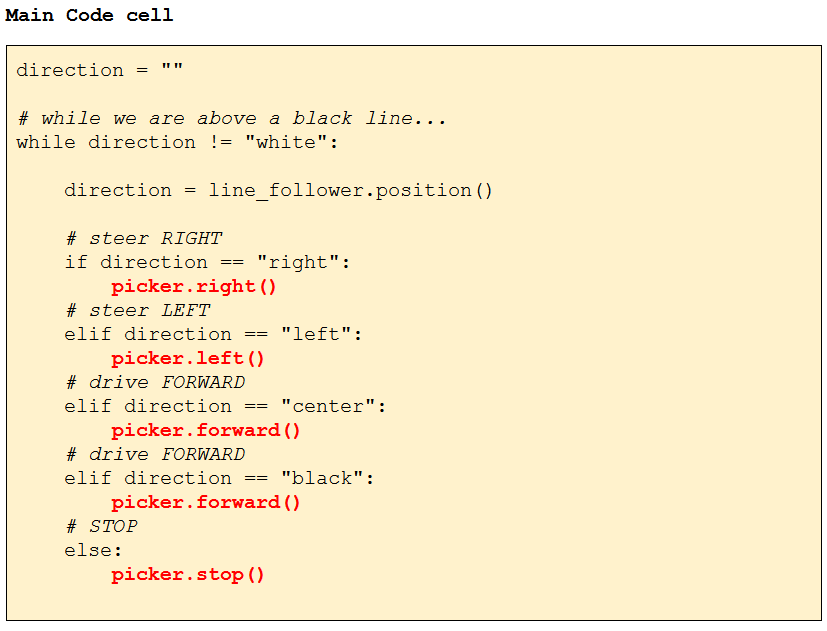
- add the relevant motor instructions in your Main Cell code as per the table above.
- remove the print statements (they take time and will reduce the efficiency of your function)
- reduce the sleep time.

- Place the robot at one end of your test track,
- Select the Main Code cell,
- Click on Run Selected Cell.
The robot should now follow the line around the corner.
If it loses the line at any point, the print contrast of your black line may be too low. To fix low contrast problems, try colouring in the line with a black marker pen, re-placing the robot at the start and re-running the code.
The else rule is our fail-safe rule. If it is doing its job as expected, it will stop when it travels beyond the other end of the track.
What do you notice about the way in which the robot follows the line?
8. Bang! Bang!
You have just implemented what is known in the engineering industry as a Bang! Bang! controller.
This turns hard left and hard right to correct itself whenever the line is off-center. This is the robotics equivalent of a knee-jerk reaction.
You can just imagine how rough it would be to ride around in an autonomous vehicle that uses this driving strategy! What’s more, it would wear down the parts of the vehicle very quickly.
9. Steering vs Turning
So far we've used the following robot methods for motor control.
forward()left()right()
There's another method that we could use: steer(left, right) where left and right are motor power values between -100 and 100. With the steer method, we can implement all other methods:
steer(0,0) => stop()
steer(100,100) => forward()
steer(-100,-100) => backward()
steer(100,0) => right()
10. Mark Learn as Done
Congratulations!
You can print these two files as reference for the line follower methods, and motor control methods.
You are now ready for the main project !
You will be asked to improve your line following code, making it smoother and more efficient and extending the lifespan of your stock picker.