04 Mission Instructions
| Site: | GoLabs |
| Course: | GoBox |
| Book: | 04 Mission Instructions |
| Printed by: | Guest user |
| Date: | Tuesday, 21 July 2026, 12:26 PM |
Description
Your mission is to create a robot that reacts to how loud the environment is around it.
1. Problem
Ears are very sensitive organs. They translate sound waves in the world around us into electrical signals for our brains to process. But unlike skin, ears don’t have any way to heal themselves. If you lose your hearing, there isn’t a way to get it back. That means we all have to be extra careful to protect our hearing.
One cause of hearing loss is listening to sounds that are too loud for too long. Things like sirens and motorcycles are known to be too loud for human ears, but did you know that concerts, movie theaters, and even school cafeterias can sometimes get so loud that they could cause permanent hearing loss to some students and teachers?
In this Mission, you will create a robot that reacts to how loud the environment is around it. You’ll practice setting multiple thresholds and designing different reactions for each one.
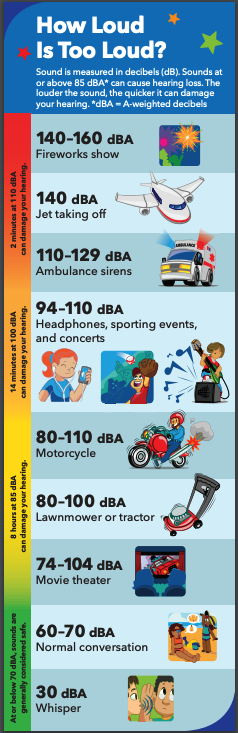
**Note: all the sound sensors are slightly different from each other, so we will not be using decibels in our program itself. BUT, you can learn more about how loud everyday noises are using this chart, if you're curious. Source: National Institute of Health.
Source: National Institute of Health
2. Design

You need to attach the loudness sensor in a way that doesn’t interfere with the GoPiGo’s wheels, and keeps the sensor as far from the motors as possible (you want to listen for sound in the environment, not sound from your own motors). You may also want to make other changes to your GoPiGo so it can catch your attention when you are distracted by a noisy room.
If your robot will be around other people, you may want to add a sign onto your robot, too, that tells people what the robot is doing.
Think about the materials available to you and sketch your plan on a piece of paper.
3. Build
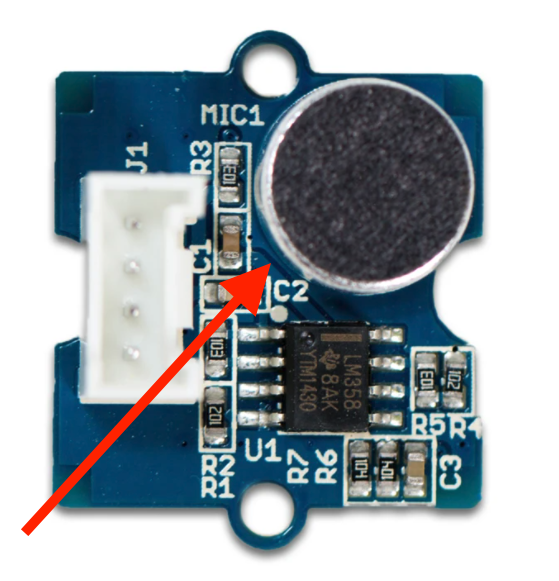
Build your robot based on your sketch from the design phase. Plug the loudness sensor into one of the AD ports.
Use zip ties to make sure the sensor cable will not get in the way of your robot’s movement. Also, do not block the microphone when you attach the loudness sensor.
4. Design: Your Code

Now you need to decide how your robot will alert you to increasing sound volume. Do you want it to only have one response, or do you want it to have a
few levels of responses that do more and more things to get your attention?
For now, choose two levels of robot reactions. The first level will be a warning that the environment is approaching too loud and the second level will be a big, bright, all-caps IT-IS-TOO-LOUD alert.
Take a moment to plan what your robot will do as it passes each different threshold. Will the eyes change color or blink? Will the robot move or spin? Write your plan so you can reference it easily while you create the program.
5. Code: Find Your Threshold
Working with the loudness sensor is very similar to working with the light sensor we used in the last mission. Last time, you chose one threshold value, but this time you’ll end up choosing two!
You will need to create two sounds —
1. A quiet noise to represent acceptable levels of sound. It is important that your robot remains calm during everyday noises. (Have you ever heard of The Boy Who Cried Wolf? If your robot is constantly running around, alerting people to normal noise levels, eventually they will ignore the robot completely!)
2. A loud sound to represent something that could be at a high-risk volume. You could use a musical instrument, clap your hands, bang on some metal pans, or just use your voice. You may want to warn other people in your home before you start testing, though!
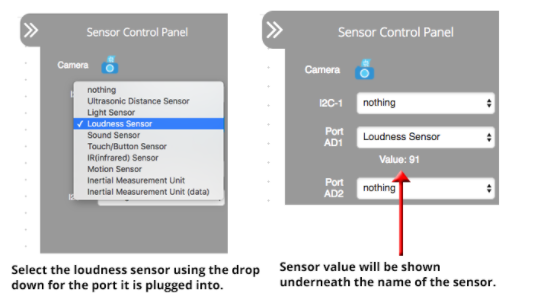
The loudness sensor values can be found on the sensor control panel on the right side of your screen when you are connected to your robot and programming in Bloxter.
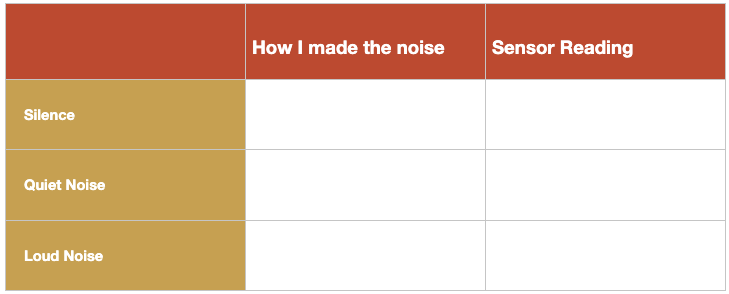
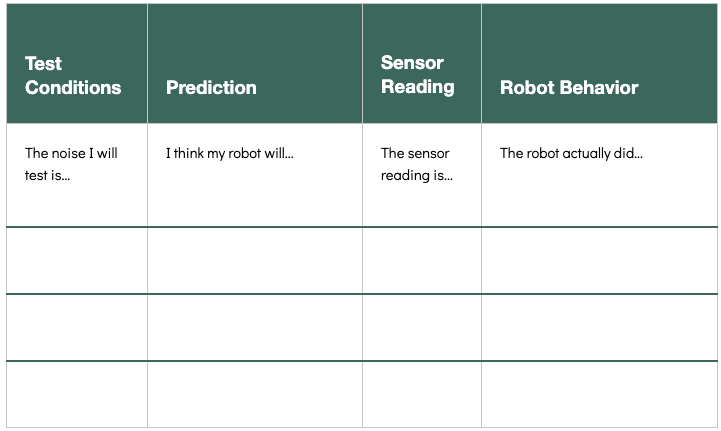
Record your values on a chart like the one pictured.

If you want to take a mathematical approach to choosing a threshold, add the high-value and low-value together, then divide that sum by 2. This will guarantee that your threshold is exactly in the middle. You can always adjust the threshold from here.
For your second threshold, choose something in between the middle and the loudest noise you recorded.
Write down your two thresholds so you can easily reference them in your program later.
6. Code: Lowest Threshold
When we programmed our biomimetic animal to respond to light, we used an if-do structure to check the light value. It meant that we needed to keep running the Bloxter programming every time we wanted to see if the light value had changed. This time, we are going to improve on our programming with a new block. This block will keep checking the value until it is larger than our threshold.

A [repeat forever loop] tells Bloxer to keep doing something forever (or until you end the program). Instead of having to press a key every time you want to check the sound level in the room, the robot will keep checking on its own. You can leave your robot on patrol and go do something else.
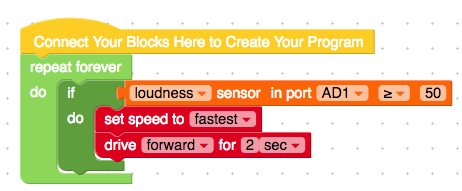
Think about how your robot will listen for a sound and start up the lights or motors when the first threshold is crossed.
Check out our example code below to give you some ideas. But keep in mind, your robot response might be more complicated - eyes, colors, blinking, turning, etc.
7. Code: Highest Threshold
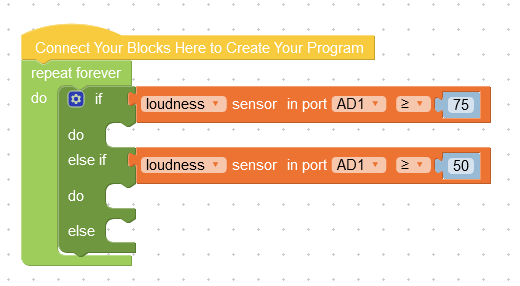
Create a second [if-do] structure and repeat the steps for the second threshold you planned.
Now let’s review the program you wrote. If the noise is louder than your lowest threshold number, then do the lights & movement you planned. Then the robot will check to see if the noise is louder than the second (higher) threshold number. If it is, then it’ll escalate to the brighter, faster movements you chose.

But if you’d like to push your thinking, you might consider tweaking it just a bit. In your lower-threshold [if-do] structure, you can add a green [and] logic block. This will tell your robot to do an action if the noise is between your two threshold numbers. Keep your second if-do loop as it stands and your robot can always skip ahead to check out that volume. Robots are surprisingly quick processors, so the delay won’t be noticeable at all.

8. Test
Before engineers test a program, a robot, or anything else, they develop a test plan. In this case, we need to make sure we check our robot’s behavior in response to all different situations. What will it do in a silent room? A loud one? What about all the situations in between?
Brainstorm a list of test cases that are practical to try out with your robot. Some ideas might be: watching a movie in the living room, a family dinner, playing with your sibling(s), practicing your musical instrument, sitting next to the washer and dryer while they are turned on, or measuring how loud a baby is (if one of your siblings is very young).
Next, make a prediction — what should your robot do in each of these cases?
Before you actually run your program, put your robot in each of your situations. Use the dropdown on the Sensor Control Panel for the port you plugged the loudness sensor into (AD1 or AD2) and select the Loudness sensor. Now you can find out the value of the loudness sensor in each of these situations.
Write down those numbers in the chart — you will need them if you decide to modify your robot’s behavior.
Finally, run your program and check - does your robot's behavior match your predictions? Write down the results on the table.
9. Iterate
Maybe your robot is behaving perfectly, and you don’t see any need to make changes. But, it’s more likely that your robot is either reacting to some quiet sounds or not reacting to loud ones and you’d like to fix that.
The most likely culprits are your thresholds. Take another look at your chart on the previous page. How do the values of those sounds compare to your thresholds? How could you change your thresholds to improve your robot’s behavior?

Once you have your robot responding to the sounds you want it to, think about other changes you might want to make. One thing to consider is that you might not want your robot to drive forward forever after it just heard one quick, loud noise. Maybe it should stop when the sound stops. Maybe it shouldn’t drive forward at all, but should spin in place.
Maybe your home is a little too quiet for your robot and you’re not even sure if it is turned on. Do you need to add any basic lights or movements to reassure that the robot is actively patrolling for noises?
Think about how you can use the [repeat while] or [repeat until] block to accomplish these goals and plan a new and improved program! How could you use an [if-do-else] block to improve your program? You may also want to use your new and improved programming skills to go back and improve your programs from prior modules — how could you improve your robotic animal program?