Servo Motor Mounts
| Site: | GoLabs |
| Course: | Engineering Design Cycle |
| Book: | Servo Motor Mounts |
| Printed by: | Guest user |
| Date: | Saturday, 4 July 2026, 4:00 AM |
Description
In Lesson 4 students will continue to enrich their understanding of the Engineering Design Process as they add mounts to hold servo motors to their GoPiGo Robots. This is a great lesson in measuring, planning, and rethinking how systems work.
1. Investigate: Introduction
3D printing new parts for your GoPiGo is a lot of fun and it's a great exercise to improve your 3D modeling skills and understanding. However, to make the GoPiGo more functional, we will explore how to attach customized mounts for sensors and actuators. Although a large focus of this lesson will be focused around the use of servo motors, don't overlook the idea that 3d printing allows us to place mounts for anything, in any position, anywhere on the GoPiGo that we would like.
2. Investigate: Learn about Servo motors
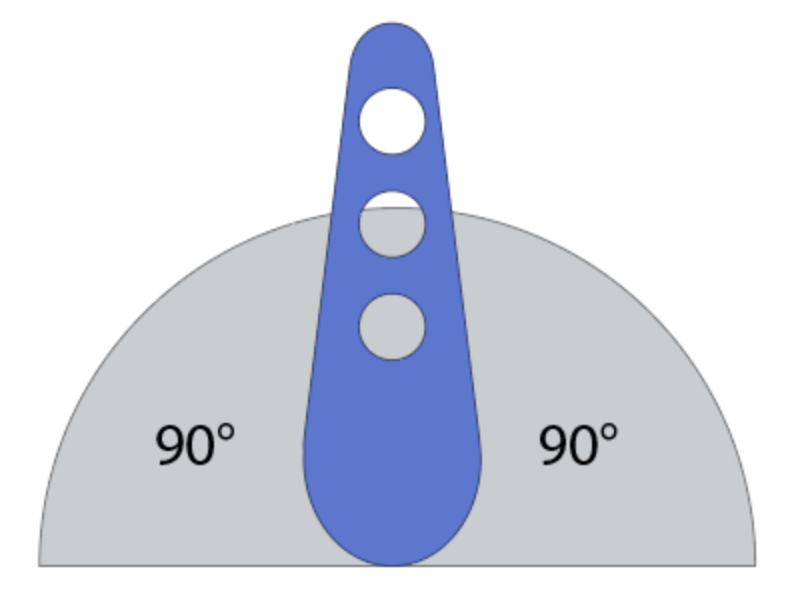
Servo motors come in many shapes and sizes and can vary in how they work. The servo motors that we will be using is a 9-gram micro servo motor. Don't let its size fool you, this micro servo is quite impressive for its size and it can help complete a large range of tasks.
The first thing to know is that your servo will go 180° degrees. It will not spin a full 360°
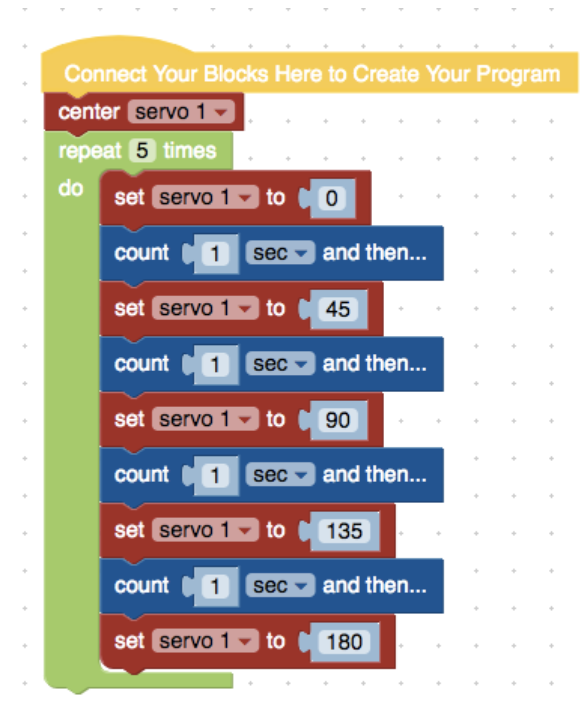
Connect your servo motor to your GoPiGo and run the following code.
Now, change the code and see how it affects your motor.
3. Plan: Attaching the Servo Motor to the Body
Attaching a servo motor to the body of the GoPiGo can be done in many ways. The method you choose may be determined by the strength you need or the place where you want the servo to sit. In this lesson, we will simply screw the parts to the GoPiGo using nuts and bolts. Attached you will find .stl files to print these same mounts.
4. Create: Working With Moving Parts
Now we are going to take our design skills to a new level. Our challenge is to attach a servo motor somewhere on our GoPiGO and use it to make something move. The mount will be 3d printed either from scratch or by using any of the files from step 3. Feel free to include materials such as popsicle sticks, fabric, and cotton balls.
*You may decide to use your car design from lesson 3 and continue with the same theme. Perhaps you made an ice cream truck like the one pictured and would like to add a spinning ice cream cone on top. Whatever you do, have fun, and remember to make use of the engineering design process.
5. Reflection
This is the fourth lesson of our design unit. Hopefully, you have started to feel comfortable with Tinkercad and starting to generate a lot of ideas on how to use 3D printing in your classroom. This might be a good opportunity to provide feedback to your teacher about your comfortability level, questions, or thoughts about the projects. As a teacher myself, I always feel it is helpful to stop and ask my students for some feedback on the projects we have worked on. Take this opportunity to provide some feedback to your teacher about anything you liked, disliked, were proud of, or are struggling with.
Reflect on anything you liked, disliked, were proud of, or are struggling with in this design unit.