Build a Self Driving Car With the GoPiGo3
| Site: | GoLabs |
| Course: | Self-Driving Car with GoPiGo |
| Book: | Build a Self Driving Car With the GoPiGo3 |
| Printed by: | Guest user |
| Date: | Saturday, 25 July 2026, 6:59 PM |
Table of contents
- 1. Instructions
- 2. Build Your Roadmap
- 3. Test Out an Intersection
- 4. Program the GoPiGo3 to Handle an Intersection
- 5. Drive to a Destination
- 6. Safety: Add the Distance Sensor
- 7. Add a Destination Function
- 8. Take a Test Drive: Drive From John's to Nicole's
- 9. Take a Real Trip
- 10. Bonus Challenge: Add Some Obstacles
- 11. Bonus Challenge: Try it in Python
1. Instructions
Set the Robot Up
Our first step to turn the GoPiGo3 into a Self Driving robot is to set up the robot. You should have already assembled the GoPiGo3.
To get the robot fully set up for this project, we will need to take two more steps.
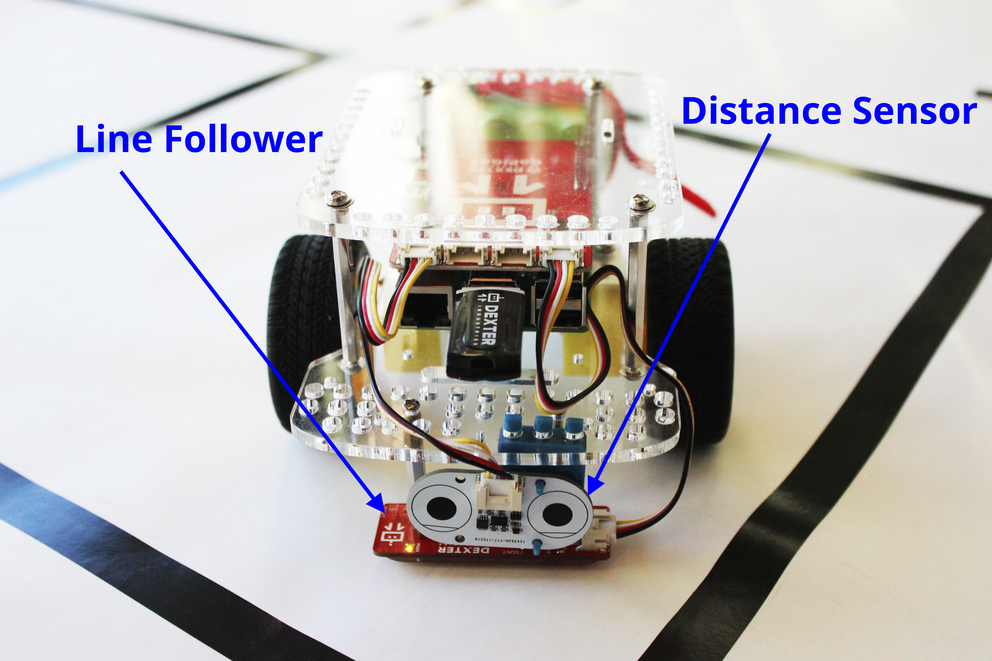
- First, assemble and attach the Line Follower to the GoPiGo3. Connect the sensor to either of the ports labeled "I2C" on the red GoPiGo3 board.
- Next, attach the Distance Sensor to the GoPiGo3. Connect the Distance Sensor to the other port labeled "I2C" on the red GoPiGo3 board.
In our picture, we've mounted the distance sensor to the GoPiGo3 using the plastic Sensor Mount. We keep the distance sensor low, so that it can detect any obstacles ahead of it!

2. Build Your Roadmap
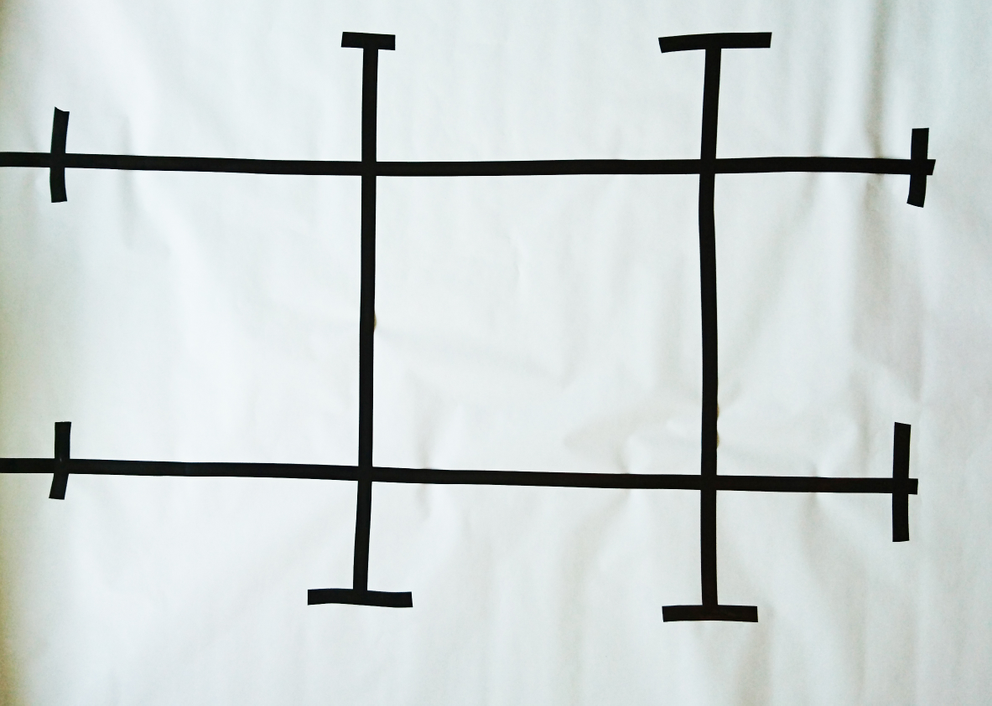
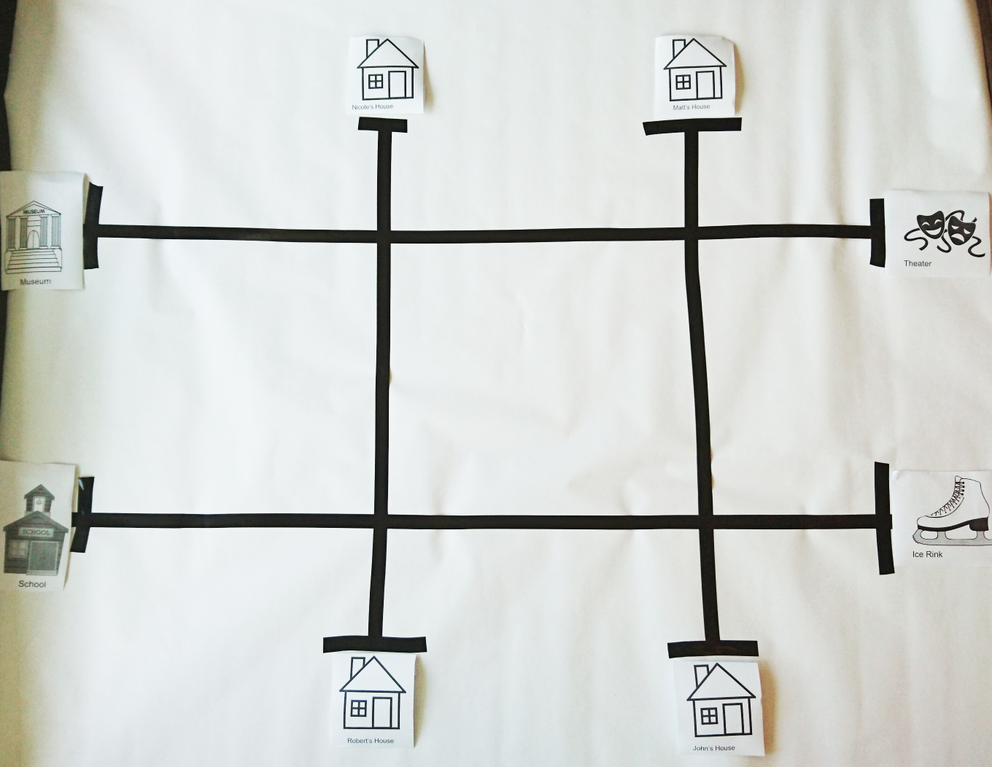
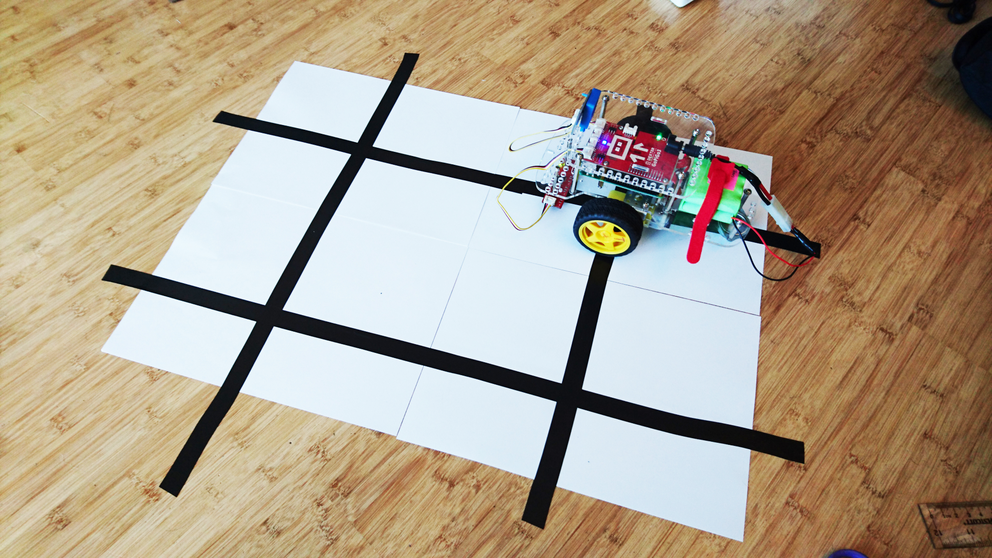
Let's build our roadmap, or the community we are going to navigate around. In our example, we include eight destinations: four student houses and four destinations. We will connect all the houses with roads.
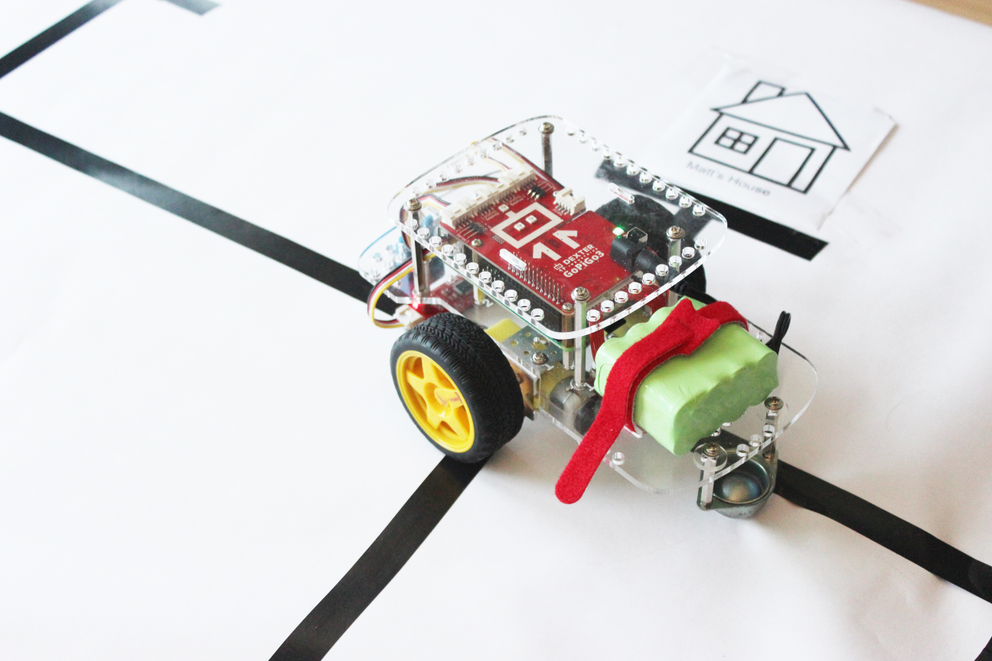
In our example, we used a roll of butcher paper about 3 feet by 9 feet. You can use any size you want, and you can add as many destinations as you want. Our example was made to show you what can be done, but if you have additional destinations or students homes you want to add, you can do so very easily. There are a few key points to keep in mind when building your community and laying out your roads.
- The roads are made of black electrical tape. You can use any tape you like, but the higher the contrast between the road and the background paper, the easier it is for the line follower to read the line. You can also use a black permanent marker. But, be sure to use black if you can and don't draw directly on the floor!
- The tape (or roads) should be between 1 and 2 cm wide. So find tape that's about 1-2 cm wide, or use a heavy marker to mark out the road.
- Intersections are great! As you can see in our video, the robot can handle intersections. Be sure that the intersecting roads are about 90 degrees.
- Space your intersections: the intersections must be about one GoPiGo3 body length apart from each other (around 30 cm apart).
- Your destinations should be "T" shaped. Destinations are where you want your Self Driving Car to stop; so a student's house, a museum, a school: these are all destinations.

You can download the attached Word document as a template for printing out your own destinations if you like!
3. Test Out an Intersection
Let's measure out our intersection. We will need to measure the distance between the line follower and the center of the wheel.
When our self-driving car approaches the intersection, it will approach until the line follower reads all black. If it turns immediately to the left or the right, it won't be able to find the line after the turn. What we'll do is add some programming in to help it take a turn and find the line again.
We want to be able to tell the robot to do the following:
- Drive forward along the line until the line follower reads all black.
- Drive forward a set distance until the center of the wheels are on the line intersecting the line our GoPiGo is following.
- Turn left or right.
- Follow the line.
In this step, we are going to measure the set distance in step 2.
In the picture you can see that the distance from the edge of the line to the wheel is about 6 cm.
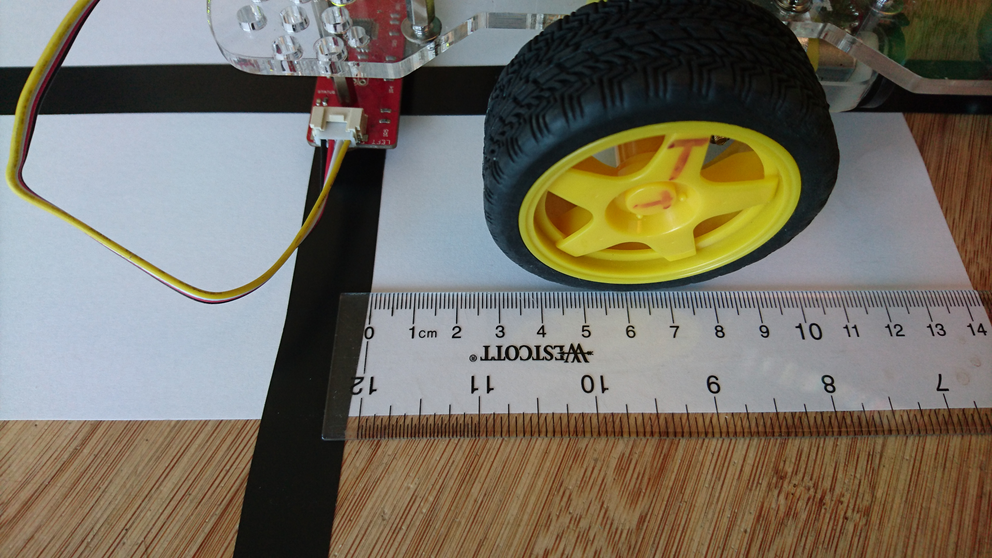
Make your own measurement, and write it down.
4. Program the GoPiGo3 to Handle an Intersection
There are two things our self-driving car needs to be able to do that are not easy! The first is to make a turn at an intersection. The second is to find a destination. In this step, we are going to try out both things.
Turning at an Intersection
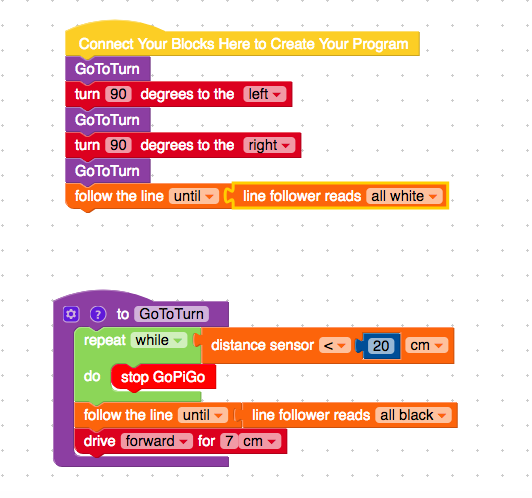
In the example code in Bloxter, we can see that the robot is going to follow the line using the line follower block. It will follow until the line follower reads all black. This happens when the line follower drives over the intersecting road.
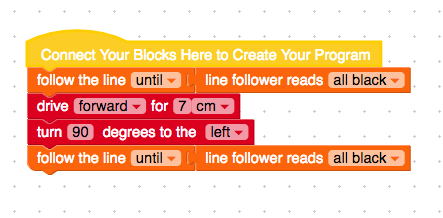
Next, we will put the wheels on the intersecting road. We drive forward the same distance we measured in the last step, 7 cm.
And then we turn 90 degrees to the right or left. In this example, we turn 90 degrees left.
Stopping at Destination
The last block will drive until we hit an intersection. We can see that we follow the line until the line follower reads all black. Once the line sensor rolls over the destination "T" it should stop.
5. Drive to a Destination
In this step, we will program our self driving car to drive around the inside box on the example course, non-stop, forever. This doesn't seem very useful, but what we're going to do is simplify some code with a function. This will make it easier to navigate later on.
Make a Function
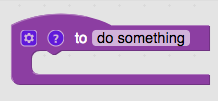
Let's take the code from the previous step and make a function. A function is a set of programming blocks that we are going to call over and over. How does it help? If we're going to do something multiple times, it will save us time: we don't have to write the same thing over and over, we just call the set of commands a name, and then tell the robot to do that over and over again.
You can find Function blocks in Advanced Bloxter.
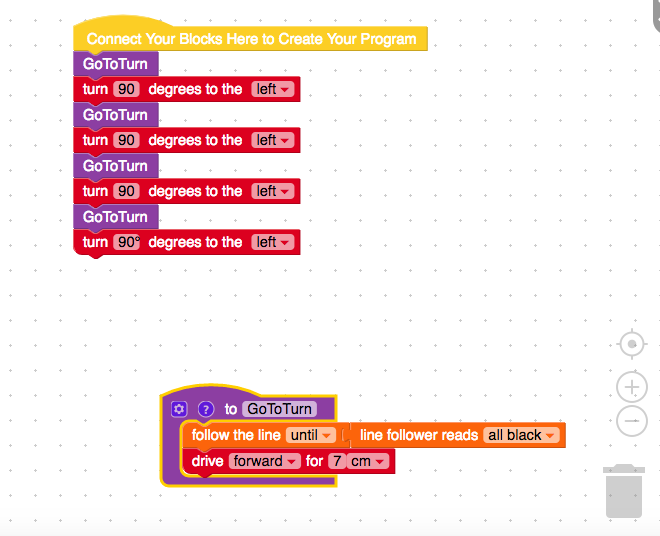
In this example, we will call the function "GoToTurn" and we will use the blocks we had in the previous step that took us to the turn. Place the "Follow the line until" and the "line follower reads all black" in the function block. Then tell the robot to drive forward 7 cm. We won't put the turn block into this: sometimes we may want to turn left, and sometimes we may want to turn right. We might also want to drive straight through an intersection. So what we do after we get to the intersection should go outside our function.
Tie It All Together
The code above will drive the GoPiGo around the town square we have in our picture. Make a function and give it a try. Though a self driving car that drives in squares (or circles) isn't very useful, we are getting to something that is!
6. Safety: Add the Distance Sensor
No self driving car would be safe to put on the streets if it ran into things. While we can program it to move around the neighborhood, we also need it to stop for pedestrians and for other cars.
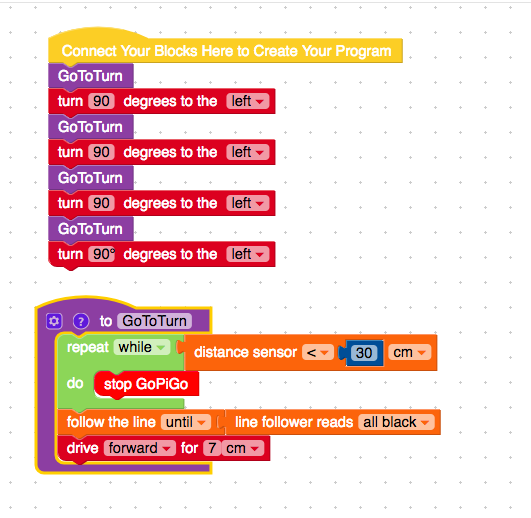
We will use the distance sensor to measure any obstacles in front of our car at each intersection. If the robot sees something within a certain range, we won't go forward; rather, we'll stop, and wait for the object to pass.
We have added a distance sensor read into our code. Now, at each interesection the GoPiGo3 will read what is ahead, and if it is closer than 30 cm (the minimum distance to the next intersection) the self-driving car will wait until the intersection is clear.
7. Add a Destination Function
The code we've used before simply finds the destination and stops. However, what if we wanted to keep going? This seems like a really important function for a self driving car: it has to go to a destination, turn around and be ready to go somewhere else.
Let's add in the code to do that, and make one more function. Once we do this, our car will be pretty useful: it can go to many different places!
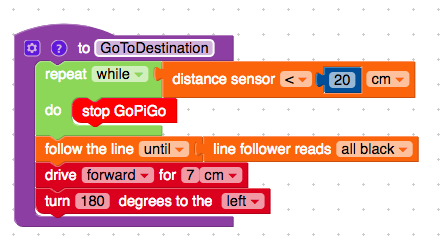
We add a function called "GoToDestination". This is going to look a lot like our previous function "GoToTurn". However, instead of finding the black line and moving forward, this will find the black line, move forward, and turn 180 degrees. It's like the GoPiGo will enter your driveway, and turn around, ready to pull out into the street and go to the next destination.
8. Take a Test Drive: Drive From John's to Nicole's
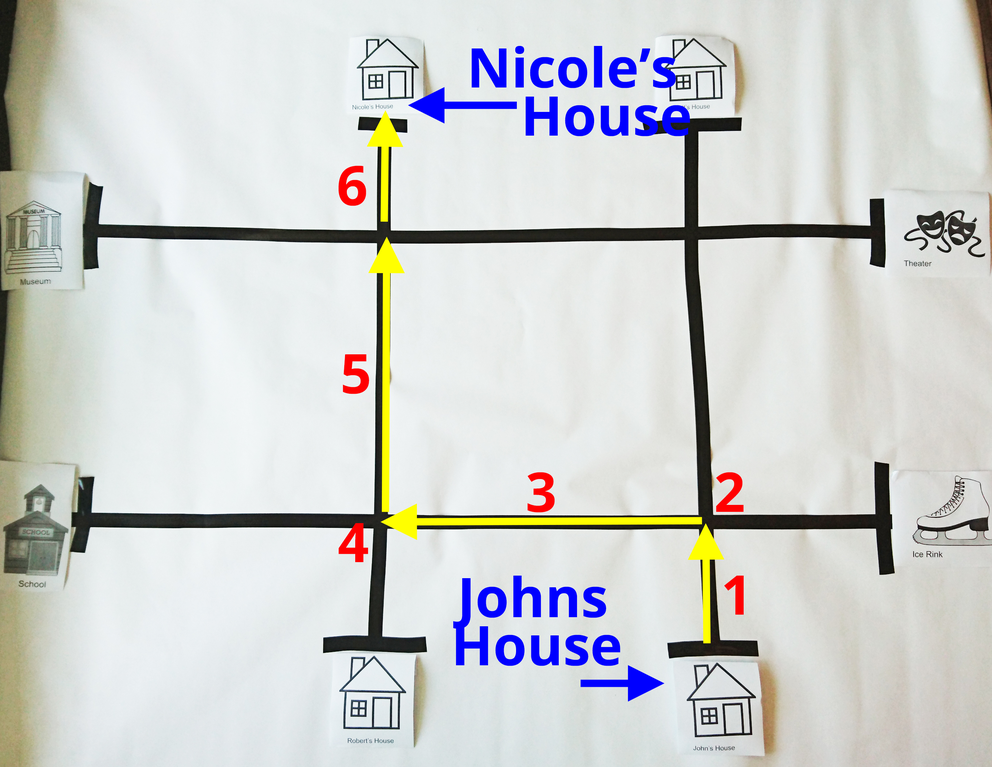
In this step, we'll take our first practical journey. We will drive from John's House on the Map, to Nicole's House.
Map Out Our Turns
If we look at the map, we want the robot to start and do the following:
- Drive straight from John's to the first intersection.
- Turn left.
- Drive straight to the next intersection.
- Turn right.
- Drive straight to the next intersection.
- Drive straight until the road ends.
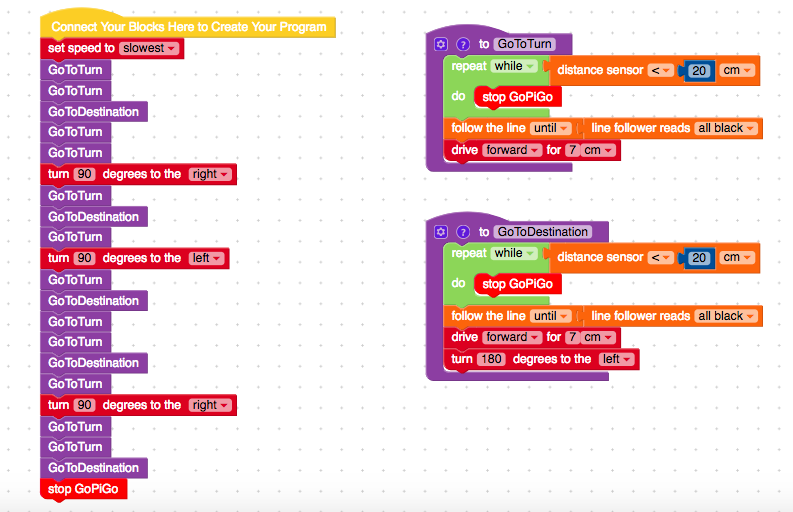
Let's look at this in code.
- GoToTurn
- Turn 90 Degrees LEFT
- GoToTurn
- Turn 90 Degrees Right
- GoToTurn
- Drive until the line follower has no more line (reads all white!)
You can download the code, attached as a bloxter file.
9. Take a Real Trip
Finally, let's take a real trip with multiple destinations. Our GoPiGo now has the functions we need to handle an intersection, to handle other cars, and to turn around at the destination.
Let's imagine we have to pick John and Matt up, and then drop them at school. Next, we want to pick up Nicole and Robert, and then drop Robert at the Ice Skating Rink, and Nicole at the Theater.
We want to do the following:
- Start at John's House
- Go to Matt's House
- Go to School
- Go to Nicole's House
- Go to Robert's House
- Go to the Ice Skating Rink
- Go to the Theater
10. Bonus Challenge: Add Some Obstacles
As a bonus, you can have multiple students driving around at the same time. You now have a fleet of self-driving cars!
If you put too many cars on the roads, you will need to improve the cars' ability to avoid each other. How would you change the code so that the cars do not interfere with one another?

11. Bonus Challenge: Try it in Python
For this last step, we've included the Python versions of the Bloxter programs. You can try to upload them to your GoPiGo and run them in the Python IDE!