Worm Brain Simulator
| Site: | GoLabs |
| Course: | Worm Brain Simulator |
| Book: | Worm Brain Simulator |
| Printed by: | Guest user |
| Date: | Sunday, 24 May 2026, 10:45 PM |
Description
Simulate a worm brain with the GoPiGo or GoPiGo3 and a Raspberry Pi.
1. Introduction
In this project, we show you how to simulate a worm brain with the GoPiGo2 and a Raspberry Pi. This project was developed by Timothy Busbice and The Connectome Project.
A version of this project has been ported to Python3 and the GoPiGo3.
2. Why a Worm Brain?
Robotics and computer science have contributed an enormous amount to brain research. As computers grow more complex, they are used more and more to simulate the way our brains work. To use a computer to study the brain, scientists have developed models of the brain and how they work with software.
For medical research, worms are a very simple brain model. The tiny worm Caenorhabditis elegans has only 302 neurons but exhibits some complex behaviors. When the worm senses food through a variety of sensory neurons, the worm will move forward towards that food source. When the worm’s nose senses a blocking object, the worm will stop, backup and change direction to move around the object or avoid it all together. After successfully simulating the worm’s brain in a more complex environment, the project attempts to build a similar application in a Raspberry Pi robot.
The GoPiGo with a Raspberry Pi was the perfect answer.
The goal of this project was to write a single Python application that could run on a Raspberry Pi and the GoPiGo and be able to traverse its environment, avoiding obstacles, only using a simulated nervous system of the C elgans nematode. This project does not use any programming to stop the GoPiGo robot or make it change direction – only the simulated nervous system guides the robot and creates the behavior that allows the robot to stop and change direction when it encounters an obstacle. This project uses a sonar sensor on the GoPiGo robot to stimulate nose touch sensory neurons and a timing mechanism to activate food sensing neurons to move the robot forward.
3. C. elegans Biology
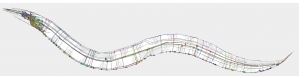
The C. elegans is one of the most studied animals in science.
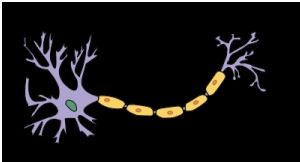
The C. elegans worm has approximately 1000 cells that make up the entire organism and is one of the most studied animals in science. 302 of those cells are neurons. Neurons come in basically three types: Sensory, Interneuron, and Motor. Sensory neurons are stimulated when conditions in the worm’s environment changes. These include touch, chemical, odor, pain, osmotic, oxygen changes, temperature and mechanical changes such as body pressure. Interneurons connect the sensory and motor neurons and might be thought of as a proto-brain of sorts. Motor neurons connect to the body muscles that are on either side of the worm body.
4. Many Muscles
5. Many Muscles
6. Combining Worm and GoPiGo
The project created the Connectome of the worm in a Python 2.7 program utilizing the GoPiGo commands for sensory input and motor output. A new version of this project works with Python3 and the GoPiGo3.
The program essentially does the following to simulate the worm brain:
- If no other sensory input is happening, stimulate food sensing neurons
- If an object is within 25cm of the sonar sensor, stimulate nose touch sensory neurons
Each stimulation of sensory neurons, runs the Connectome whereby each sensory neuron has added weights within a dictionary of the entire worms neural structure (i.e. dendriteAccumulate function). After each sensory neuron is activated and weights added, the programs run through all the neurons (i.e. runnconnectome function) and anywhere the accumulated weights of a neuron is greater than a predefined threshold, the neuron fires (i.e. fireNeuron function) and additional weights are added throughout the connectome which include neurons and muscles.
Each time the Connectome is run, muscles, which are part of the same dictionary as the neurons, are accumulated as Right and Left muscle weights (weights for muscles can be negative as well as positive) and the wheels on the robot are activated according to the weighted values. Each time a neuron or muscle is activated, the weights are set to zero so that accumulation can start again.
7. The Code
The above section is all boiled down into a simple Python2 program that can be found on github.
For the GoPiGo3 and Python3 version using Raspbian for Robots, the program is to be found on your SD card in /home/pi/Dexter/GoPiGo3/Projects/Connectome and is named GoPIGo3Connectome.py. It is possible you will need to refresh your SD card (detailed in step 9) It is also available on github and there is also a jupyter notebook version for DexterOS.
The Python program uses a Postsynaptic dictionary based on the C. Elegans Connectome Model. The code (or model if you will) starts with almost 5000 lines of definitions of neurons.
These definitions make up the brain library, and simulate what each neuron is doing, when. The “neurons” are all interconnected.
As the GoPiGo wheels around, the Ultrasonic Sensor is checked for distance. If food is detected, this counts as a simulation.
Note that the GoPiGo2 uses an ultrasonic Sensor and the GoPiGo3 uses the distance sensor.

8. Pi Robot With Worm Brain - GoPiGo2
This step is for the GoPiGo2 only. For the GoPiGo3, go to next step.
Step 1: Build the GoPiGo. We have step by step instructions on building the GoPiGo.
Step 2: Attach the GoPiGo Ultrasonic Sensor. See our building instructions.
Step 3: Connect the GoPiGo to the internet.
Step 4: Clone the Github repository to your desktop:

When the program is run, your GoPiGo will start to behave like a worm. Now with a worms brain, it will start moving around and looking for food!

9. Pi Robot With Worm Brain - GoPiGo3
This step is for the GoPiGo3 only. For the GoPiGo2, refer to preceding step.
Step 1: Build the GoPiGo3. We have step by step instructions on building the GoPiGo3.
Step 2: Attach the distance sensor and connect it to one of the I2C ports.
Step 3 Raspbian for Robots: You may need to update your GoPiGo3 library.
- Look for
/home/pi/GoPiGo3/Projects/Connectome - If it is present you do not need to update your library.
- If it is not present then you need to refresh by doing one of the following:
- Connect your GoPiGo3 to the Internet.
- on Raspbian for Robots click the DI Update icon on the desktop as per the image. Click on Update Dexter Software to refresh everything. This method is the best but it takes time. You will need to reboot your robot.
- for a faster approach, you can open a terminal window and type
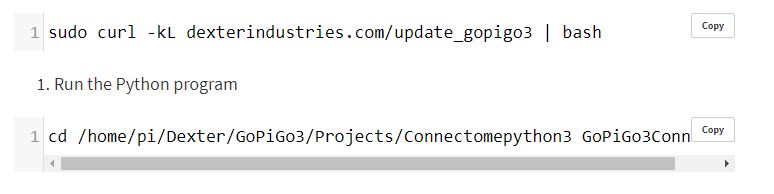
When the program is run, your GoPiGo will start to behave like a worm. Now with a worms brain, it will start moving around and looking for food!
Step 3 DexterOS:
- Right-click this link and save the notebook file to your laptop/computer.
- Connect to your GoPiGo and go into `Code with Python`
- Click the Upload button as shown in the image below.
- Upload the file from your laptop to the GoPiGo.
- Run the whole notebook.
NOTE:
This version has been enhanced a little compared to the original GoPiGo2 code . When looking for food, the two eyes on the GoPiGo3 will turn blue. When an obstacle is detected, they will turn red.


10. Worm's Brain and GoPiGo
To be clear, there is no programming that is directing the robot to stop or rotate a wheel in one direction or another. It is only the collective weighted values being generated from the simulated worm Connectome that guides the actions of the robot. It was very difficult to contain the Connectome into a single application and make it run on a Raspberry Pi but this is a very good attempt. This is truly a totally autonomous robot that is reacting to its environment through a simulated brain of a nematode.
The Connectome Project wants to encourage others to use the Connectome program and try to change the methods to make the program run more efficiently and react better to the environment. Changes to the Connectome, however, means you are creating your own simulated nervous system that will differ from the worms nervous system, which might be fun to explore as well.
You can find more information and the Python program on the Connectome Website.
You can see video of the GoPiGo robot
11. Questions?
Have a question or a problem? Post it on the forumtemp_id_1434s and we’ll help you out.