Candy Count
| Site: | GoLabs |
| Course: | Candy Counting Robot |
| Book: | Candy Count |
| Printed by: | Guest user |
| Date: | Wednesday, 24 June 2026, 6:37 PM |
Description
Build a Candy Counting Robot with the Raspberry Pi.
1. Introduction
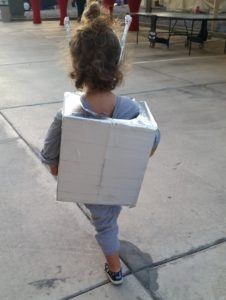
In this project, we took the tried-and-true robot costume and gave it some life with the Raspberry Pi, GrovePi, and a handful of Grove sensors. The costume is a standard robot costume, but with a talking candy-counting machine attached!
When a piece of candy is placed in the robot, it flashes its LEDs, thanks the candy donor for the piece of candy, and announces the candy count. We use the Raspberry Pi for brains, the GrovePi and assorted sensors to detect candy, and a battery powered speaker to do the talking. The whole project takes about 2 hours to build.
2. Supplies Needed
We’ll need a few electronic and non-electronic components for the project:
- Raspberry Pi
- GrovePi
- GrovePi Case
- WiFi Dongle
- Ethernet Cable
- Power Supply
- Portable USB Battery
- Chainable RGB LEDs (4)
- Grove Bar Graph LED
- Grove RGB LED Display
- Ultrasonic Sensor
- Raspbian for Robots CINCH SD Card
- Large Cardboard Box for the Body
- Small Cardboard Box for the Candy Counter
- Metallic Colored Duct Tape
- Speaker for the Raspberry Pi
You should be able to use cardboard boxes from around the home. The size of these are going to vary depending on your child’s size and your expected candy haul.
3. The Build
We started by wrapping the small box and the large box with the silver duct tape. Originally we were planning on using silver spray paint, but decided that the fumes might be bad for our 2-year old. The tape worked well and gave it a bit of a rough look.
Next, we cut a small flap in the top of the small box, about 4″ x 4″ for the candy chute. We bent this into the box, and taped it to the bottom of the box at an angle. This provides a protective area to keep the candy from dropping in on the electronics.
Make some holes
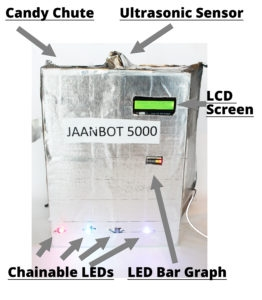
Then we made some holes. First, we poked 4 small holes along the bottom for the chainable LEDs. We secured them to the box with some thin wire we had laying around.
We made another hole, big enough for the RGB LED Screen to fit through. We secured the RGB LED Screen with some clear packing tape on the back of the display. We made a similar hole for the Bar-graph LED Display, below it.
Finally, we added the Ultrasonic Sensor. This will be our candy detection sensor: as a hand with candy in it goes towards the candy chute, it triggers the Ultrasonic Sensor. We mounted this at a slight 45 degree angle and wrapped it in silver duct tape to make sure it didn’t move around and trigger false alarms.
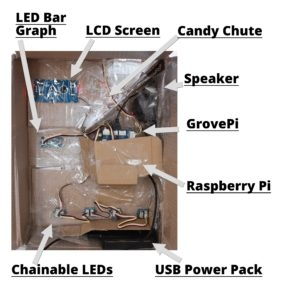
We will mount the Pi and GrovePi in the small box with more clear packing tape. We built a small cradle for the bundle on the side, below the candy chute.
We also made a slot for the USB Battery Charger at the bottom. This needs to be securely held in place: it’s the heaviest item and if it breaks loose and combines with the kinetic energy of your 2 year old, could do some damage.
4. Hardware Setup
With all the sensors mounted to the small box, we can begin set up the Pi. You’ll need to place the SD Card in the Raspberry Pi, attach the GrovePi and place both in the GrovePi Case. We have instructions on this here!
Connecting the sensors:
- LED Bar Graph - Port D5
- Ultrasonic Sensor - Port D4
- Chainable LEDs - Port D7
The RGB LCD Display connects to any of the I2C Sensor Ports
Connect the Raspberry Pi Speaker to the Raspberry Pi Aux Jack
Initially, we’ll connect to the Pi with the Ethernet Cable so we can do some set up, but we’ll eventually use the WiFi Dongle to make the costume a WiFi Access Point. For now, connect both the Ethernet Cable and the WiFi Dongle to the Pi.
With the sensors in place, we can now strap the Pi into the box and tape her in there!
5. Set up the Code
Next, we’ll login to the Pi and do some set up. The code is up on Github and available here. You’ll want to update Raspbian for Robots.
First, let’s make sure the volume is up and running on the Raspberry Pi. In the command line run:
aplay /usr/share/sounds/alsa/*If you are able to hear the sounds, move to the next step! If not, this tutorial may help you set up the audio: Increase the volume to 100%.
Next, install espeak. Run the following in terminal:
sudo apt-get install espeak -yAfter it is successfully installed, run the following command. (Disregard error messages on the terminal if you can hear sound):
espeak “hello”If you are able to hear “hello” from the headphones or the speakers then move to the next step!
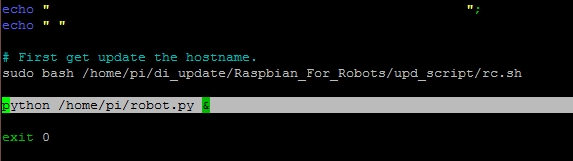
Our final step is to set up the Python program to auto-run at boot. We’ll be using rc.local, and there is some background on this here. In the command line, open up the file rc.local
sudo nano /etc/rc.localIn the file, add in the line:
python /home/pi/Desktop/GrovePi/Projects/Candy-Counting-Robot-Costume/robot.py &This should go into the file ABOVE the final exit command, and below any other commands.
Optional: Customize the WiFi Access Point
As we mentioned above, the robot costume is going to have its own WiFi Access Point. We do this through CINCH, a version of Raspbian For Robots, which automatically opens up a WiFi Access Point. This can be handy for debugging or restarting the costume on the fly with a phone or laptop (not that you want to haul one around while trick-or-treating, but hey . . . maybe you’re that person!). It can also be a cute party trick: “She’s also a WiFi Access Point!”
You can customize the pages served up by the Raspberry Pi access point by rewriting the HTML files in the directory:
/var/www/htmlAdd in any extra pictures or code you want to run. When someone logs into the WiFi Access Point “dex” they’ll see this web page at the address “10.10.10.10”.
6. The Robot in Action
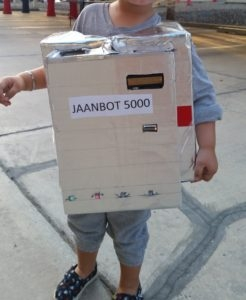
With the rc.local file modified, the robot should boot right up. Be sure to give it a few test runs. The code is super-stable (I ran it for a day or so in my office to test before releasing it in the real world!).
Remove the Ethernet Cable and the Raspberry Pi Power Supply, and plug this baby into your USB Power Battery and go get some candy! Close up the small box, and mount it to the big box, slap it on your child and go!

7. Further Improvements
As with any project, you always think of improvements on the backside.
I really wanted to add the Grove IR Sensor and a remote control, so I can have the robot say messages out loud to either my kid or the the candy donor. I was also hoping to add a “reboot” button this way so I could remotely reboot the Pi if anything got stuck (it didn’t, but that’s easier than taking the costume apart to reset the Pi.
I also thought about adding a Temperature Sensor to the inside of the costume. We live in Dubai and it gets hot; it would be fun to maybe blast out the temperature once in a while.