Original BrickPi Bookreader
| Site: | GoLabs |
| Course: | BrickPi Bookreader |
| Book: | Original BrickPi Bookreader |
| Printed by: | Guest user |
| Date: | Thursday, 9 July 2026, 6:12 AM |
Description
In this project we make an ebook reading robot with the BrickPi.
1. Introduction
Wouldn’t it be nice of someone read you a book aloud when you were feeling lazy to read it yourself?
Have you ever wanted to get that Kindle Book into another format, or just copy the text?
Have you ever wanted to get all of your highlights or notes off your Kindle?
In this project we make an ebook reading robot with the BrickPi. We use the BrickPi to control the LEGO Mindstorms to turn the pages, a Raspberry Pi Camera to take pictures of each page, and the Raspberry Pi to convert the text to speech. The result is an ebook reader that can store text, search for selected text, or read the ebook aloud to you.
2. Materials List
- Raspberry Pi
- BrickPi
- Raspberry Pi Camera (available in Project Pack 2)
- Raspbian for Robots SD Card
- LEGO Mindstorms NXT Motor
- LEGO beams to construct the platform
3. Overview
If you want to digitize a book, there are mechanisms available. However, most are too big, too error prone or too expensive for personal use.
The BrickPi Bookreader strikes a balance by using the Raspberry Pi to do the heavy processing and the BrickPi as the interface to the real world, controlling the NXT motors to handle page turning.
To make an automated system that reads a book aloud we need a few tools (some that already exist):
1. A software setup which can take a good picture of a page, perform Optical character recognition (OCR) on the image to convert it to text, and a Text to Speech (TTS) engine that can read the text aloud.
2. A mechanism which can turn each page, automating the system.
For step 1, we have some open source software that does the job very well. With the Raspberry Pi as the brains of the operation and the official Raspberry Pi Camera as its eyes, the size of whole setup is considerably smaller than Google’s.
The second part is a bit tricky. When we started, we assumed there were be some decent projects out there that did the page turning.
So after digging around we found nothing so we set out to build our own. The biggest challenge of the project was creating a good page turning mechanism. After some research we found the Google Book Scanner, which turns the pages well but is beyond the scope of almost anyone but a corporation. We also found Scanbot, which works well but requires a lot of moving parts with a lot of precision timing. Building the contraption with LEGO’s is naturally easier.
Instead of diving straight into building a mechanism for turning the pages on a physical book, we decided to build a platform which could read from the Kindle app on a Nexus 7.

4. Building the Bookreader
Setting up the Camera
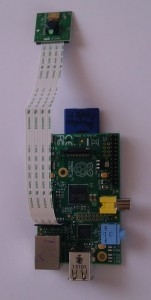
The first thing to get our Bookreader up and running is to get the Raspberry Pi Camera up and working. The Raspberry Pi Camera packs a lot of punch, there are a lot of options, it’s easy to set up, and the image quality is acceptable for our project.
The Raspberry Pi and the camera module and Camera connected to the RPi.
5. Focusing the RPi camera
After connecting the camera, there is one more thing to do: change the focus of the Raspberry Pi camera. The Raspberry Pi camera comes with its focus fixed at infinity, and since it is a fixed focus camera you have to manually change it. Here are some helpful links to help focus the camera:
After setting up the camera, take a test image to see that it is properly focused. In the rig that we built, we have the camera about 10.5 inches above the tablet (choose a height which is comfortable for you and take a few test photos to check if the images are clear and the whole screen of the tablet is captured).
Now fix the camera into its adapter next to the Ethernet Jack. Here is a great guide to setting up the Raspi Camera. It should be helpful in setting up both the hardware and software.
After the camera is set up, test it to see if it works:
raspistill -o image.jpg
If the camera is initialized properly you’ll see a new file image.jpg in your present folder. Open it to see the image.

6. Set it Up
Now secure the camera at the desired height and place your tablet. Take a picture. You may need to readjust the focus of the camera and angle at this point.
Black text on white background works the best, so select that from the text options and keep the text size sufficiently large. The larger the text is, the better results will be from the OCR software.
7. Setting Up the TTS Engine
For the TTS, we are using eSpeak. It works fine for our purposes: the voice is a little robotic, but it does the job. Here is a definitive guide to TTS on RPi.
First test if the audio is working on the Raspberry Pi. Plug a headphone or speakers in the audio jack and run the following command:
aplay /usr/share/sounds/alsa/*
If you are able to hear the sounds, move to the next step! If not, this tutorial may help you setup the audio.
Next, install eSpeak. Run the following in terminal:
sudo apt-get install espeak
After it successfully installed, run the following command (disregard error messages on the terminal if you can hear sound):
espeak “hello”
If you are able to hear “hello” from the headphones or the speakers, then move to the next step.
8. Installing the OCR Engine
The OCR (Optical Character Recognition) engine converts the image file we take of the book into text. We are using Tesseract OCR Engine. It runs well on the Raspberry Pi, it does not require an online connection, and it reliably converts images to text.
First, install Tesseract:
sudo apt-get install tesseract-ocr
Next, test the OCR engine.
Take a good image of a piece of text in a Book and run Tesseract:
tesseract image.jpg o
where image.jpg is the image which was taken by the Raspberry Pi Camera and o is the file in which the text will be saved (Tesseract will make it o.txt so no need to add the extension).
Now, wait a few minutes, the OCR takes a lot of processing power.
When it is done processing, open o.txt. In our experience, the recognition was >90% and works better with larger font size. If the OCR did not detect anything at all, try rotating the image and running Tesseract again.
9. Building the LEGO Platform
By taking pictures a few times from various height’s we found that we needed the camera above 10 inches for getting a goo, clear image of the text.
Our first build was not elegant: we just looked for LEGO blocks to build a platform on which we can place the BrickPi casing along with the battery pack and the camera (we cheated with a little bit of tape to fix the camera in the correct position).


10. Building the Robotic Arm
Probably the hardest part of this build is to get a robotic arm to turn the pages on a capacitive touch screen.
We used the foam that comes when you get some IC’s.

Cut a small piece for using as the stylus.

After testing a couple of materials, the best candidate for a capacitive stylus was a bit of antistatic foam (the one that comes with IC’s from Mouser!). You can also use normal kitchen sponge, but it has to be moist, so just put a few drops of water on it. We found performance improved with a conductive wire with the foam and wrap it around the arm. We also found that it helped to connect a 47 nF capacitor between the foam and the ground on the BrickPi.
You can even use a moist kitchen sponge.

Attach the piece of foam on an arm stretching out from the motor and connect the capacitor to it. We also attached a small LEGO block, tilted, which helps making an easy contact with the touch screen.
Place the tablet in a proper position so that the arm is able to move up and down properly and turn the pages on the screen.


11. Putting It All Together
On the Github repo, there is a test code called arm_test.py to help you calibrate the arm for perfect movement. Connect the motor to Port C of BrickPi and change the values of ‘t’ and ’sp’, until you get flawless movement.
With the camera and all software’s working and the platform ready with the motor arm, it is time to bring the Bookreader to life.
Make sure that the camera is calibrated to take focused images of the tablet here with the text clearly visible and that the motor mount is moving correctly and turning the pages.
Download bookreader.py from the BrickPi Github Python Repo and put it in the directory where you have the BrickPi.py library and just run the code to bring it to life.
12. Future Work
This project could be extended by building a page turning robot. This would and use the book reader to read aloud a real book. If you end up building a page turning robot or converting the whole book as an audiobook or text, or something that you think is great, just post it on the forums, we would love to feature it.