Mission Instructions
| Site: | GoLabs |
| Course: | GoBox |
| Book: | Mission Instructions |
| Printed by: | Guest user |
| Date: | Tuesday, 21 July 2026, 12:31 PM |
Description
Your mission is to create a robot that can explore remote, narrow canyons. First, you will create a sample canyon system with both a left and right turn. Then you will design, test, and refine your robot until it can navigate the canyon system independently.
1. Problem

2. Build Your Robot
Attach one distance sensor to the I2C port and the other to an AD Port.
STOP AND THINK.
Where should the distance sensors be placed on your robot?
We definitely want the robot to notice a wall in front of it, so place one distance sensor facing forward. Now where should the second sensor go?
There’s an algorithm in maze-solving known as the left hand rule or wall-follower algorithm. To get out of any canyon system, simply place one hand on the left-hand side of the hallway and follow that wall until you reach the exit. Of course, the left hand rule takes a long time, and requires you to go through every dead-end in the canyon system, but it does work! (This works equally well if you choose to use your right hand, but you cannot switch hands in the middle of your maze-solving.)
We recommend you place the second distance sensor facing one side: your choice whether it’s the left or right! (Our sample code will have a distance sensor facing the left)
You might want to run a few tests to determine where on the robot the side sensor should be placed. Should it be near the front, over the wheels, or near the back of the robot?
3. Pre-Code: A Simple Corner
Let’s try turning a simple corner first.
We need to evaluate how the robot can successfully make a turn. After all, humans have brains that auto-magically calculate how we go through an open door, but not robots.
Try the following code to go around a cardboard box:
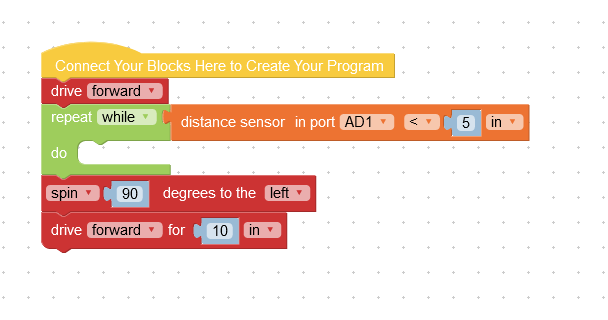
What happened? Did the robot hit the box? Can you think of better ways to handle corners?
Here are a couple of options to try and questions to answer:
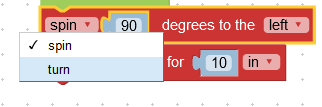
- Does turning behave better than spinning?
- Which requires a wider corridor, the spin or the turn? Will your canyon system be wide enough for either of those, or do you need to choose the tighter turn?
- Should the robot drive forward a couple of inches and then spin (or turn)?
- Maybe the side distance sensor should be moved elsewhere on the robot? Closer to the back or just above the wheel?
Try different scenarios until you are happy with the way your robot handles the corner.
Remember that robots process extremely quickly. So the moment a Distance Sensor detects an opening to the left of the robot, it will start to turn. BUT your robot might need to drive forward for a couple more inches so it doesn’t run into the wall. Since every canyon system is different, you’ll need to figure out what works for you!
Make It a Function
Once you are happy with your robot’s simple corner program, turn it into a custom function that you can use later. You’ve done this before in Mission 08, so look there if you need a reminder.
4. Pre-Code: Turn the Other Way
In a similar manner, can your robot manage to turn the other way? Let’s say if there’s a wall in front of the robot and a wall to the side with the sensor, it would be a good idea for the robot to attempt a turn in the other direction - as we are not dealing with dead-ends for the moment.
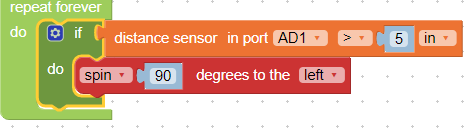
Try this code that will turn right if there’s a wall in front and a wall to the left
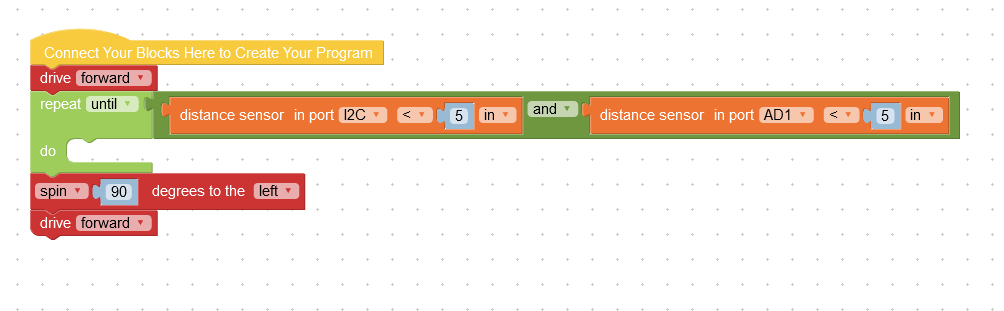
What happened?
Chances are your robot hit the wall with its back section. Oops. It seems it’s following the wall too closely. The GoPiGo needs space to turn ! Adjust your code and place your robot accordingly.
When you will build your canyon system, you will need to take those measurements into consideration. How wide should the corridor be? How far from the wall should the robot be?
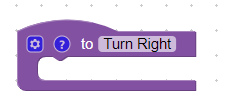
Make It a Function
Now save your thinking as a second custom function. Make sure to name this one very carefully, too! If your last function was named “Turn Left”, this one should probably be named, “Turn Right”.
5. Build a Canyon System
Now that you have a better sense of how much space your robot needs in order to turn left and right, it’s time to build the canyons for your robot to explore.
What materials can you use ? Cushions? Cardboard boxes? What space do you have available to you, can you get special permission to build your canyon system in the living room? Maybe, maybe not. If you have to build it outside, try to avoid grass surfaces as much as possible. The GoPiGo is not an all-terrain vehicle and prefers a clean surface.
Build a simple canyonland for your robot. It should contain one left turn and one right turn, and it needs to be wide enough for your robot to turn around at any point. For now, don’t create any dead-ends. You’ll be able to make your canyonland more complicated after your first draft of code is complete.
When building your canyonland, try to use straight “walls” as much as possible. While it is possible to solve a canyon system where the walls are wonky, it does make the algorithm more complex.
Note that when you create your turns, they should be 90 degree angles, or as close to 90 as you can make them.
6. Plan Your Code
Let’s think aloud as if we were the GoPiGo.
What blind spots do I have?
- There are no sensors facing backwards, so driving in reverse is not recommended.
- Which side am I completely blind? There may be some things I simply can’t see!
When can I go forwards?
- When there's enough space in front of me.
What can I do if I can't go forward because there's a wall?
- Check the side sensor to see if there’s room on that side. If there’s room, then turn towards that side.
What can I do if I can’t go forward nor turn to the side that has my second sensor?
- Assuming there's an opening to the other side and turn away from my side sensor. Now can I go forward?
If there’s room to go forward and there’s an opening to the side where my distance sensor is, what should I do?
- Since I follow the left-hand rule, do you think I should prioritize turning instead of driving forward? In this simple canyon system, it won’t matter much which one is prioritized but it may become important when you build bigger canyon systems.
How will I know I solved the canyon system?
- What is different about the world outside the canyon system compared to being inside the canyon system?
In Mission 1, you created a canyon system but you knew in advance how long the GoPiGo had to drive so you were able to use specific distances.

This will not be the case here. We’re trying to solve an unknown canyon system!
7. Code: Enter the Canyon System
First things first, how will your robot get into the canyon system?
Our program is pretty basic. We called this section, “Enter at your own risk!”

Now that your robot is inside the canyon system, what does it need to look for first? Should your robot look for more room ahead of it, or should it look for an opening on the left?
It would look a little silly if the robot missed a left turn at the beginning of a challenge, so we chose to have our robot check its side-facing distance sensor first.
Check your plan above to remember what your robot should do if it does detect an opening to the left. Better yet, find a way to use your “turn left” custom function that you created earlier!
8. Code: Drive Forwards
Check your plan to remember what your robot should do when it has room to drive forward after it knows there’s no option to turn left. You haven’t created a custom function for this yet, so it’s time to put on your thinking cap!
If the front-facing distance sensor sees enough room to move forward, then what?
Should it move by a known distance (let’s say 2 inches) before testing for openings, or should it just go ahead until it finds an opening? Which of these 2 blocks would be more appropriate to use?


Drifting
As you test your robot, you might notice that sometimes it drifts from one side of a canyon to another. This happens for a lot of possible reasons: the robot might have started out not quite perfectly aligned with the path, the motors might be slightly imperfectly calibrated, there might be an inconsistency on the texture of the ground, or many others.

It is less important to figure out why your robot is drifting and more important to create a way for it to help itself when it does, inevitably, drift.
Drifting will be measured by the side-facing distance sensor. You’ll need to do quite a bit of testing to make this function work for you, but here’s the one that worked for us:
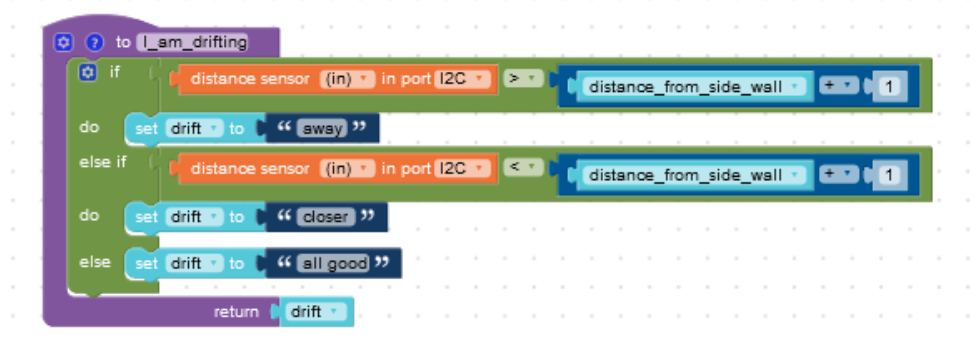
Note that this function does not correct the drifting itself, it only returns information about whether the robot is drifting or not.
Since you know which side your sensor is facing, you might even change the “away”, “closer”, and “all good” to be more specific: “left”, “right”, and “center”. Your choice!
Once you’ve created your I_am_drifting function, it’s time to add it into your Driving Forward code!
9. Code: Wrapping Up
Turning Away
The last part of your code answers the question: what should the robot do when it can’t drive forward and can’t turn towards the side-facing sensor?
Answer: Turn away!
Add this command into your code and it will be time to test your robot!
Exiting the Canyon
Here’s a little philosophical question to ponder. How will the robot be made aware when it has actually exited the canyon system? There will be room to move forward, and to turn left, and to turn right. What will your robot end up doing?
You don’t need to code anything here but you might need to use the stop button once your robot has left the canyon system.

10. Test: Canyon Explorer
When you’re ready, move your GoPiGo to just outside the canyon system you created, and then press Start.
As always, you might need to adjust your code a few times before your robot becomes an expert explorer, but we all need to start somewhere.
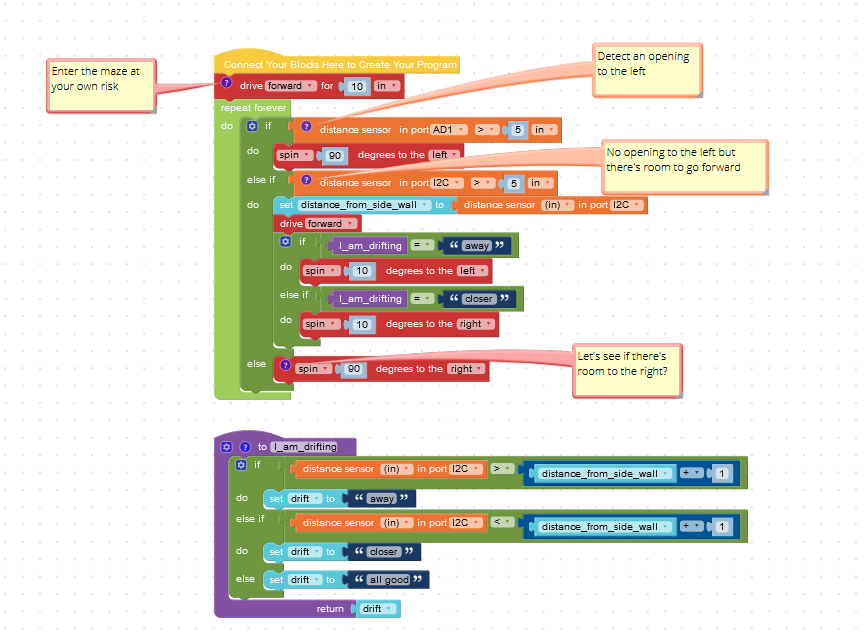
This is what our code ended up looking like - yours might be a little different and that is perfectly fine! One of the great parts of coding is how many different solutions can lead to successful robots!
Iterate
As you test your code, you might find some things that confuse you - that’s ok and it’s perfectly normal! Try renaming some functions to help the program make more sense with what you’re seeing.
You could also try changing the order of some parts of your program. Does that help your robot or slow it down?
If you’re seeing a behavior that puzzles you, simplify your canyon system. You can start the robot just before the spot where the issue happens. This gives you control over exactly where (and how) the robot starts a specific task. Now you don’t have to worry about whether the robot was drifting before it reached the obstacle! (And you don’t have to wait for the robot to keep exploring all the canyons that it already does well.)
11. Extensions
Extension: Build a bigger canyon system
Once you’ve had your robot solve the simple canyon system, go ahead and build a bigger one! There are all sorts of ways to make a canyonland bigger: simply add more corners or add a dead end. Try your code again.
Does your algorithm need tweaking? Most likely it does. That’s the point! Keep going!
Extension: canyon system are natural
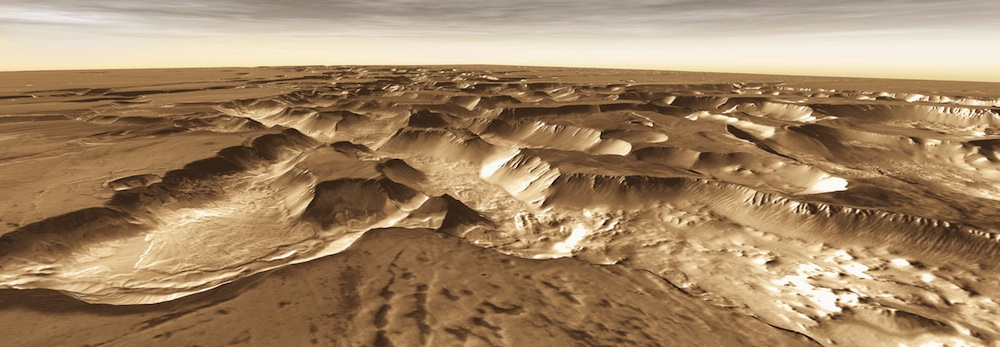
Of course, canyon system in nature rarely have perfect right angles, and each corridor is rarely the same size as the others. If you want a real challenge, try changing only one of those things in your canyonland. How does your program need to change to become more flexible in a “natural” canyonland?
Extension for Groups
Try setting your robot in another canyon that somebody else created. This could be a different group in your class, or it could be a canyon that a parent or sibling creates just for you! By having someone else build the canyon, it will give you a better sense of how your robot would behave “in the wild”.
Were you successful? Then it is time to race your robots! See which robot is most efficient at exploring a canyon. You could also get points for exploring more of a canyon if the robot programs are really different!