05 Mission Instructions
| Site: | GoLabs |
| Course: | GoBox |
| Book: | 05 Mission Instructions |
| Printed by: | Guest user |
| Date: | Tuesday, 21 July 2026, 12:26 PM |
Description
Your mission is to create a robot that starts an interaction when a human approaches. Your robot should be friendly and act as naturally as possible.
1. Problem
One critical part of computer programming and robotics is the user interface. Designing a user interface means designing how the computer program or robot will interact with humans. UX (user experience) designers consider things like: what buttons do humans need and where should they be located, how will the robot look friendly or approachable, and how can the robot behave in ways that make sense to the humans around it.
Your mission is to create a robot that starts an interaction when a human approaches. Your robot should be friendly and act as naturally as possible.
2. Design: About Servos
For this mission, you have received a servo, and you are invited to use any of the sensors from prior missions (we’ll use a distance sensor in our examples below). A servo is basically a motor with an arm attached to it, but instead of only controlling the speed of the motor, we can control its exact position. [Fun fact: The technical term for a servo arm is a horn.] Servos allow you to add motions like waving or pointing at things.
Think about ways that people or animals move when they first spot each other and want to invite this new visitor to come closer. Some ideas to get you started might be waving a hand or wagging a tail.
Choose the movement you want your robot to make to invite you to come closer when it notices you and write in words some of the details about that behavior.
For instance, in the sample program we’re using today, we’ll be creating a robot that waves its “hand” side to side like a human. To prepare for this, we walked around our office and our homes waving at friends and family and colleagues. As we waved at them (and they waved back), we paid attention to things like:
- How many times did their hands move from side to side?
- How long was a wave in total?
- Did everyone start their wave on the same side?
- How far to the side did people tilt their hands?
Based on the information we collected, our program will wave back and forth with 3 side-to-side motions and take roughly 2 seconds. The people we waved at didn’t tilt their hands very far, so we’ll try to create a narrow waving pattern for our first robot.
3. Assemble the Servo
The servo comes in two parts: a big, chunky black and white piece which contains the actual motor, and a servo arm (horn) to be attached on top. Do not install the arm horn right away, because it has an impact on the movement you will be able to get from the servo.

The servo attaches to your robot in a different place than any other sensors. Look for 3 pins labeled Servo 1 or Servo 2 (you can use either one but Servo1 will be simpler to use!).

In order to properly attach the servo to the connector, you need to line up the brown or black wire on the servo connector to the minus (-) sign on the red board. You might need to flip the servo connector over! If you don’t pay attention to this detail, your servo will not work properly.
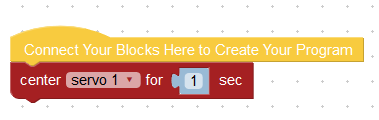
In shipping and manufacturing, the servo may not be in its center position. So before you attach anything to the servo, open Bloxter and select the center [servo 1] for [1] second block. Run this program and it will put the servo into its center position.
Now you can use craft supplies to create a hand or a tail. Once you create it, attach it to the servo arm, which you can now attach to the servo itself!
Then mount the entire servo on your GoPiGo using the sensor mount from Mission 02. Make sure that your hand or tail will not get caught in the robot if it rotates too far or accidentally spins in an entire circle.
To solve this mission, you will also need to attach the Distance sensor into an I2C port and mount it on your robot.
4. Code: Doing the Wave
Before we try to create the interactive part of our code, spend some time investigating the commands related to the servo itself. A program like this can help you understand what it means to center your servo, rotate it 90*, and release it.
Based on what you learn during these investigations, it might mean that you adjust where or how your servo is mounted on your robot.
Once you understand the three basic commands for a servo, design a program that most closely matches your planned behavior from Step 2 above. You’ll need to fine-tune the degrees that your servo rotates as well as any wait time in between movements.
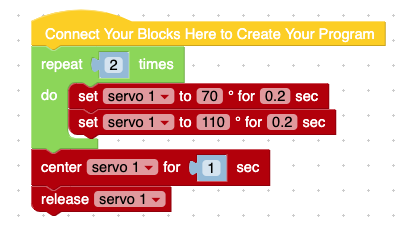
Here are two versions of an example code that both do the same thing. One shows off using loops and the other just lists the servo turns one by one.

5. Code: Responsive Robotics
Now we need to think about when the robot will wave. A robot that just randomly waves - or only waves when you press “Run” is not the most useful or easy-to-use. Instead, we’re going to use the Distance sensor so when the robot detects an object nearby, it begins to wave and interact.
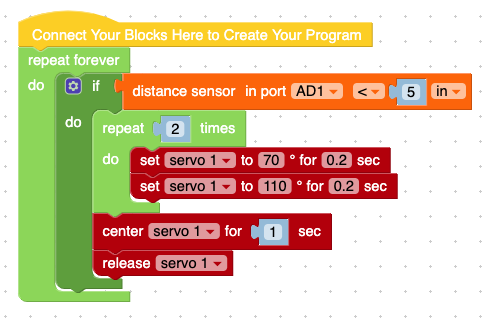
If you only use an [if-do] loop, however, the robot will only check the distance sensor one time. Remember to add a [forever-do] loop to your program!
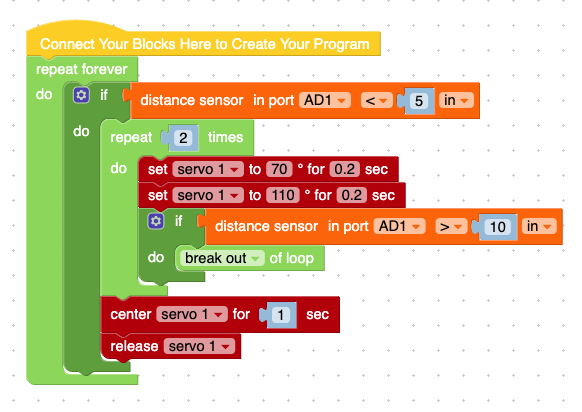
But what if the human (or a pet, maybe?) begins to walk away from the robot when it starts waving? In human-centered robotics, it’s important that robots are programmed to stop their behavior if it’s not getting the right response from the people around it. To incorporate this, we’ll need to add a new command [break out of loop]. Let’s start by having the robot check again for an object nearby each time it completes one cycle of its wave. (Hint: that means you’ll need another [if-do] loop inside your repeat loop!)
6. Test
Now it’s time to test your robot. Run the program and try getting closer to the robot and then further away. Is the robot responding in a comfortable way for you? Does it make you want to get closer or is it startling you and making you want to get further away? Does it notice you early enough for you to respond or do the distances in your program need to be tweaked?
Tweak your robot as needed and then invite your friends and family to give it a try. Remember in robotics, some designers are trying to create robots that invite people to interact with them even when those people are not planning to. Maybe some of your friends or family will enjoy a little surprise before you tell them about your robot design!
7. Iterate
As you play with this fun robot, you might notice ways to improve your code. Would your robot be improved with a longer wave? A shorter wave? A wave with steeper angles?
Is your hand or tail made of the right materials? Should your robot dance a little or open its eyes as it notices an object approaching?
Think about ways this type of robot behavior could be even more useful. Perhaps you could tie a string to a door so the robot opens the door when it senses a person coming through, or lifts a pencil off the table when someone sits down at a desk to write.
Servos are used in lots of different robots. Consider building a totally different robot, like one that can express “emotions” by rotating different smiley (or frown-y) faces into a view-window. Another way servos are commonly used is to attach the distance sensor directly to the servo. This allows the robot to scan the room and choose the direction with the fewest obstacles.
Follow the same design steps - Design, Build, Code, and Test - for each change you want to make.
Make sure you keep track of your work!