06 Mission Instructions
| Site: | GoLabs |
| Course: | GoBox |
| Book: | 06 Mission Instructions |
| Printed by: | Guest user |
| Date: | Friday, 26 June 2026, 10:08 PM |
Description
Your mission is to design a timer, with a loud alarm, and then send it wherever you need to keep track of time.
1. Problem
Humans have been trying to accurately measure the passing of time since the dawn of
civilization. At first, people measured time using regular occurrences in the natural world — the seasons, the height of the sun in the sky, the stars, the moon, and the tides. Then, people began to invent devices for measuring specific amounts of time — water clocks, sundials, time candles, all trying to measure smaller and smaller increments of time.
Today, you have a powerful computer that can measure tiny fractions of seconds, and yours is small and portable as well! Unlike that ancient sundial that had to stay right where it was built, once you design and code your timer, you can send it anywhere it needs to go.
Your mission is to design a timer, with a loud alarm, and then send it wherever you need to keep track of time. Keep track of cookies in the oven, or set a new speed goal when you’re playing a game or cleaning your room — the choice is yours.
2. Design: Amplifier
If you are going to time something important — your brownies in the oven, your five minutes to finish your math facts, a nap — you want to make sure you know when your time is up. This month, we are going to use a piezoelectric buzzer to produce sound to alert you (and anyone else who is nearby) when your timer is finished. The buzzer we sent you is pretty loud, but your design challenge is to figure out how to make it even louder!
When a buzzer or a speaker or anything else makes noise, the sound travels outwards from the source of the sound as waves. Those sound waves spread out into the room. Some are absorbed by walls or furniture, and some make it to your ears. If you want to make something louder, you want to make sure more of those sound waves make it to your ears. If you yell into a megaphone, the megaphone walls take the sound waves you create and point them in one direction, making you louder.
When you attach your buzzer to your GoPiGo, you can include something to focus the sound, just like a megaphone focuses the sound of your voice. You may want to consider using a plastic or Styrofoam cup, tin foil shaped into a cone, or another recycled material. Make sure your plan includes a way for the wire from the buzzer to connect back to the GoPiGo.
Sketch your plan on a piece of paper.
3. Design: GoPiGo Response
In addition to planning your amplifier, you need to think about how your GoPiGo should respond when your timer finishes.
- Should it simply sound the buzzer for a few seconds?
- Sound the buzzer and flash the blinkers?
- Drive around in a circle?
Describe your desired GoPiGo behavior when the timer finishes on a piece of paper.
When the timer finishes, the GoPiGo will ____________________________________.
4. Build
Reminder: your GoPiGo has more than one port for attaching input and output devices, and although the cords on all these devices fit into all the connectors, the sensors will not work if plugged into the wrong port. The buzzer is an output device, something that takes a signal from that Raspberry Pi brain and sends information back out to the world. This time, it will be in the form of a loud noise.
Once you have threaded the cable through your amplifier, you will need to plug your buzzer into the correct port. For output devices, use either one of the Analog Digital ports (instead of the I2C ports you used before).
Attach your amplifier securely to the roof of your GoPiGo (tape or a zip tie works well for this) and decorate it as desired. When everything is hooked up and ready, turn on your GoPiGo and get ready to code!
5. Code: Creating a Variable
Before we plan our timer program, we are going to learn a few new features of Bloxter.
We don’t want to write a completely new program every time we change the length of the timer, so we need to create an easy place in our code to update how long we want the timer to run.
To do this, we will create a variable. You may have used variables in math class, where a word, letter, or symbol represents a number. In Bloxter, we can make up a word and use it to keep track of a number.
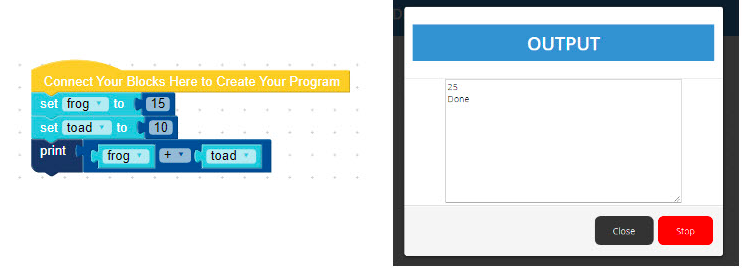
For example, if we invent a variable named “frog” and set it equal to six, and then we invent a variable named “toad” and set it equal to four, we can ask Bloxter to add “frog” plus “toad” and print the result (see below).
Now our robot can add!

So how did we create these variables and then add them together? In order to make our own variables, we will need to use Advanced Bloxter.
Variables are found in the bright blue section labeled Variables in Advanced Bloxter. When we want to make a new variable, we go to Variables and then click on "Create variable". Once you do this a new window will open for you to name the new variable. Type your name into the box and then click OK. Your new variable will now appear in the Variables section.
Now, you will also have blocks to set the variable, change it by [1], and the variable block. You can drag the block that holds the variable name into any Bloxter Block that needs a number. We did that when we added our variables frog and toad together.

Before we go on, let’s practice with variables. Write a new program that uses a loop (try repeat) and create a variable that counts to 100 (By 1’s, 5’s, or even 25’s!). Have the robot print each number as it counts. The print block will tell your robot to show each number as it counts. When you run your program, a window will pop up that says "Output" and will write out each number as your robot counts. If you are stuck, take a look at our example program below.
The blocks to control the buzzer can be found under Actuators. You can control the buzzer in several different ways. But, one way we can control it is by creating a Variable! Take a look at the sample program below to try it yourself.
6. Code: Timer
There are also a couple of pre-made variables in Bloxter. One of them is a timer. It can be found under the Time category. There are blocks to start the timer, use the current timer value, and reset the timer. We are going to use this instead of the "change ________ by ___" block. The timer will do the work for us.
Now, we are going to create a new timer program.
- Create a new variable. In the example below this variable is called "end".
- Set the variable. When do you want the buzzer to make noise? Set your variable to that number.
- Start the timer.
Next, we want to create at least one "if-do" statement. What do you want the robot to do if the current timer value is above the value of the variable "end"? Wrap your if-do statements in a forever loop and you have created a timer using the buzzer! If you need some help, take a look at the examples below.
By using a variable, if you want to change the amount of time the GoPiGo waits until the alarm sounds, you only need to change the number at the beginning where you tell the robot what to set the variable to.
Now you have all the tools you need to write your program. You will update the variable to set the timer length, wait that long, and then display whatever behavior you planned back in the planning step. If you get stuck, you can check out our sample program below.

7. Test
In this mission, you have two different things to test. Testing your program is pretty simple – set your timer to something short and then watch what happens. Does it match your plan?
Testing your amplifier is a little trickier. Sure, you can listen to your buzzer with and without the amplifier you built, but can you be sure that it is louder with the amplifier?
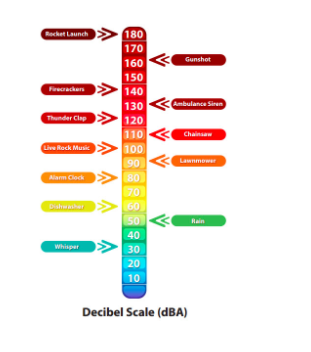
If you want to make sure your amplifier is doing its job, you may want to test it in a more scientific way. If you have access to a smartphone or tablet, there are many free apps that measure sound in decibels. Try your buzzer with and without the amplifier and record the results on a piece of paper.
8. Iterate
Now that you know how to create and use variables, how to wait, and how to turn on your buzzer, you have many options for improving this project.

Maybe you can build an amplifier that makes your buzzer even louder. Can you compare the decibel levels for a plastic cup, a paper cup and a Styrofoam cup? Are there other materials to make the buzzer louder?
Maybe you would like your program to do more when the timer signals. Try to make the buzzer get louder and louder the longer it is turned on, or customizing the tones it makes. Try turning on the blinkers or add some motor control to move the robot around. Your timer will be sure to get your attention right away!