07 Mission Instructions
| Site: | GoLabs |
| Course: | GoBox |
| Book: | 07 Mission Instructions |
| Printed by: | Guest user |
| Date: | Saturday, 4 July 2026, 10:07 AM |
Description
Your mission is to create a robot that counts how many times the lights are turned off and on each day for later analysis.
1. Problem
Electricity is an extremely valuable resource. It enables almost every aspect of modern life from staying up past sunset to charging our phones and laptops, and some cars even use electricity instead of gasoline!
While electricity is so helpful to modern life, however, it is not an easy resource to create - and some of the ways we do create it are particularly harmful to the environment. So it is important to be a responsible citizen when choosing how you use electricity. Some ways to be a responsible citizen are: turn the lights off whenever you leave a room, unplug your charging cords when they aren’t actively charging a device, and take advantage of natural light streaming through your windows.
Some people choose to create their own electricity using solar energy, or the energy from wind or water. In order to build an electric system that can generate enough electricity for your life, you’ll need to start with a self-assessment.
For this mission, you will create a robot that counts how many times the lights are turned off and on each day for later analysis. Your robot will be placed in one common room of your house to record the information for you to analyze later.
2. About Finite State Machines
As robots seek to solve more complicated problems, the computer programs that control them also need to become more complex. One big idea that programmers and engineers use to solve many problems is a finite state machine.
A finite state machine is a way of keeping track of a system using different snapshots over time. Your program will model a machine that changes its own state based on events happening around it (whether the lights are on or off).
The important thing to know about state machines is that they only notice if something has changed, not necessarily what exactly changed about it. So in the program we will write today, our program will look to see if the light sensor is receiving the same values as it was the last time we checked on it.
Fun fact: finite state machines aren’t just for light bulbs - they can also keep track of much more complicated inputs. A finite state machine might be the algorithm behind the spell check software on your computer or the artificial intelligence that controls the bosses in the game you have been playing.
Once you have completed this task, the sky's the limit — what else can you track with your robotic state machine?
3. Design
You have already completed many projects that use sensors to collect information about the world around your GoPiGo. So this time, we need to design a slightly more complicated program to respond to those sensors.
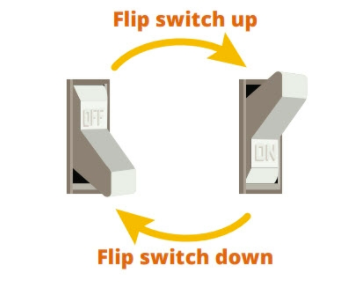
You already know how to write a program that does something when the light is on or off at the moment the GoPiGo checks the light sensor. This time, though, we need to write a program that constantly monitors the lights in the room and detects any change in their state: counting how many times the lights change from off to on and back again. We call this a state change.
Draw a state machine diagram for your design of this program on a piece of paper. Think about what the robot might be doing while the lights are staying in the same state.
Then, compare it to our diagram. Remember, your diagram doesn’t have to look exactly like ours to be right — there are many good ways to solve this problem.
4. Build
Setting up your GoPiGo for this project is pretty simple. If you are using a GoPiGo3, plug the light sensor into one of the I2C Ports and the LED into an Analog Digital port.
Secure both the light sensor and the LED (maybe with a zip tie) and decorate your GoPiGo in any other way that you would like.
5. Code: Initialize the Variables

Since we are using variables, we will be using Advanced Bloxter.
Just like the last time we used the light sensor, we need to find a threshold value by choosing a value of the light sensor reading that is between the value with the lights off and one with the lights on. You will need to write a program to check those readings and then choose your threshold.
Now let’s look at our diagram again. We need to keep checking the light sensor. Every time we check, one of four things will be true:
- The light was previously on and stays on.
- The light was previously on, but it was turned off .
- The light was previously off and it stays off .
- The light was previously off, but it has been turned on.
We need to know two things – what the light sensor sees right now, and what the light sensor saw last time we checked. For this, let’s create a variable called state. We are going to use state to keep track of the current state of the light. “Dark” will represent a dark room and “Light” will represent a light room.
We should always initialize our variables at the beginning of a program, so let’s start out by setting state to “dark” (assuming we start in a dark room). We need to make sure we do this before we start our repeat loop.
**We randomly chose “dark” as our “previous state”, which means the robot will be starting the program in either #3 or #4 of the list above.**
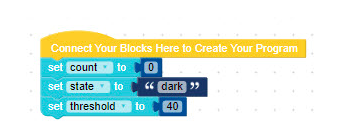
Create another variable for the threshold and set it to your desired threshold value. Last, create a count variable to keep track of how many times you turn the lights on.
Let’s add a repeat loop below our variables and choose an arbitrary length of time that we want to run our state machine. Since we’re still testing and iterating, let’s keep it short. Let’s say 20 seconds for now.
6. Code: State Machine
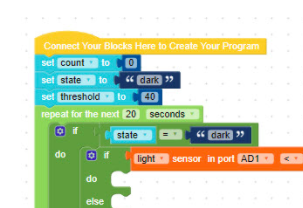
Then, we can use an [if-do-else] block to answer the first part of our question (was the light on or off before we checked the sensor). If the state is set to “dark” then…. (And we know that it *is* because we told the robot it was dark when we created the variable above!).
Now the robot will need to figure out whether it is acting based on #3 or #4 from the list of states above. That means the choices are:
3. The light was previously off and it stays off .
4. The light was previously off, but it has been turned on.
So we need to add an if-do-else block inside our first if-do-else block. If the light sensor reading is less than the threshold reading, then the lights stayed off. Let’s have our program print the sentence in number 3 above so we know exactly what is happening when we test our robot.
Otherwise (Else), print “the light used to be off, but it has been turned on.” AND we’ll need to change the state variable to “light” (because the lights are on now!).
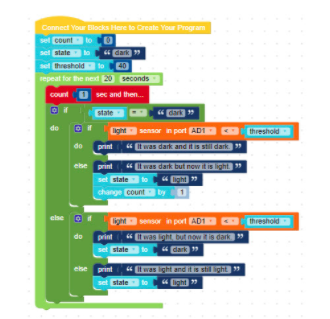
Now let’s copy that if-do-else block and paste it in the Else section of the larger if-do-else block. Time to change the sentences to match #1 and #2 above!
1. The light was previously on and stays on.
2. The light was previously on, but it was turned off .
Take a minute to read the program out loud and check that your print-outs make sense. Start from the repeat block and read down one at a time.
“If the state is dark, then the sensor reading is less than the threshold?” That means it was dark and it is still dark.
“If the state is dark, then the sensor reading is not less than the threshold.” That means it was dark and it is now light.
“If the state was not dark, then the sensor reading is less than the threshold.” That means it was light and it is now dark.
We’re building a state machine that should count every time the lights in the room change state, right? So that means we need to add in commands when we want the count to change. See if you can figure out where to put the change [count] by 1 block.
Now that we have a program that counts how many times the lights are turned on and off, we need to make sure it reports the number back to us at the end. How could you do that with a “print” command?
7. Code: LED Report Back State Changes
What if we want to provide feedback to people in the same room as the robot? They might be interested to know whether they are the first person to flip the light switch, or whether they are adding to a much larger pattern.
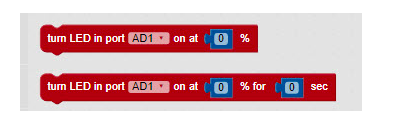
Let's use the LED to report back how many state changes occurred using blinks. If the lights were turned on 7 times, the LED should blink 7 times.
The blocks to control the LED are found under Actuators. Which one are you going to use?
Remember that you can use a variable in a repeat loop, so you can tell Bloxter to do something “counter” times. You will also want to think about how to turn on the light, wait (not long, maybe half a second?), turn it off, and then wait again. Use a count block to tell the program to wait for a specified amount of time.
8. Test
As always, before we test, we need to create a test plan. We want to test both the obvious behavior (if I turn the lights on three times, does the LED blink 3 times?) as well as the edge cases.
Including the edge cases means checking what happens at the very smallest and largest possible outcomes. What if you don’t turn the lights on at all? What if you flick them on and off really fast and many times? Which of these cases is the most important for your program to get right?
Create your test plan and then test!
9. Iterate
Once you’ve worked out any bugs you may have uncovered in your testing, it is time to expand.
Think about all the sensors and output devices you have already received with GoBox. Are there other finite state machines you could build? What else in your environment might you want to keep track of? How else could your robot communicate a result to the people around it?
Some ideas might include using the loudness sensor to record how often the noise level in a room goes above a certain threshold, or a distance sensor tracking how often a door opens or closes.
There might be a creative way to use the buzzer or servo alongside the LED to provide live feedback, too!
Create a plan to improve on this project or build a different finite state machine and then try it out.