08 Mission Instructions
| Site: | GoLabs |
| Course: | GoBox |
| Book: | 08 Mission Instructions |
| Printed by: | Guest user |
| Date: | Saturday, 4 July 2026, 5:58 AM |
Description
Your mission is to design a robot that can be the Traffic Light for a game of Red Light, Green Light. Then you can play alone or with your friends. To be successful, your robot will need to:
- Randomly change between two different colored LEDs
- Sense motion during a "Red Light"
- Declare when the robot wins or loses
1. Problem

Humans of all ages love to play games. Some games are brain games like puzzles, mazes, or sudokus. Other games are physical games like tag, relay races, or jumping contests. This mission introduces a game that requires a little bit of both.
Red Light, Green Light is a game that many students play in their classrooms and on the playground. One person is the Traffic Light. This person gives commands that control the traffic: either "Green Light!" or "Red Light!" Everyone else is in a race.
Whenever the Traffic Light is green, everyone tries to move as quickly as possible toward the light.
But when the Traffic Light is red, everyone needs to freeze. If the Traffic Light notices anyone moving during a Red Light, then those people are out of the game and have lost.
Your mission is to design a robot that can be the Traffic Light for a game of Red Light, Green Light. Then you can play alone or with your friends. To be successful, your robot will need to:
- Randomly change between Green Lights and Red Lights
- Sense motion during a Red Light
- Declare when the robot wins or loses
- The robot wins if it senses you moving during a Red Light.
- The robot loses if you successfully tag it by moving only during Green Lights.
2. Build

Remove any extra sensors, outputs and attachments from your GoPiGo and attach your motion sensor and distance sensor (from Mission 05: Service Animal) to the AD1 and AD2 ports (GoPiGo3). You’ll want to be sure both sensors are facing forward.
Use zip ties or other means to keep your cords nice and neat.
As usual, turn on your GoPiGo and connect to its Wi-Fi. Then type mygopigo.com into your web browser.
Use the dropdown on the Sensor Control Panel to select the motion sensor in the port it is plugged into (either A1 or A2).
The PIR motion sensor is a digital sensor which will return a boolean value of "true" or "false". On the Sensor Control Panel, this will be represented by the words "motion detected" or "motion not detected". Remember that the sensor is very sensitive, so you may see some positive readings that you don't expect -- look around for other sources of motion! Maybe you're being wiggly yourself?!
Try waving at your GoPiGo at lots of different angles - can you find any blind spots where the robot can't see you? Write down your observations so you remember to plan for them in your design!
3. Code: Start with the End in Mind!
Today we’re inventing a very playful robot, so let’s start with a fun warm-up. When a game ends, someone wins and someone else loses, but if it’s a fair game, then the winner and loser will not always be the same person. That means your robot will sometimes win and sometimes lose.
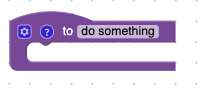
To keep our code clean and organized, we’ll create a special Function for when our robot wins and when our robot loses. Functions are available at the bottom of the list to the left of your programming canvas. Choose the to [do something] block and then type the name of that function. Make it something obvious and easy to remember. We chose robot_wins and robot_loses so we wouldn’t get confused about whether our robot was supposed to behave happy or sad.
How do you want your robot to celebrate when it wins? How will it let you know it lost, but be a good sport about it?

When you are ready to test your celebrations, simply attach your new functions directly to the yellow Connect Your Blocks Here to Create Your Program block!
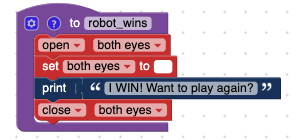
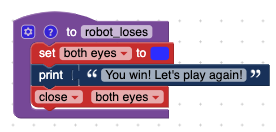
The sky's the limit for how simple or complicated your robot dances are. You might include flashing lights, blinkers, spinning around in circles, or even text printed on your computer screen. We chose a pretty basic dance for when our robot wins and loses: changing the eye color and then printing a short message on the computer screen. Feel free to use our example for your robot or invent your own.
4. Code: When to Win or Lose
Of course, now that you’ve designed the robot reactions to winning and losing, we’ll need to start building a game for the robot to play with you!
We’re still thinking backward for a minute: If the robot does not see you move when the light is red, then you win! And If the robot catches you moving when you shouldn’t be, then you lose.
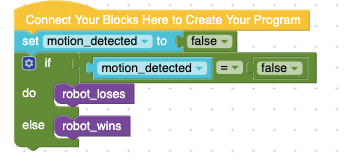
Because the most important thing to keep track of is your motion, we’ll create a variable called motion_detected and start the game with it set to false. It’s definitely not going to be a fair game if the robot thinks you’re moving before it begins using the motion sensor or distance sensor!
Then we’ll create the end-of-game conditional statement.
Feel free to fiddle around with this conditional statement.
What happens if you set motion_detected to true instead?
Keep it simple. We can always come back and tweak it later as we learn more about our game.

5. Code: Play the Game
In Red Light, Green Light, when the person who is the Traffic Light calls out, “Green Light!”, everyone starts walking, running, or hopping toward it as fast as they can. Then the Traffic Light calls out, “Red Light!” and everyone freezes. During a Red Light (which can be a super loooong red light, or lightning fast), if the Traffic Light catches anyone moving, wiggling, or falling over, that person is out and they’ve lost the game.
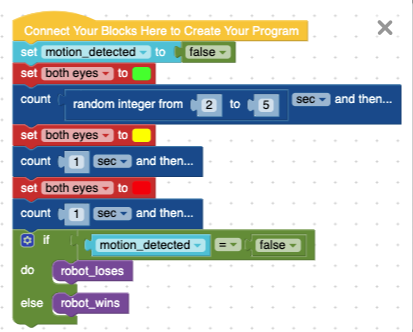
Today, you are creating a robot that is the Traffic Light. Your robot will need to signal to you when you are supposed to be moving (Green Light) and when you should be frozen (Red Light). How you do this is up to you, but we’ve included an example if you want to see what we came up with.
In our example, you might notice that we included a very short Yellow Light that’s not normally part of the human recess game. When we were testing the game in our lab, we were a little too slow at stopping our bodies for a Red Light. Building in the Yellow Light helped our human brains and bodies have enough time to react to the robot Traffic Light.
**Note: if you run your program right now, the robot will always lose! That is normal. We’ll start solving that problem in the next step!
6. What Makes a Game?, part 1
Right now, your robot can flash its eyes at you in several different colors, but that’s not the most exciting game. First of all, it only flashes each color once and then it stops, but secondly, it isn’t looking for you! A friend who doesn’t notice when you’re around is not a great friend to play with. So let’s start telling our robot how to look for us - and when!
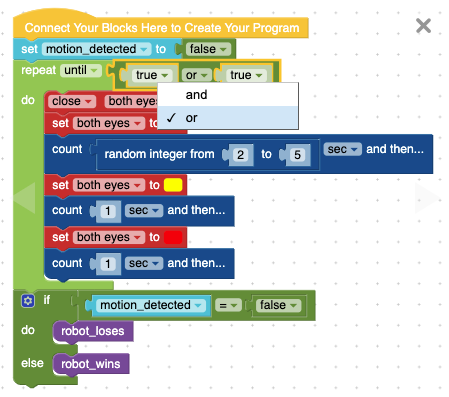
Most importantly, we want our robots to keep playing until either we win or the robot wins, so we’ll wrap our game commands from the last step into a repeat until loop. And the logic that we’ll need to add to that until… loop will need to have two possible ways to get out of the loop and end the game, so let’s grab the Logic block, [true] [and] [true]. Change the ‘and’ dropdown into an ‘or’. After all, only one person/robot can win. Whichever statements happens first will determine the winner.
Let’s start with how exactly you can win the game - and what your robot needs to do, too.
In Red Light, Green Light, if any of the runners tags the person who is it without getting caught during a Red Light, that person wins.
Which sensor can detect that you are close enough to the robot to win the game?
7. What Makes a Game?, part 2
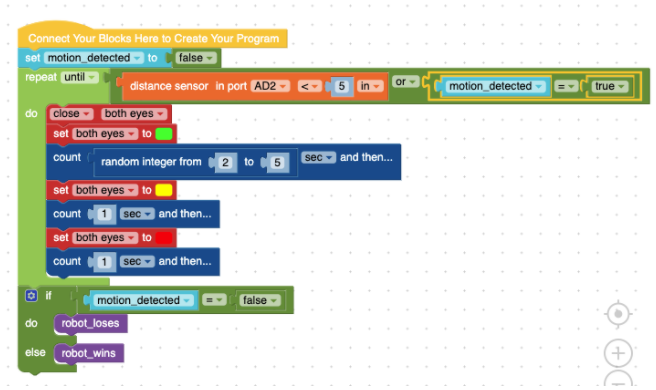
In the last step you noticed that the robot needs to use its distance sensor to detect when you’re close enough to win the game. Robots can’t detect anything unless they have a specific sensor to do so. Since we’re using a distance sensor for this mission, you can be very close to the robot without needing to actually touch it. We set our winning distance to be within 5 inches of the robot, but you can set your distance to be further or closer depending on your mood. You can even change the distance in between games to make them harder or easier to win!
Now, in order for the robot to win the game, it’ll need to sense you moving during a Red Light. Right now our program starts with motion_detected as false. So, for the robot to win the game, motion_detected would need to become true. That will be our second logic function in our Until… Loop.
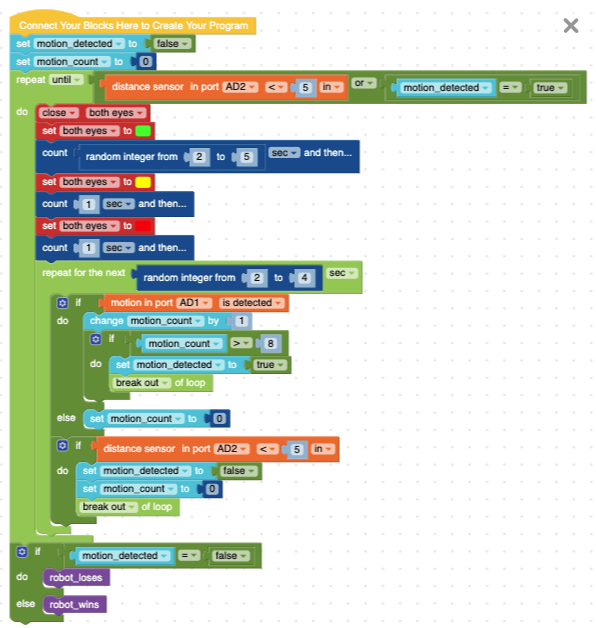
8. What Makes a Game?, part 3
You may have noticed, we still don’t quite have a game that works. We haven’t actually told our robot to look for us (still!) nor have we asked it to see if we are close enough to win the game!
Both of those tasks happen when the robot is in a Red Light status, so the next part of the code will slip right under the last Red Light command, but still inside the Until… loop.
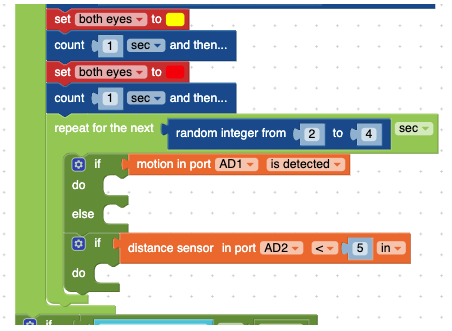
We’ll make this a short loop to keep the game interesting, but the most important thing to notice is that there are two separate conditional statements in this part of our code. One is about the motion sensor, which will help the robot win the game, and the other one is about the distance sensor, which will help you win the game!
IF motion is detected during the Red Light stage of the game, THEN something will happen.
IF the distance sensor notices you are close enough to win, THEN something will happen.
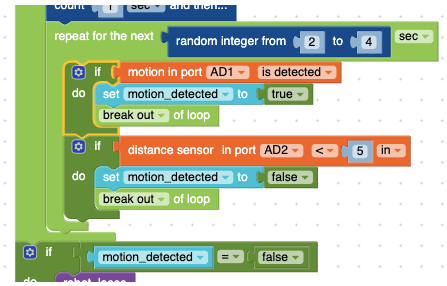
For both of these conditions, the robot will need to stop playing the game and immediately report whether it won or lost the game. So we’ll need to set motion_detected to either true or false and tell the robot to break out of loop so it stops playing the game.
Now, try playing the game. What do you notice? Are we done? Are there still some bugs we need to fix?
9. Fun and Fair Games are Best
If your motion sensor is anything like mine, that was a very disappointing game to play. I lost every single time!
If you had trouble winning your game, this step might be exactly the solution that you need. We want the motion sensor to be a little less sensitive.
Instead of detecting every slightest hint of movement, let’s ask it to count how many tiny movements it detects and if it counts high enough, THEN we’ll lose the game.
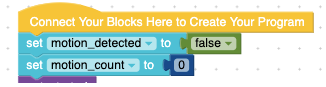
To do this, we’ll create a finite state machine like you did in Mission 07. Let’s name the new variable motion_count. Set motion_count to 0 at the very top of your program. Right next to the motion_detected variable.
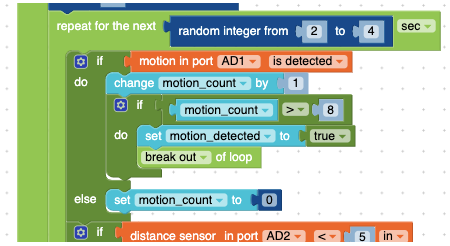
Then we’ll modify the motion_detected conditional statement. Instead of just detecting the slightest movement and immediately ending the game, when the robot detects a movement, it will count up by 1 (change by 1).
IF motion_count ever gets above 8, THEN it is fair to end the game and we’ll admit defeat. But IF motion is not detected, then we’ll get a pass and reset the count back to zero!
NOTE: Change your motion_count > [ # ] to make the game easier or harder to win. We experimented for a while in our labs. Some people enjoyed their game with a number as low as 3, others liked the game with numbers as high as 11! It all depends on how still you can be during a Red Light!
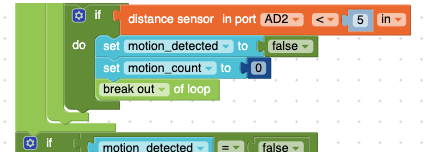
Finally, let’s really make sure this game is fair and we really stand a chance at winning, let’s also reset the motion_count back to zero even if the robot notices we won. It never hurts to be a little extra!
10. Test
Put your robot on a table, desk, or chair so it’s about the same height as your waist (this does not need to be exactly at waist height! It can be a little taller or a little shorter!).
Then Run Your Program, head across the room and try playing a couple rounds!
Check out some of our ideas about how to tweak your game in the next step!
11. Iterate
Now you can tweak your game to be the perfect amount of fun for you.
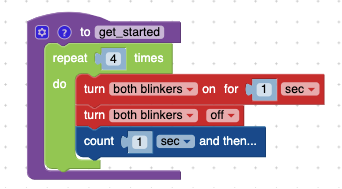
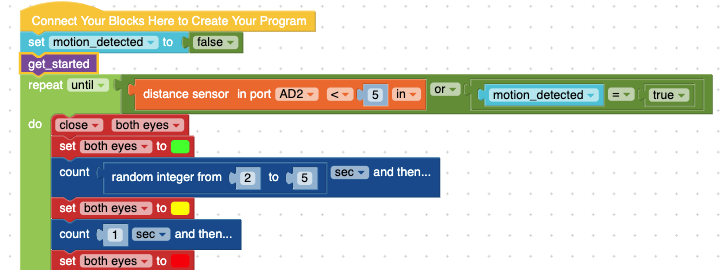
Having trouble starting the program but not having enough time to run across the room to actually play with your robot? Try creating a get_started function to give yourself some set-up time! Here’s an example of a get_started function and where it might fit within the overall code.
Want the game to be more difficult or a little easier? Change the motion_count for the motion port.
Want the game to move more quickly? Shorten the longest time in the random integer blocks!
Want more time between Green Lights and Red Lights? Lengthen the longest possible time in the random integer blocks!
Try changing how your robot celebrates wins and acknowledges losses. More dancing? More lights? Do you need to add a Buzzer or some LED lights that you received in previous missions?
*If you do decide to add a Buzzer or some LED lights to your robot, you’ll need to move your Distance Sensor to the I²C port and then plug the Buzzer or LED into the AD1 or AD2 port. Remember that you’ll need to update your code to tell the robot what you changed!