09 Mission Instructions
| Site: | GoLabs |
| Course: | GoBox |
| Book: | 09 Mission Instructions |
| Printed by: | Guest user |
| Date: | Monday, 27 July 2026, 12:02 AM |
Description
Your mission is to create a mobile emergency alert robot. Use a button as an input and a buzzer (or LED -- you choose!) as the output to deliver your mobile emergency message.
1. Problem
Humans have been searching for new and more efficient methods of communication for all of recorded history.
In the 1800s, the invention of the telegraph allowed people to send electric signals across greater distances than ever before. These telegraphs only allowed operators to send electronic pulses (like beeps or taps) — no voice or video calls for them!

In order to send useful information in this way, they invented Morse code, an alphabet made up of short and long pulses.
Even today, with many more sophisticated methods of technology, Morse code remains a simple way to communicate in emergencies. The short and long pulses can be transmitted as blinking lights, audio tones, or dots and dashes written on paper (or drawn in the sand on a desert island!). The code for SOS is recognized internationally.
If you want to learn more about Morse Code, here are a couple resources you might like:
Your mission is to create a mobile emergency alert robot. Use a button as an input and a buzzer (or LED — you choose!) as the output to deliver your mobile emergency message.
2. Design: Message

Before your robot can deliver a message, you’ll need to figure out what to say! Choose a short message — you could say your name, declare an emergency with an SOS, or just say hello. Use the Morse code chart to plan out your message on a piece of paper.
One example of a message would be if we chose to send GPG3 (for GoPiGo3). The Morse Code would be:
G dash-dash-dot
P dot-dash-dash-dot
G dash-dash-dot
3 dot-dot-dot-dash-dash
3. Design: Communication Method
Now that you have a message ready, you need to decide how you will communicate it. In our example, we will use the built-in robot eyes, but you could use short and long pulses of the buzzer, blinking LEDs, short and long movements of your robot, or anything else you can dream up.
Sketch the way your robot will communicate in Morse code on a piece of paper.
4. Build

To follow along with our example, you will need to attach the Button input into one of the Analog Digital ports and, optionally, the LED into the other Analog Digital port (GoPiGo3). If you are using a different output, make sure to plug it into the correct port.
You may also want to build other enhancements for your Morse Code robot — an amplifier for the buzzer, a trigger for the button to make it easier to push. Think about how you want your robot to function.
5. Code: Overall Structure
Since we will be using variables and lists you will need to go to Advanced Bloxter.
The morse code robot does two different main tasks. First, it listens to the Morse code that you tap into the button. It will silently listen to your entire message before it moves onto the next step.
Then, the robot will repeat back your entire message using the output you've chosen - we're using the built-in eyes in our code examples, but you might choose the LED from Mission 7 or the buzzer from Mission 6 - or something else entirely!
To do this correctly, we'll need to have the robot record your button presses into a list. Then we'll need to program the robot to read that list and act on what it reads.

So, let's start by setting up the overall code structure. Your code needs to include:
- Setting up a new list*
- Start the timer
- Setting up a new loop (let's use the repeat for 15 seconds loop for this program). This first loop will have a conditional statement nested inside of it where we'll fill in some details about whether the button is pressed or not.
- A command telling your robot to read over the list it made. (Hint: there will be another conditional in here, too, if you want a head start!)
Here is what our code looks like so far. Is it similar to what you designed?
*To set up a new list, you'll need to create a new variable and give it a name. The variable blocks are in the light blue section. Once you have created your new variable and given it a special name, it will show up as a block to choose in the menu! Ta-Da!
6. Record Your Message, part 1
Morse code is entirely based on time. Dots are the shortest option, and dashes are three times longer! When we are recording our Morse code message, we'll press the button quickly to represent a dot, and we'll hold the button down for nearly one second to represent a dash. Then we'll remember to pause extra long between each letter of our message.
If we want our robot to repeat our message back to us, it will need to have some data about how long each part of the message was. Luckily, the GoPiGo has a timer built into it, and we can write a program that tells the timer to reset every time the button changes from not pressed to pressed and back again.
To do that, we'll be playing with our conditional statement. Let's start by imagining what we're going to do:
First, we'll turn our robot on (but we won't be pushing the button yet).
Then, we'll push the button and reset the timer back to zero.
Then, we'll release the button and reset the timer back to zero.
And we'll repeat this over and over until our message is finished.
Since we don't need the timer to record anything between when we turn on the robot and when we push the button for the first time, let's start our conditional statement there.

If the button is pressed,
DO...
- Reset the timer.
- Wait until the button is not pressed anymore.
- Reset the timer again.
- Wait until the button is pressed again.
Here is what our program looks like. What does yours look like?
7. Record Your Message, part 2

Take a look at our example code below to see how we programmed this solution!
8. Sending the Message
Now it's time to decide how you want your robot to send the message it recorded. We are using the built-in eyes for our example, but you might use an LED or buzzer instead!
Since GoPiGo is produced by a company called Modular Robotics, whose team color is blue, we set our eyes to our favorite color: ModBot blue!
Then we create another state machine that's similar to the first one we made.

First, we'll create another variable, just like what we did for the list and set it to false. We named ours "LED_currently_on" so that we can keep track of whether we're telling the eyes to be turned on or turned off.
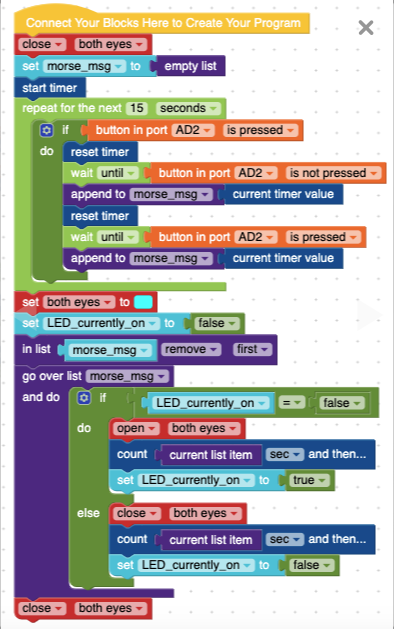
Then, we'll nest a conditional statement within the go over list command that we set up in the very beginning.
IF our variable is currently false (off), DO open both eyes, count for the current list item and then set the variable to true.
ELSE close both eyes, count for the current list item and then set the variable to false.
Optional: We chose to end our message with both eyes closed so it would be obvious when the message was completed, but you might choose something different! Maybe your lights change color? Or you launch a different actuator entirely, like a buzzer noise? It's completely up to you!
9. Test
You've already run your code a few times while you were writing it, but now try sending a few different messages! Play with your Morse code. If you have a friend or parent nearby, try tapping in your message and see if they can decipher it from your robot accurately.
10. Iterate
As you play with this fun robot, you might notice ways to improve your code. Do you want the robot to notice your message has ended before a full fifteen seconds have passed? Do you want to send your message with a different actuator - or use multiple colors of eyes or LEDs?
Maybe you want your robot to send the message twice so that your friend or parent can check their work?
Follow the same design steps - Design, Build, Code, and Test - for each change you want to make. Make sure you keep track of your work!
11. HINT: Reading the List
As you begin to iterate on your program, you might get curious about what exactly your robot is recording in its list. There's an easy way to find out!
Simply include a print command at the end of the first section to print all the values that were appended to your list!
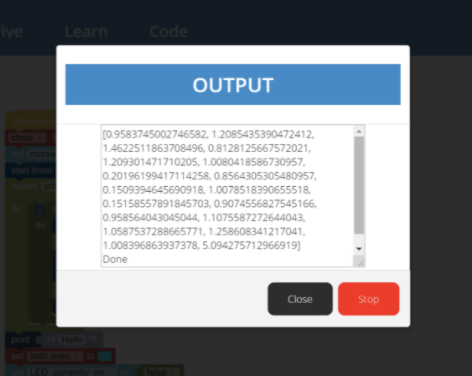
Run Your Program to see what the list looks like.
Our list was a little overwhelming. Look at all those decimal place value!!
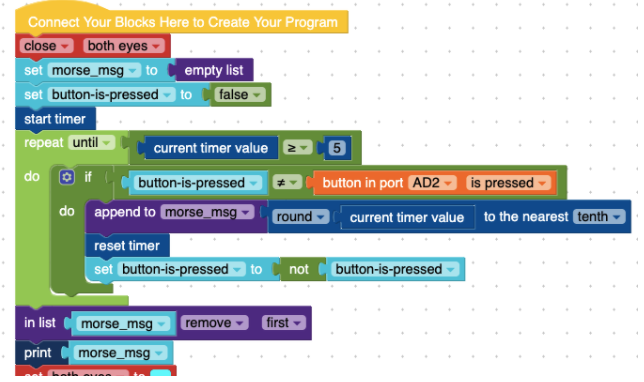
Good news - that's another quick-fix. In the Math Tab, simply choose the round to the nearest block - and then you can decide whether to round to the nearest integer (whole number), tenth, or hundredth.
If you notice the first number is wayyyy greater than the rest of the numbers, your robot is probably recording the time between turning on the robot and the first time you pressed the button. Since that is not part of your actual message, you might need to remove the first value from the list.
What did you create?
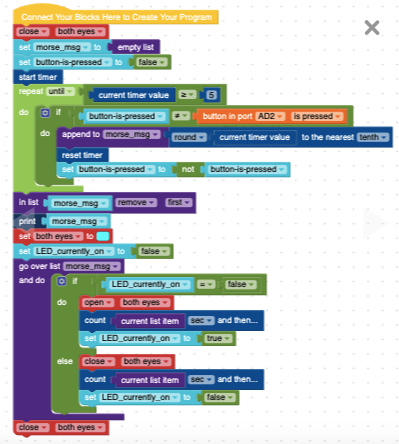
Here is an example of our code when we used the Print block, Round block, and we Removed the first value from our list!