10 Mission Instructions
| Site: | GoLabs |
| Course: | GoBox |
| Book: | 10 Mission Instructions |
| Printed by: | Guest user |
| Date: | Saturday, 4 July 2026, 10:50 AM |
Description
Your mission is to create a remote control car that won't get into an accident.
1. Problem
Today’s cars are equipped with many tools to help drivers and, in some cases, they can even be driverless! Some companies are even starting to test completely driverless cars in some cities.
In Mission 1, you already created a simpler version of a driverless car when you had your GoPiGo navigate through a pre-set obstacle course. That car wasn’t quite ready for the road and all its unpredictable dangers though. Ask an adult about their experiences while driving and how human drivers have to watch out for many different types of hazards.
Self-driving cars have to come equipped with lots of sensors and cameras so they can avoid any obstacle that stands in their way, like pedestrians or cyclists. This advanced technology is still being researched and is very costly. In the meantime, some car makers have developed models equipped with sensors that are meant to help their human driver, instead of replacing them. All car manufacturers are including these sensors in modern cars, but here’s one example of a car with many different built-in sensors.
This month’s mission will be to create a remote control car that won’t get into an accident. You will first build a simple remote control car that can go forward and back, and turn left and right based on key presses on your remote control. Then, you will add some logic and a sensor to it, so the robot can avoid collisions.
2. Design: Remote Control Functions
First, design your simple remote control car! Think about which buttons on the remote you want to use. One idea is to use the arrow keys to control the direction of the GoPiGo, and the OK key in the middle to mean Stop. But you don’t have to go with this approach. You’re the car builder and the car owner, so you can choose what you want!
Plan what you want each button to do on a piece of paper. Create a graphic organizer for the information like the one shown to organize the information.
Do you want to be able to control the GoPiGo’s speed? It will be a slightly more complex program to write, but not by much. Fill in the following table, describing what type of action you want the GoPiGo to take when the key is pressed. You do not need to plan an action for every key. Some will be unused and that’s fine.
3. Design: Sensor Placement
Where will you place the distance sensor on your robot? Will it be facing forward so your GoPiGo won’t run into the cat? Or will it be facing backward so your crawling baby sister can’t bump into it?
There’s only one distance sensor so you will have to choose.
You also have to decide how sensitive you want your collision avoidance system to be. If you choose a distance that’s too big, your GoPiGo might not move at all because of the threats of a collision. If you decide on something that’s too short, then there may not be time to avoid the collision. Plan on trying a few different distances before you are happy with your results.
Write down your plan on a piece of paper.
4. Build
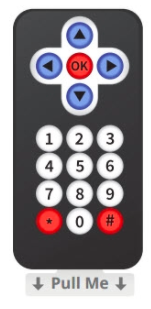
The first step is to activate the remote control. This is a battery operated remote, and there’s a clear plastic pull-tab that protects the battery. You need to remove this plastic tab by pulling it out.
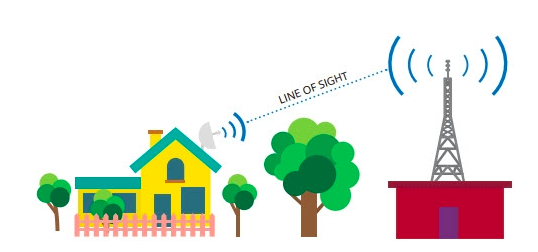
The IR sensor is a line-of-sight sensor, which means it needs to communicate with the remote in a clear path with nothing in its way. If you have any decorations on your GoPiGo, make sure they don't block the sensor.
Now, this line-of-sight concept is a bit deceptive because IR light can bounce off surfaces (like walls). Your TV remote is likely an IR sensor/remote too. You don’t have to point it directly at the TV for it to work, as the signal will bounce off various surfaces.
Warning: If you have a sibling or a friend with a GoBox subscription, note that both of the GoPiGos will receive the IR signals! They will interfere with each other and may cause some confusion or chaos.
Plug the IR sensor into either of the Analog Digital ports and attach it to the top of the GoPiGo.
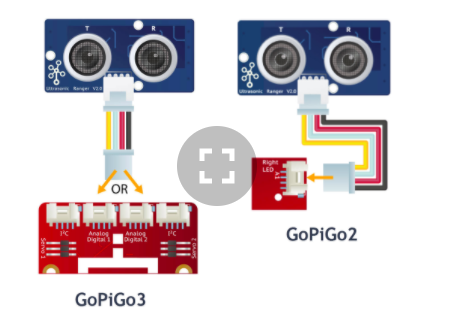
Plug the distance sensor into the I2C port and place it on the robot facing in whichever direction you decided in your plan.
5. Code: Control the GoPiGo with a Remote
This mission has two goals:
- To be able to control the GoPiGo with the remote controller,
- To enable the GoPiGo to avoid obstacles on its own.
We’re going to tackle each goal separately, then merge them together. Computer scientists call this approach a top-down design. It’s a helpful way to approach difficult programming.
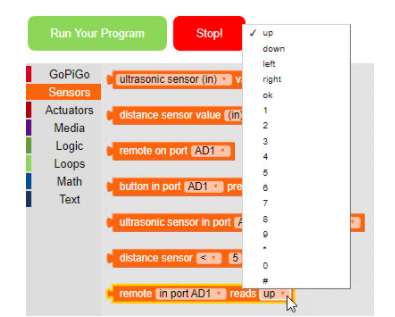
The first part of the project is to program the remote controller behavior so that it can move the GoPiGo forward and backward, left and right, based on the behavior you decided upon in the design section. Here are the inputs the IR sensor can take.
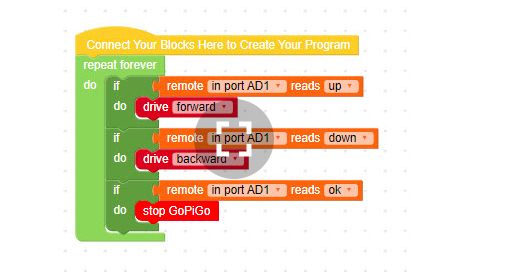
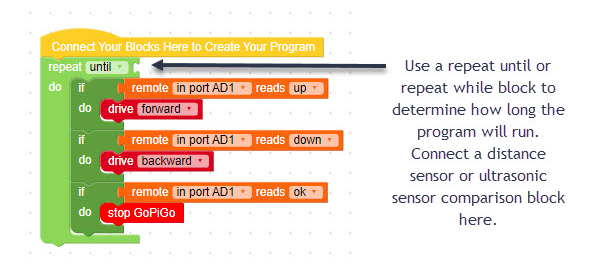
Now, you have to decide what kind of loop fits your project. Will the program run without interruption or is there a case where you want to stop it? Under what conditions? The sample program uses a repeat forever loop.
I will be using a:
- Forever loop
- Repeat until __________ loop
- Repeat ___________ times loop
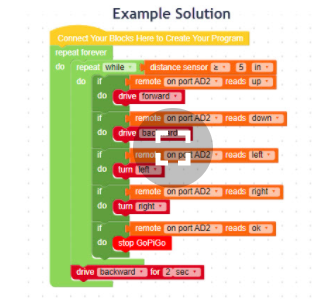
Once your remote controller is working as intended (forward and back, left and right), you’ve achieved the first goal and it’s time to turn your attention to the second goal! Note that the sample program is only programmed for forward, backward, and stop.
6. Code: Enable the GoPiGo to Avoid Obstacles
To address the second goal, let’s figure out what conditions are needed for the GoPiGo to avoid collisions.
- An object is detected ______cm away.
- The GoPiGo is going __________ (forward, backward, left , right)
- If needed: Other condition: __________________________________
Second, we need to decide on the GoPiGo’s reaction when these conditions are met. It might be as simple as stopping, but it might be backing up, turning around, or sending a distress signal. On a piece of paper, write down what your GoPiGo will do if an obstacle is detected.
The collision-detection code has two distinct parts: one decides if there’s a danger and the second decides what to do.
Take a look at the code you created so far. Where in that code could you add collision-detection?
What part of your code corresponds to the above conditions? Is there more than one place?
There is more than one way to achieve the same result. You may very well find a solution that’s different than the one shown below. As long as it passes your tests, you’re fine!
7. Test
What should you test for? You likely have two independent sequences. This implies two different test plans. First test plan, does the remote controller work?
Second test plan: check the behaviour of the distance sensor. How close is too close for comfort? Do a few test runs. For each one you will need to decide whether:
1) The GoPiGo was too sensitive, stopping too quickly, too far from an obstacle.
2) The GoPiGo was too tolerant, running into an obstacle, or stopping a bare inch from it.
3) The GoPiGo’s action was appropriate or not.
8. Iterate
Are you happy with the safety feature of your remote control car?
Can you come up with something else that might work too? Maybe you can try using the buzzer to give warning signals too. Big trucks have a buzzer when they back up. Some cars have audio signals to help with parallel parking. Can you make your car even smarter? Feel free to share your ideas with us!