11 Mission Instructions
| Site: | GoLabs |
| Course: | GoBox |
| Book: | 11 Mission Instructions |
| Printed by: | Guest user |
| Date: | Saturday, 25 July 2026, 8:25 PM |
Description
Your mission is to create a cookie delivery robot.
1. Problem
When someone from your family orders a toy from a big online store, this toy has to be taken off a shelf in a vast warehouse and brought to a packaging area before it can be shipped to you. This is actually a lot of work because those warehouses are huge!
To keep costs down and to allow the warehouse to be functional all hours of the day for next day deliveries, robots are beginning to be used to fetch items.
1) What will be the starting point where the cookie gets ‘loaded’ onto the GoPiGo?
2) What will be the ending point for the cookie to be delivered and presumably consumed?
3) How can you put a line on the floor for the GoPiGo to follow?
4) How can you code the GoPiGo to follow the line?
2. Design
You are going to have to plan your delivery route and there are many challenges to be solved.
Start by choosing your start and end points. Maybe your room isn’t on the same floor as the kitchen in which case there’s no way the GoPiGo can bring you cookies. Our trusty little robot can’t handle stairs yet, but it can probably go to a different room, like the living room.
Think about your home layout to decide with rooms you will be using for this. Keep in mind that carpets can pose a challenge, so choose a path that is on hard flooring like wood, or linoleum and maybe tile. If you are using a carpet, consider a creative alternative like braided yarn or rope that's a contrasting color to your carpet!
Once you have both the start and end points, you will need to trace the route itself. You have two options:
1) You can lay down some black painter’s tape on the floor but be careful as it may leave a residue behind! Get permission before you stick any kind of tape onto the floor.
2) Print out the PDF file with a route printed on it. If you print them on card stock paper, they are solid enough and will last long enough to complete the mission.
Assemble your route by connecting the sheets according to your plan, using transparent tape. The sheets allow you to create straight lines and turns as needed. You’ll need to figure out which sheets to print and how many of each. You don’t need to make a long line either, just a couple of feet is enough to complete the mission.
Cargo: Choose what you want your robot to carry. If you plan to use a real cookie, you need to design a protective shell to make sure no crumbs fall on the GoPiGo circuit boards. Do NOT plan on sending a glass of milk. Liquids of any type are a big no-no and can kill your robot.
It is also a good idea to keep pets away from the GoPiGo, especially if they want to grab the cookie!
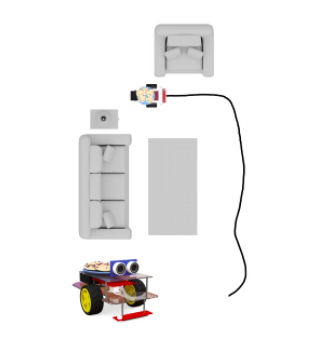
3. Build: Assemble the Line Follower
First, you need to assemble the line follower. For that, you will need a Phillips screwdriver.
Use the diagrams below to help you out (protective paper has been kept on the bumper so it’s easier to see). If you want, check out the directions on the Dexter Industries website.
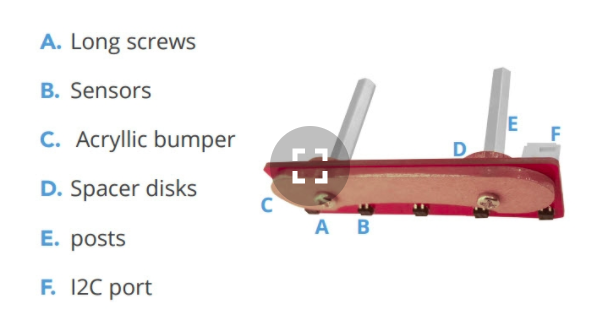
Insert the long screws from the side of the line follower that has the sensors to keep the acrylic bumper in place. On the other side of the line follower, attach the two spacer disks and posts. The port is already on that side of the line follower.
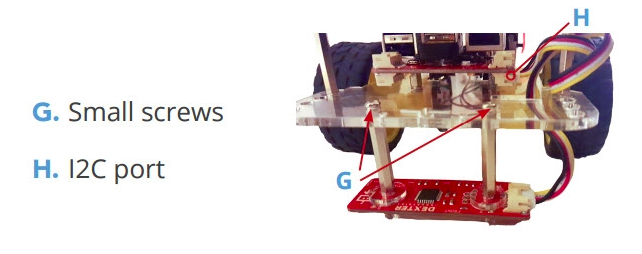
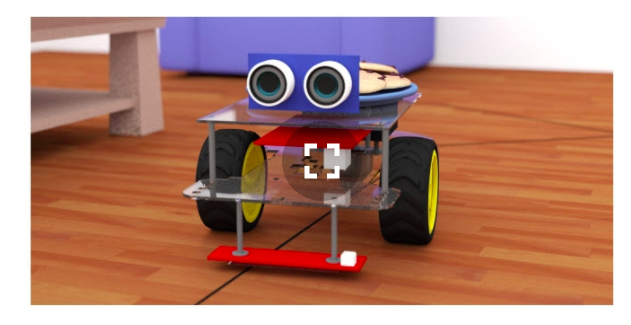
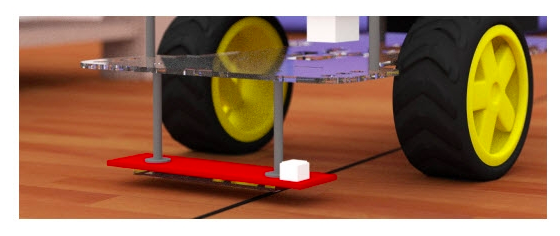
Next, you will need to attach the line follower to your GoPiGo. Use the two small screws to attach to the front of the bottom acrylic body. It’s important that your line follower is level, which means each of the five sensors should be at the same distance from the floor. Take the supplied cable and connect your brand new sensor to the I2C port, underneath the GoPiGo. A green LED and a blinking red LED will turn on when you power up the GoPiGo.
Check out the video for more help with assembly.
4. Build: Calibrate the Line Follower
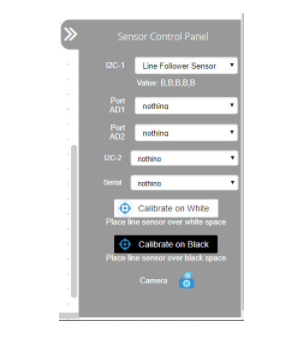
Finally, you need to calibrate the line follower. This sensor is sensitive to surrounding lighting conditions and needs to be calibrated each time there’s a major change in lighting. Use the drop down menu on the Sensor Control Panel for the I2C port that you plugged the line follower sensor into to choose the line follower. You will then see the calibration tools at the bottom of the Sensor Control Panel.
Place the sensor board over the black line so that all five individual sensors are over the line.
Click the Calibrate on Black button. When it is calibrated, it will say "Black line is calibrated" below the Calibrate on Black button.
Then, put the sensor board over white space, all five sensors should be over the white area. Click the Calibrate on White button. When it is calibrated, it will say "White line is calibrated" below the Calibrate on White button.
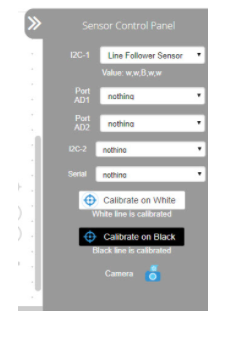
You can verify this by placing it centered over the black line, as if it was following it. When you look at the value for the Line Follower Sensor on the Sensor Control Panel it will read a value of five w's and/or B's. These values represent what each sensor is reading. A reading of w indicates that it is seeing white and a reading of B indicates it is seeing black. You should get either w,w,B,w,w or w,B,B,B,w depending on your line thickness.
The first picture below indicates that the GoPiGo’s line follower sensor is reading all black, and is not detecting any white at all. The second image below shows that the line follower sensor is reading centered over a black line.
5. Code: How does the Line Follower Work?
Before we attempt any code with the line follower, let’s have a look at how this sensor works.
Underneath the sensor, closest to the floor, you have five individual light sensors. They’re not quite the same as the light sensor we used before but they are similar. They will react differently if they are just above a dark surface or just above a light surface. Each one of them will detect whether it’s over white or black.
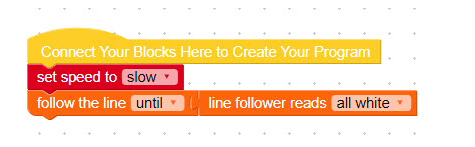
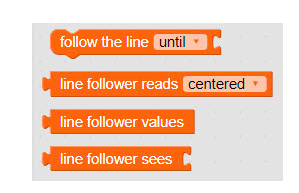
In Bloxter we can write a VERY simple program to tell our robot to follow a line. All we need is two blocks - one to tell the GoPiGo to "follow the line until" and another to tell it when to stop. In the example below the GoPiGo will stop following the line when the line sensor reads all white (there isn't a line any longer). The example program also includes one more block - "set speed to slow".
This helps to improve accuracy when following the line.
BUT, that is way too easy. You can use a simple program like the one shown below to test out your robot to see how it follows a line, however let's make a program that tells the GoPiGo what to do when the line follower senses that it is too far to the right or too far to the left.
6. Code: Create Your Program
Remember the last mission when the notion of top-down design was introduced? The idea is to take a big problem and break it down in smaller problems until we find something we can solve.
Our main goal is to have the GoPiGo follow our line from start to finish. How will that work?
Let’s take a look at what can happen when the GoPiGo is on a delivery mission.
1. The GoPiGo might veer to the left, in which case it should try to get back on track by shifting a little more to the right..
2. The GoPiGo might veer to the right, in which case it should veer a little left. (These first two points are almost the same. Once we solve one, we'll have the other solved, just in reverse.)
3. The GoPiGo might have to go around a curve. Good news - if your line curves, your robot will too. All we need to worry about is keeping the robot centered on top of the line.
4. The GoPiGo needs to know when it’s reached its destination at the end of the line.
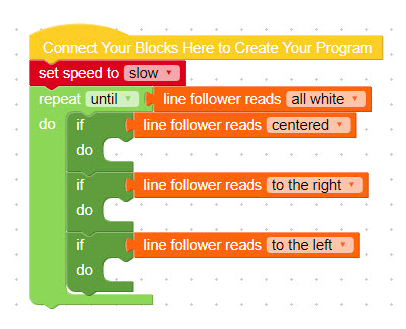
Write down how the GoPiGo should react to each of the following scenarios help answer the questions above.
If the line follower reads centered then _____________
If the line follower reads all black then _____________
If the line follower reads all white then _____________
If the line follower reads to the right then __________
If the line follower reads to the left then ___________
That top-down design approach is turning out to be very useful. When we break down the challenge into smaller parts, we can re-use the solution from one small part for another.
We need to keep in mind that following a line is precise work. To achieve this mission, the GoPiGo has to slow down.
Hint #1: Don’t expect the GoPiGo to stay exactly in the middle of the line at all times. It will waver from left to right. As long as at least one of the five sensors is on the line, the GoPiGo should be able to correct its direction.
Hint #2: Under which conditions do you want the GoPiGo to stop? How will it know it’s reached the end of the course? Maybe the end of the course is a black sheet of paper, so the GoPiGo will read black on all sensors, or maybe it’s a white sheet of paper? Make your decision and code accordingly.
Hint #3: What happens if the GoPiGo loses track completely? How do you want the GoPiGo to react?
7. Test
Run the test a couple of times. Is the GoPiGo able to reach the end multiple times in a row? If something goes wrong and stops the GoPiGo, can you figure out what it is?
Potential issues:
1. The line follower is not calibrated according to the current lighting conditions.
2. The lighting conditions vary wildly from one part of the line to another.
3. The GoPiGo is moving too fast and leaves the line completely.
There may be plenty of other issues that will interfere with your GoPiGo. You’ll need to keenly observe what’s going on when an issue arises. Testing is a skill that is highly valuable. Good testers have fascinating careers!
8. Iterate
Our cookie delivery service is pretty cool, but not very smart. Can you think up some ways to make it smarter? What if your bedroom door is closed? Can you add a sensor so it can detect the presence of an obstacle and ask for help?
The GoPiGo has to be able to return to its starting position for a cookie refill, however the person receiving the cookie doesn’t have access to a computer. Can you come up with ways for that person to send the GoPiGo back for more treats?
Using Advanced Bloxter you can also program individual sensors on the line follower sensor. Can you program the GoPiGo to travel the line with even more accuracy? Can you create a more intricate line for the robot to follow? Maybe one with intersections? How could you program the GoPiGo to navigate this new line by controlling individual sensors?