PA Designer Learn 1: The Notebook
| Site: | GoLabs |
| Course: | Robotic Challenges with Python and GoPiGo |
| Book: | PA Designer Learn 1: The Notebook |
| Printed by: | Guest user |
| Date: | Friday, 19 June 2026, 6:46 AM |
Description

This is the second challenge within the Robotics with GoPiGo and Python Curriculum.
Your task is to program your robot to alert a person with a hearing impairment to visiting house guests.
Learn how to use the Loudness Sensor alongside Jupyter Notebooks.
1. Connect
Power up the robot and connect to it from your browser over Wifi. In case you need to refresh your memory, you can go over how to do this from the first challenge.
Remember that the computer you use to connect to the robot will lose access to the Internet.
2. Loading a Notebook
For this challenge, you are provided with a template notebook called assistant.ipynb. To open this in Jupyter Notebooks, do the following:
Setting up the USB drive
- Connect a USB drive to your laptop.
- Store this file on your USB drive.
Transferring the notebook
- Plug the drive into a USB port on your robot.
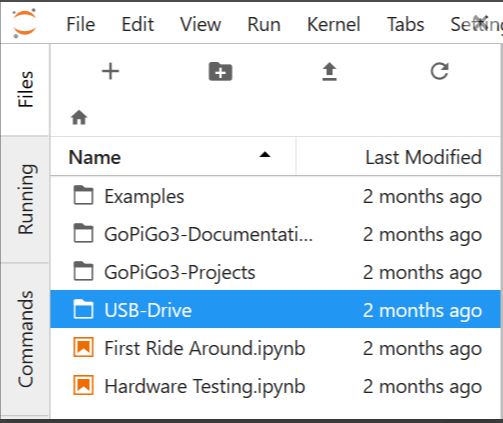
A USB-Drive folder will appear in the file explorer of Jupyter Notebooks.
Open the notebook
- Double-click on USB-Drive to open the folder.
- Double-click on the assistant.ipynb file to open it.
3. The Template Notebook
The assistant.ipynb notebook contains the following code cells. Some of them are pre-populated for your convenience, some are empty.
You will be writing the code for the empty cells.
Robot Setup Code
In challenge 1 you learned how to create an instance of the EasyGoPiGo3 class and name it. To give you a bit of practice, we’ll ask you to do the same again here.
Template Functions
You have been have provided with some pre-written functions. These will allow you to perform some of the challenge-related tasks without having to know precisely how they work. A description of these functions, along with some example usage, is provided in the markdown cells within the notebook.
Sensor Setup Code
In this challenge you will learn how to use our first GoPiGo3 add-ons; a loudness sensor and an LED. In this cell you will create instances of these objects and tell our code which ports you have plugged them in to so you can listen for the bell and light up the LED. Later in the LEARN section you will get some help to write the code for this cell.
Variable Initialization
You have been provided with a cell with an empty init() function where you can declare all your program’s variables and give them sensible starting values. This is known as initialization.
Why initialize?
Imagine you are playing your favorite computer game and it ends because you lost your final life. What do you think would happen if you started a new game and your life counter was not reset? Be wise. Initialize!
Main Loop
This is the cell where you will write your challenge code.
Data Analysis
Data analysis is the process of interpreting the meaning of the data you have collected in a table, bar chart, line graph, or other visual representation. You can use this cell to pass any data you have collected to a graph drawing function that have been written for you.
You can also display graphs from within the Main Code cell. However, putting the graph drawing code in its own cell makes it optional. If you want to see a graph after running the Main Code cell you simply select the Data Analysis cell and click on Run Selected Code. This is one of the great things about Jupyter Notebooks.

4. First Run
To ensure that we’ve run the robot setup and defined all the template functions, let’s run the template notebook now by selecting Cell >> Run All Cells from the Jupyter menu.
Don't expect anything to happen yet! We're just setting everything up.
5. WAKEY WAKEY, GOPIGO!
Let's create an instance of our GoPiGo, name this instance assistant and instruct our assistant robot to let us know that all is well.
Type the following code into the Robot Setup Code cell. Part of the code is already in there for you, you only need to enter the last three lines.
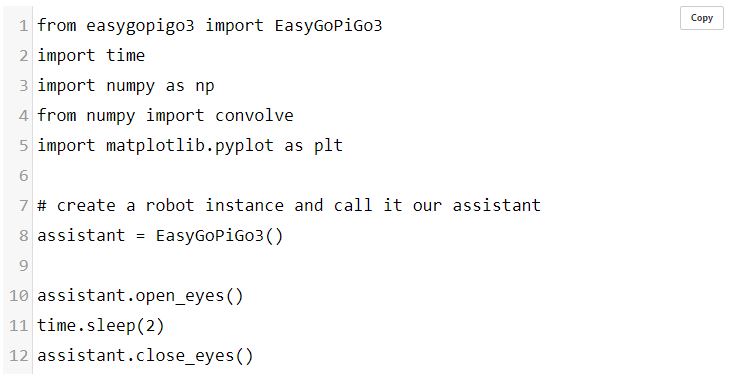
The eagle-eyed amongst you may notice that we’ve imported some additional class libraries here, specifically numpy and matplotlib. These will be useful for this challenge and they will be discussed further as they come to be needed.
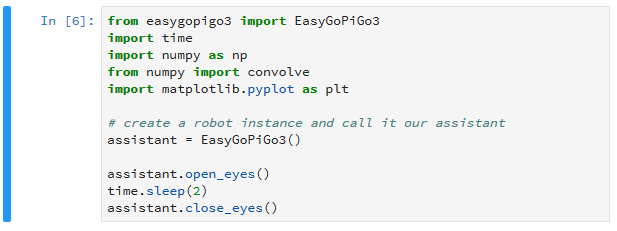
Let’s now test this setup code by running this cell. Click on the Run Selected Cells icon in the Notebook Menu. If all is well, you should see the robot open and close its eyes.
Note:
- the blue bar to the left of the cell that indicates this cell is currently selected.
- the number 6 in brackets [6]. Your number may vary depending on what else you have run before. This number lets you know in what order the cells have been run. Each time you run this cell, the number will increase by one.
6. Next Learn
If you got your robot's eyes to light up, you are ready for the next step in Learning!
Or you may want to go back to the Personal Designer Assistant main page