PA Designer Learn 2: LED and Loudness Sensor
| Site: | GoLabs |
| Course: | Robotic Challenges with Python and GoPiGo |
| Book: | PA Designer Learn 2: LED and Loudness Sensor |
| Printed by: | Guest user |
| Date: | Saturday, 25 July 2026, 7:18 PM |
Description

This is the second challenge within the Robotics with GoPiGo and Python Curriculum.
Your task is to program your robot to alert a person with a hearing impairment to visiting house guests.
Learn how to use the Loudness Sensor alongside Jupyter Notebooks.
1. Build: Connecting the LED
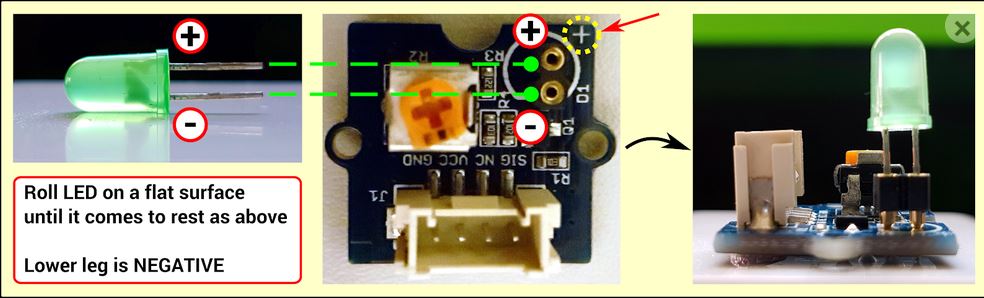
LEDs only work if electricity passes through them in the correct direction. Insert the LED into the LED board with the positive leg of the LED in the hole marked +.
2. Build: Setting up the loudness sensor and LED
Let’s plug our loudness sensor and LED into the robot’s controller board using the cables provided. The GoPiGo3 has a number of ports we can use. In this challenge we will use the Analog Digital 1 port (AD1) for the LED and the Analog Digital 2 (AD2) port for the loudness sensor.

3. Code: Instantiation
We are now ready to create instances of the sensor and LED classes and give them the names loudness and led for ease of reference later on. Type the following code into the code cell labelled Sensor Setup Code in the template notebook you have just uploaded.
Fill the Sensor Setup code cell:
# initialize loudness sensor object (attached to Analog Digital 2)
loudness = assistant.init_loudness_sensor("AD2")
# initialize LED object (attached to Analog Digital 1)
led = assistant.init_led("AD1")
# set the LED’s starting state to OFF
led.light_off()
The EasyGoPiGo3 class library contains init_ functions for many add-ons (e.g. init_led()). These functions create an instance and do a lot of the hard work of initializing important add-on settings for us. All we have to do is say which port we have attached the add-on to.
4. Test: LED
To test the LED, let’s write some code to flash it on and off a number of times. In the Main Code cell of our notebook, type the following code:
Main Code cell:
for i in range (1,5):
    # turn on LED at maximum brightness
    led.light_max()
    time.sleep(0.5)
    # set LED to 30% brightness
    led.light_on(30)
    time.sleep(0.5)
    # turn LED off
    led.light_off()
    time.sleep(0.5)
Click on Run Selected Cell.
This demonstrates the range of functions that you can use to switch your LED on and off and adjust its brightness in a range from 0 (off) to 100 (maximum brightness).
You might also recognize the for loop and time.sleep() instruction from Challenge 1.
5. Troubleshooting the LED
Did you see the LED flash on and off?
If not, check all of the following and re-run your code:
- Have you plugged the LED board into the Analog Digital 1 port?
- Does your code initialize the LED using port “AD1”?
- Are both ends of the connector cable fully inserted?
- Is the LED seated with the positive leg in the hole marked (+)?
- Is the LED fully inserted? (see image above)
If you still see no flashing LED, you could have a faulty LED. Try swapping your LED for another one.
6. Test: Loudness Sensor
To test the loudness sensor, let’s write some code to repeatedly take sensor readings for 10 seconds, reporting the values read as we go.
To help with this task, we have provided you with an elapsed_time() function. This measures the time difference, in seconds, between the moment that it is called and a reference time stored in a start_time variable. We need to declare this start_time variable and initialize it when we start our program by assigning the result of a time check to it.
There is an empty function in the Variable Initialization cell, called init(). Except it's not entirely empty! It has the keyword pass, which is just a placeholder for future code. Remove that pass keyword.
Within the now empty init() function , type the following code. We won’t run this code just now. Instead, we will be inserting a call to this function at the start of our Main Code cell to set everything up every time we run that cell.
Variable Initialization cell:
def init():
        # declare global variables that will be used by our program
        global start_time

        # perform a time-check at the start of our program
        start_time = time.time()
7. Global Variables
When declaring variables within a function, temporary variables that are invisible to the rest of your code will normally be created. Every call to that function generates a new set of temporary variables. If we want to create, read or update a variable that persists across the lifetime of the program and is usable by all the program’s functions, we need to declare that variable to be global.
8. Test: Loudness Sensor
Now we’re ready to code up the sensor reading loop. We no longer need the code that we wrote to test the LED so
- let’s clear this code from the Main Code cell.
- Now type the following code into it
# perform all variable declaration and initialization
init()

# repeat the following instructions for 10 seconds
while elapsed_time() < 10:
    print (f“Loudness = {loudness.read()}”)
    time.sleep(0.02)
Click on Run Selected Cell.
If everything is in order, you should see a stream of loudness readings displayed below the code cell (your numbers will be different):
Loudness = 171
Loudness = 126
Loudness = 314
If you don’t get any readings, run through the troubleshooting steps, noting that we are using port “AD2” for the loudness sensor, and try again.
- Have you plugged the Loudness Sensor board into the Analog Digital 2 port?
- Does your code initialize the Loudness Sensor using port “AD2”?
- Are both ends of the connector cable fully inserted?
9. WHILE loops
To test the loudness sensor, we repeatedly read our sensor using a WHILE loop.
Where a FOR loop repeats a set of instructions a fixed number of times, a WHILE loop repeats those instructions for as long as a condition remains true.
In the test code above, when the program has been running for 10 seconds the elapsed_time() < 10 condition will no longer be true and we will stop looping.
10. Print
One line of the code does a lot of the work:
print (f"Loudness = {loudness.read()}")loudness.read() is a loudness sensor class library function. It gives us a number that represents the loudness of the environment, as measured by the sensor.
The print() function uses what is known as an f-string (or formatted string) as its argument. An f-string is identifiable by having an f before the quote marks.
f-strings are different from normal strings in that they can contain variables or the results of function calls. These are marked by curly braces { }. In this case, reading from the loudness sensor {loudness.read()} is inserted directly into the string to be written into the notebook.
11. Next Step
You are now ready to move on to the next section. What can we do with those numbers from the loudness sensor?
Find out more in the PA Designer Learn 3: Data Analysis section.
Or you may want to go back to the Personal Designer Assistant main page