Stories from Code (Gr. 3-4)
Students will write a short fictional story including a characters, setting, a problem, and a solution to coincide with code written for a robot. Students will read their fictional story while the robot acts out the events.
Setup
- Copy student handouts *Three versions of the example programs are included. Determine which handouts match the needs and experience level of your class. There are also two versions of the planning sheet. **
- Download example Bloxter programs (https://drive.google.com/drive/folders/0BwKeDBXg69qrWVBaeTdaWWhiVTA?usp=sharing) onto a USB flash drive. After putting the files on the USB flash drive, plug the USB into a GoPiGo robot. When reviewing the programs with the class (step 3), you will be able to run the programs.
- Note: a writing rubric is included in the student handouts
Introduction
- Ask the students what they do before they begin a piece of writing (plan). Ask students to share different ways they plan to write a story (web, list, etc).
- Show the students a picture book of your choice. Ask the students what is included in the book (written story with a beginning, middle, and end, pictures, etc).
- Tell the students that they are going to write a story, but instead of planning with a web or graphic organizer, they are going to use code. Tell the students that instead of illustrating the story they are going to use the code to tell a robot to move around to show what is happening in the story.
Analyze Code
- Ask students, what is code? Code is a set of instructions for a computer (https://www.merriam-webster.com/dictionary/code). If the students are not familiar with programming the GoPiGo robots in Scratch, give them a copy of the “Scratch Block Student Reference Sheet” handout to use as a resource during the class discussion.
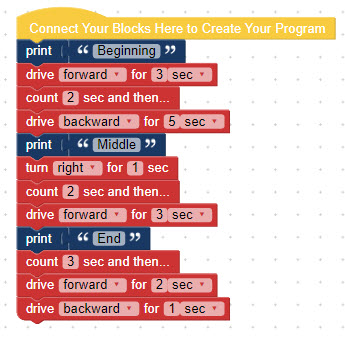
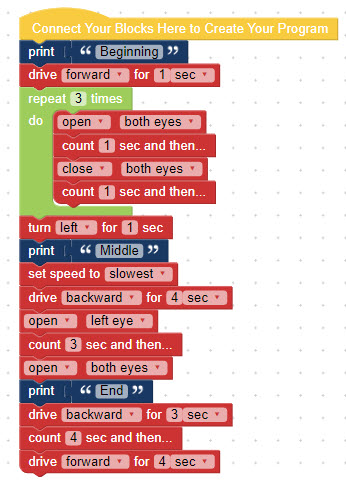
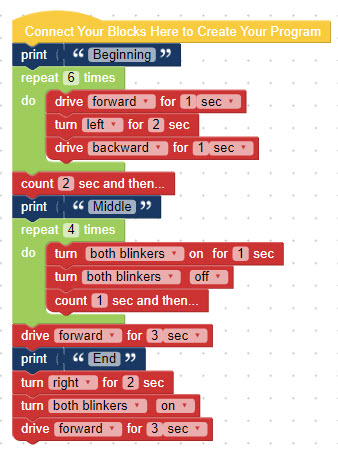
- Project the student handout “Stories from Code: What Will the Robot Do?” Tell the students that they are going to look at sample code and then determine what the robot will do in each scenario. **There are three examples. Use one or all of them depending on student understanding of using Bloxter to program the GoPiGo.**.
- Review each script with the students and write down what the robot will do at each step. After students tell what will happen, run the script and see if the GoPiGo moved as expected.
Write A Story
- Tell the students that they are now going to write a story to go with the scripts. Students could do this as a class, in small groups, or individually. Project “Stories from Code: Story Practice (Example 1)” for the students. Ask the students to identify a main character and setting. Then, ask them to create a story to go along with the code that is already written. An example is shown below. **There are three different story practice examples to use depending on student need. Students may have difficulty moving away from something such as "The [main character] walked forward for three seconds and then stopped." Encourage them to leave out the specific amount of time and think about why the character may be moving that way and where they might be going. Ask them, is it a short amount of time or long amount of time? **
- Tell the students that they are now going to plan their own story by writing the code for their robot. If student access to computers and/or GoPiGo robots is limited, students will plan their code on paper before programming their robot. Two graphic organizers are included in this lesson plan: one with a template for students to fill in boxes that look like Bloxter blocks and the other that is blank for students to have more freedom with their coding. If needed, students may write their programs when not conneccted to a robot on http://www.bloxter.com/. If students write their program on Bloxter.com, they should save the program onto a USB jump drive. Then, they will plug the jump drive into one of the USB ports on the GoPiGo robot. After connecting to the GoPiGo, click on Code in Bloxter. Then, click on File --> Open and choose the file from the USB drive.
- Once students have completed their plan, they will write their story based on their plan. A graphic organizer is included that breaks down the story into the beginning, middle, and end.
- Students will then edit and revise their story. Students will ensure that the events in their story are in a logical order and coincide with their code.
- Students will program their GoPiGo robot to follow their planned code (if they were not able to do so earlier). Students will run their scripts to make sure that they align with the story.
- Students will write or type their final drafts.
- Once students have finished writing their final drafts, they will connect to their GoPiGo and run the scripts for their story. The students will practice reading their story out loud while their GoPiGo is running.

Conclusion
- Students will present their stories to the class or small group by reading the story out loud while the GoPiGo runs the scripts they wrote.
** A writing rubric is included at the end of the student handouts.
Last modified: Thursday, 5 November 2020, 9:45 AM