Learn 2: Build and Calibrate
| Site: | GoLabs |
| Course: | Robotic Challenges with Python and GoPiGo |
| Book: | Learn 2: Build and Calibrate |
| Printed by: | Guest user |
| Date: | Tuesday, 16 June 2026, 6:06 AM |
Description

This is the fifth challenge within the Robotics with GoPiGo and Python Curriculum.
Your task is to design a robot program to deliver a selection of mail to the residents of GoPiGo Drive, a small cul-de-sac containing 3 houses.
Learn how to how to use and calibrate the color sensor.
1. Attach the Line Follower
We’ll be using the line follower from the Robot Operations Manager mission again. Let’s attach it to our robot if it's not already there from our previous mission.
You can refer to Ops Manager Learn 2: Build and Calibrate if you need a reminder.
2. Attach the Color Sensor
In this mission we will use color to represent addresses. Our courier will identify house addresses by reading color markings on the road.
Let’s mount a color sensor :
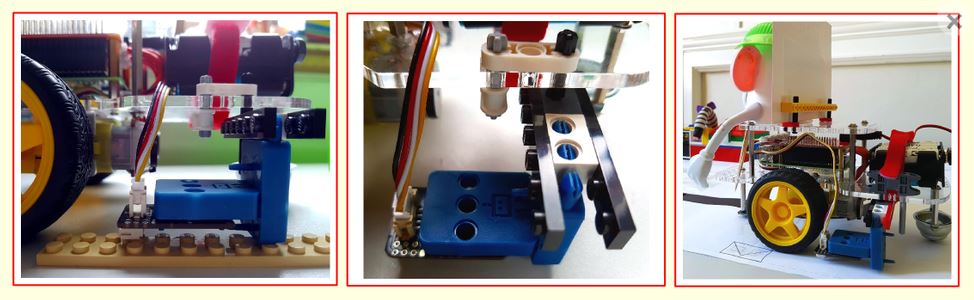
- on the side of our robot, just behind the wheel and facing the floor,
- with the color sensor less than half an inch (1 cm) off the floor.
- Using the supplied connection cable, connect the sensor up to an I2C port on the front of the robot.
You will need to come up with a method of mounting the sensor that works for you. A combination of sensor mounts and LEGO blocks is good for this. However, you can also make one with craft materials if you prefer. We’ve provided images of a LEGO-based example below to give you an idea.
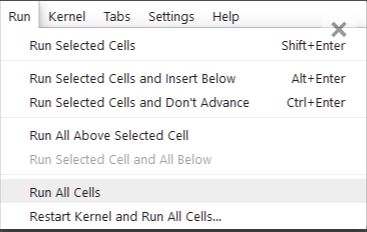
3. Run All Cells
Before we start adding code, you can run all cells in order to activate the scaffolding code that is provided.
4. Instantiating
We are now ready to create instances of the line follower and color sensor classes and give them the names line_follower and color_sensor for ease of reference later on.
# initialize the light & color sensor (attached to an I2C port)
color_sensor = courier.init_light_color_sensor(led_state = True)
# initialize the line following sensor (attached to an I2C port)
line_follower = courier.init_line_follower()
Type the above code into the Sensor Setup Code cell in the template notebook and select Run Selected Cell to set up your sensor.
- Run this cell right away.
5. Testing the sensors
Let’s write some basic code to test that everything is set up correctly and works as expected and also learn a little about using the color sensor. To do this, we will write a couple of simple functions that we will trigger from button presses in the Interactive Control Code cell.
- Create a new code cell immediately below the Sensor Setup Code cell.
- Type the following function definition code into this cell.
- Declare these functions by clicking on Run Selected Cell in the notebook menu.
def test_line_follower():
global line_follower
print(f"POSITION OF LINE = {line_follower.position()}")def test_color_sensor():
global color_sensor
(red, green, blue, clear) = color_sensor.safe_raw_colors()
print(f"R={red:.2f}, G={green:.2f}, B={blue:.2f}, C={clear:.2f}")We have used function calls like these before when testing the line follower in the Robot Operations Manager mission. To recap, all we are doing here is reading sensor values and writing them into our notebook. The use of f-strings allows you to place function calls and variables directly inside the string so their values can be printed as part of the string.
We’ll skip over the line follower test function as you should be familiar with that from the previous mission.
Let’s look at the color sensor test function. The safe_raw_colors() function is a color sensor class library function. This reads the sensor and returns a list of values, in the range 0-1, that tell us how red, green, blue and clear (intense) the color is that the color sensor is facing. The higher the number, the more pronounced that color or intensity is.
We read the sensor values into a set of variables and then write those variables into the notebook.
The :.2f after every variable is simply a formatting instruction that says “print this value as a float to 2 decimal places”.

6. Testing with the Click of a Button
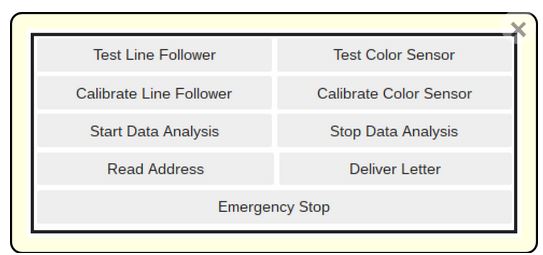
- Scroll down to the Interactive Control Code cell.
Directly underneath this cell you should find the following clickable button panel displayed.
7. About Clickable Buttons
If you want to see how the clickable button panel works, take a look at the first Extension:

8. Test the Color Sensor
Let’s now test our sensors.
We have designed a color calibration sheet for you to use in this mission. Print one off and place the robot on top of it, with the color sensor above the red square, as shown in the picture above. Click on the Test Color Sensor button. You should see output like that shown below (your numbers will be different):
R=0.17, G=0.07, B=0.08, C=0.28
Write your numbers down in the boxes provided under the red square on the calibration sheet. Repeat this exercise for the green, blue, black and white boxes.
Can you spot any patterns in the values that are reported?
When is the clear value lowest and when is it highest?
Which non-clear value is highest for each of the colors in turn?

9. Test the Line Follower
- Place the robot on a printed straight line template sheet with the black line somewhere below the line follower, as shown in the picture.
- Click on the Test Line Follower button.
You should see output like that shown below (your position value may be different).
POSITION OF LINE = left
If both of the above tests resulted in output messages as expected then everything is working as expected and you can skip the next section and move on to the experiment section.

10. DEBUG
If there is no visible response to the button clicks:
- Check that your test code matches that printed above, paying special attention to the function names.
- Make sure that you have made your robot aware of your test functions by selecting your test function cell and clicking on Run Selected Cell before clicking on the buttons.
If you observed any error messages:
- Use what you have learned in previous missions about debugging code to fix your code and try again.
- You can look back at previous missions for debugging advice if necessary.
11. Next Step
You are now ready for the next session: Courier Learn 3: Create Your First Class.
Or you may go back to the main lesson: Autonomous Mail Courier.