Learn 2: Classes and Instances
| Site: | GoLabs |
| Course: | Robotic Challenges with Python and GoPiGo |
| Book: | Learn 2: Classes and Instances |
| Printed by: | Guest user |
| Date: | Thursday, 19 February 2026, 9:52 PM |
Description

This is the first challenge within the Robotics with GoPiGo and Python Curriculum.
Your task is to program your robot to navigate an area of previously unseen terrain to reach its destination, passing through a number of waypoints.
1. Classes and Instances
To make things really easy for us we can instruct our robot using functions that have been written for us in a class library. These functions will result in robot actions such as moving and turning.
What is a class library?
A class library is a blueprint for creating objects of a specific type (e.g. cars) and describing their properties (e.g. make, model, color) and the things that they can do (e.g. drive forward). It tells us what we can instruct the object to do and usefully hides all the complicated details of how it does it from us.
For example, to drive a go-kart the driver doesn't need to know how the steering wheel and pedals are connected to the motor and wheels in order to make it move. They just need to know the effects of the motion of the steering wheel and pedals and how to use them.
What is an instance?
To work with an example of an object we use a constructor function to create and name an instance of a class and instruct this instance using the functions defined in the class library. We can create and use many instances of a class in our code at the same time if we wish. Just imagine what you could do with a whole army of robots at your command!
2. Wakey, Wakey GoPiGo
Let's create an instance of our GoPiGo that we can instruct using the class library functions available to us.
Open a new notebook.
You will be presented with a single empty cell that you can type into. This is highlighted with a blue border and you will see a blinking cursor inside it. This tells you that the cell is selected.
Type the following code into the cell:
The first two lines import easygopigo3 as easy and import time are used to tell our program we will be using functions from the easygopigo3 and time class libraries. Since easygopigo3 is long to type we are giving it a nickname: easy.
The third line orienteer = easy.EasyGoPiGo3() tells our program we are creating a robot orienteer instance using the nickname we gave to the easygopigo3 library. Our robot will answer to the name orienteer.
The last line orienteer.open_eyes() tells our orienteer robot to wake up and open its eyes!
To summarize:
- easygopigo3 provides us with functions to interact with the GoPiGo3 robot.
- time provides us with time-based functions. Later on, we will use this to pause the robot.
- EasyGoPiGo3() is a constructor function for the easygopigo3 class library. This creates an instance of an easygopigo3 object.
- Let’s name our robot within the code. In programmer speak, this means that we assign the instance to a variable that we have called
orienteer. This is our robot orienteer that we will instruct. - To instruct our robot orienteer we simply call its name and give it an instruction. In this example, we are instructing our robot orienteer to open its eyes.

NOTE
It is important to note that there is a period (.) in between the robot’s name and the open_eyes() instruction. This is important. This acts like spaces do for us humans. Imagine how difficult it would be for us to understand written text iftherewerenospaces. Be kind to your robot orienteer. Use periods. Period! 😉
3. Wakey, Wakey Run
Let’s now run this code.
- Select your code cell
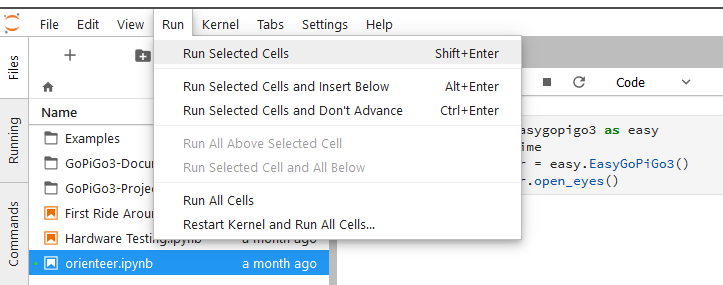
- Go to the Jupyter Menu, click on Run and select Run Selected Cells (you can also run your code by clicking on the Run Selected Cells icon in the Notebook Menu or typing Shift+Enter).

What do you see happen?
By instructing the robot orienteer to open its eyes we are testing that our robot instance has been correctly set up. Without the correct set up, the eyes won’t open. If you see the eyes light up, then we’re good to move on. If not, or you see an error message appear in a pink box under the cell that you’ve run, check that you’ve typed the above code exactly as shown and re-run the cell.
4. Functions and Arguments
So far, you’ve learned how to instruct the orienteer using commands such as orienteer.open_eyes().
What if we wanted to tell the robot to drive forward a particular distance, say, 50cm? Well, as it happens, we have an EasyGoPiGo3 class library function for that:
Notice how this function has a value inside its brackets where open_eyes() didn’t.
With this type of instruction, the function name identifies the action to be taken (driving forwards a set distance, measured in cm) and the number inside the brackets identifies how the action should be performed (in this case, the exact distance to travel).
You can think of this type of instruction like an English instruction, with the function name being the verb and the value in the brackets acting like an adverb. Can you see why the open_eyes() function doesn’t need any values in its brackets?
NOTE:
In the computing industry, any values that are supplied to a function inside its brackets are often referred to as function arguments.
5. Ready for More?
You are now ready for the next Learn step:
Or you might prefer to revisit the main mission page.