02 Mission Instructions
5. Code
Before you can code, you need to connect to your GoPiGo. Once you are connected to your robot, click on the "Code in Advanced Bloxter" button. 
Our first prototype is going to lead the handler (you) forward until the robot gets too close to an obstacle. Then, the robot will stop. We’ll help you get the code started, but it will be up to you to figure out how far away the robot should stop from the obstacle.
There are a few different ways to give this command to the GoPiGo.
First, there’s actually a single block that can create this behavior.Look for the red drive [forward] [while] block. Change the [while] to [until].

Notice that the drive forward until block requires a true value. We will need to overwrite that default true block with a block reading the distance sensor but will also give us a true or false and not a number.

Take the distance sensor in port [I2C] < [5] [in] block and drag it so it falls into place where the default [true] block is.

If you use that block, all you need to do is tweak the distance that the robot stops before it gets to an obstacle. You can change the distance to what you want, and you can also switch to metric if you are more comfortable.
But if you want the most flexibility (think: blinking lights, or rainbow lights), you’ll want to choose a repeat [until] loop. It’s a green block. You can still use the repeat [until] loop, even if you don’t put anything inside of it. It sounds totally crazy, but an empty loop is still a correct way to write code sometimes!

Choose which version of the repeat [until] block that you want to use, and try a few different programs!
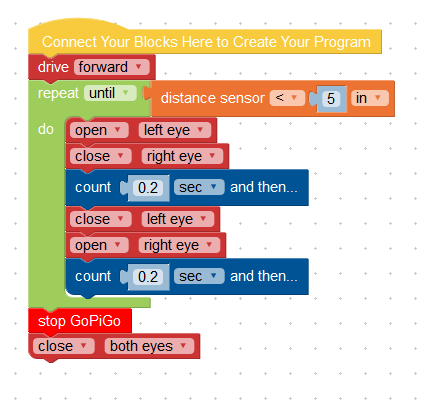
Here's one example from the Modular Robotics labs: