12 Mission Instructions
Your mission is to create a robotic seismograph that can travel to remote locations and measure tiny tremors. First, you will invent a way to simulate earthquakes so you can test your robot safely. Then you will design, test, and refine your robot until it is gathering the most useful data for you.
7. Code: Choosing What's Important
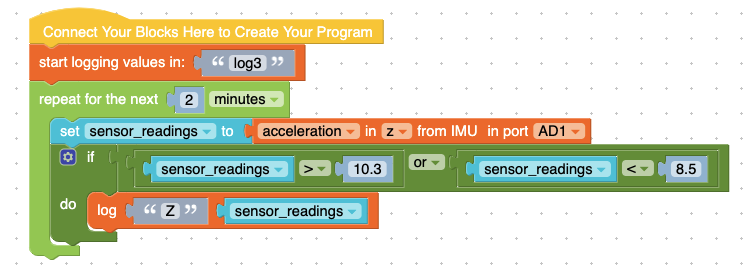
I don’t know about you, but just having the loop gave us waaaaay too many numbers to notice any patterns very easily. We are hoping for a robot that can alert us to when an earthquake is happening, not to live-stream even when the shake table is standing still. Time to add a conditional statement!
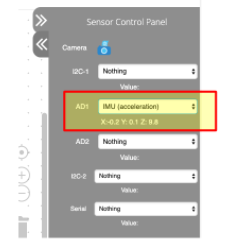
First, let’s take a look at the Sensor Control Panel while our robot is sitting still. What do you notice?
If you’re writing your code to measure the Z-axis like our example, then you might notice that a robot sitting totally still does not show a zero in the Z-axis! This is because gravity is always pulling everything towards the center of the Earth (or, in our case, the ground). Gravity is a constant, and any accelerometer standing still on a flat surface will notice gravity tugging on it at a rate of 9.8 (m/s² is the unit, but don’t worry about that today).
THIS MEANS that the number that will trigger our earthquake detector needs to be designed around 9.8 instead of around 0! Run your looping program one time without any conditional statements. Look for what the highest values are, and look for what the lowest values are. What do you notice?
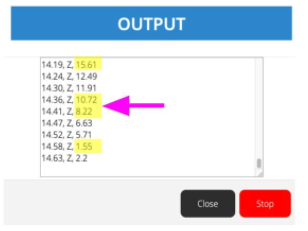
We noticed values as high as 15, and as low as 1.5 when our shake table was moving the most, but those were very extreme earthquakes.
Let’s start with a pretty narrow range for what’s considered “not an earthquake”. I certainly don’t like it when I notice the ground moving in any amount, but maybe I’m just picky.
You can choose how sensitive your robot is by adjusting the lower and higher values within your conditional statement. Feel free to start with our samples, but you can change them at any time!