Introduction to Inequalities
Students will write and graph basic inequalities on a number line. Students will program the GoPiGo robot to react to light using inequalities and comparison blocks in Bloxter.
Setup
- Copy warm-up and exit ticket ** Three warm-ups are on each page. Cut them out before class.
- Copy student handouts
Attachments:
Introduction
- Distribute the student warm-up sheet for students to complete independently to see what students already know about inequalities.
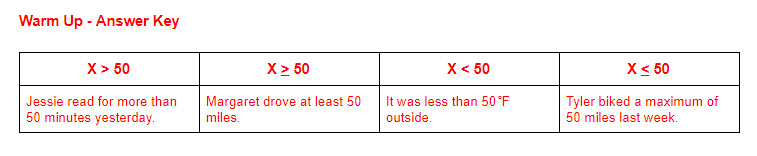
- Review warm-ups and answers (key provided at the bottom of the page in red) as a class. They key is also attached in picture form below.
- Tell students that they are going to learn how to read, graph, and write inequalities. They will then apply that knowlege to program a GoPiGo robot to react to different light levels.
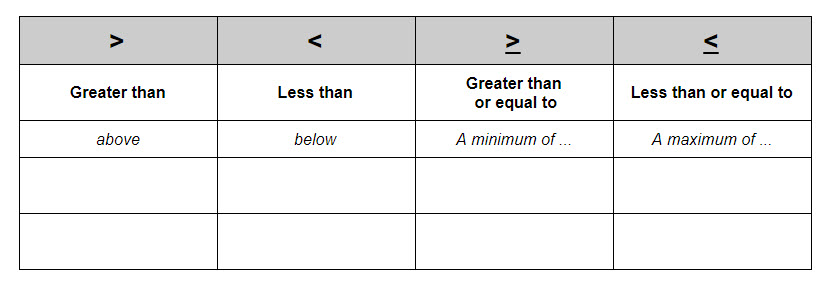
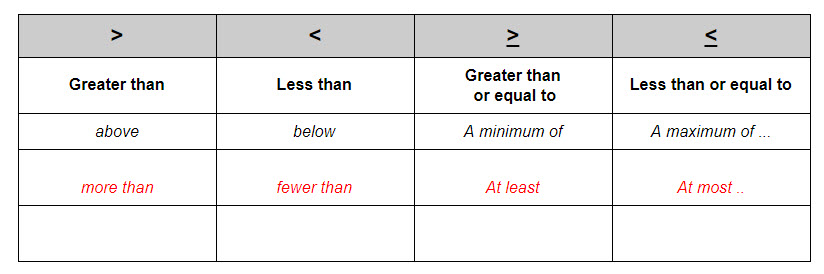
- Distribute student handouts and complete the graphic organizer for the different inequality symbols to show what they mean, and other words/phrases for the inequalities. Possible scenarios for each inequality symbol could be written int the graphic organizer as well. Sample answers are shown below.

Procedure
- As a class practice writing and graphing inequalities. Four practice problems are provided on the student handout.
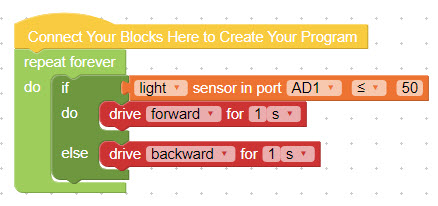
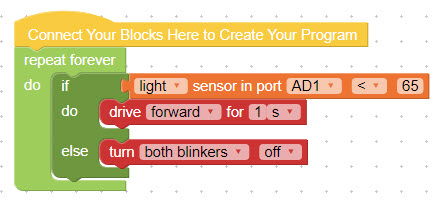
- Students will then analyze two a Bloxter program that uses an inequality to tell the GoPiGo what to do depending on the light level (pictured below). Facilitate a class discussion around the two programs. What will the GoPiGo do based upon the light level? Describe the actions and graph the inequalities (answers attached).
- Students will then work in small groups write their own programs. First, students will plug the light sensor into one of the Analog Digital ports on the GoPiGo3. Attach the sensor to the GoPiGo using a sensor mount, zip tie, or small piece of string.
- Students will then determine the light levels in your classroom. Then, they will connect to the robot and then click on the button for ‘Code in Bloxter’. Next, use the drop-down menu on the Sensor Control Panel on the right hand side to select light sensor for the port the light sensor is plugged into (AD1 or AD2). Real-time light level readings shown in percentages will be shown.
- Students will take a reading in a full light environment and in a dark light enviornment. These readings and the average will help the students determine what light sensor reading to include in their program.
- Using the graphic organizer provided on the student handout, students will plan out their program and graph what will happen in each scenario. For the first program, encourage simplicity, especially if students have limited experience programming.
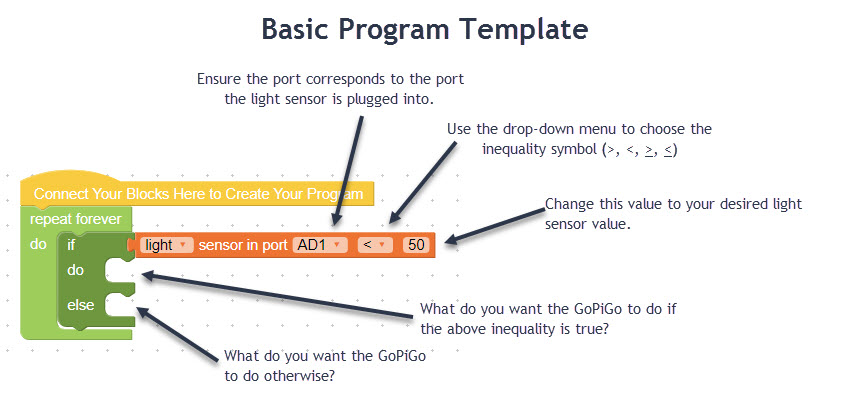
- Students will then program their GoPiGo in Bloxter and test their program. Directions and a sample program template are included in the student handouts. If needed, students may write their programs when not conneccted to a robot on http://www.bloxter.com/. If students write their program on Bloxter.com, they should save the program onto a USB jump drive. Then, they will plug the jump drive into one of the USB ports on the GoPiGo robot. After connecting to the GoPiGo, click on Code in Bloxter. Then, click on File --> Open and choose the file from the USB drive.
- Next, students will create a different program and create a program for given inequalities.

Attachments:
Closure
- Students will reflect on their experience programming using inequalities. What did they learn? What worked well? What was difficult?
- Students will complete an Exit Ticket (attached at step 1).
Last modified: Tuesday, 10 November 2020, 8:45 AM